PDF書類の寸法が知りたい [AppleScript辞書はつくれるか?]
PDF書類のドキュメントの寸法を取得するのに、以前はImage Eventsのdimensionsを使えば得られていたのだが、
いつからか求められる数値が 無かったり、{0, 0} で返ってくるようになっていた。
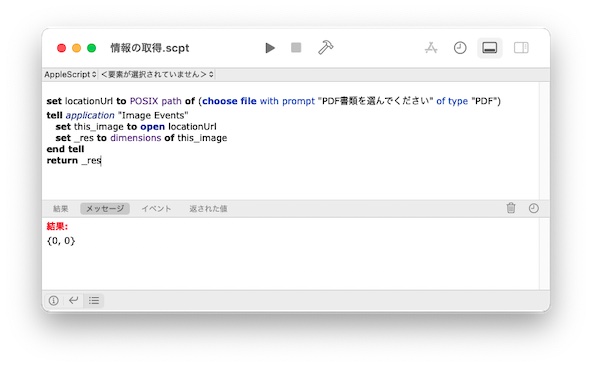
しかし、dimensions は読めなくなったが、resolutionは問題なく読めているところが不思議なところ。
イメージイベントで取得できないなら、書類のメタデータから取得する方法をとってみた。
|
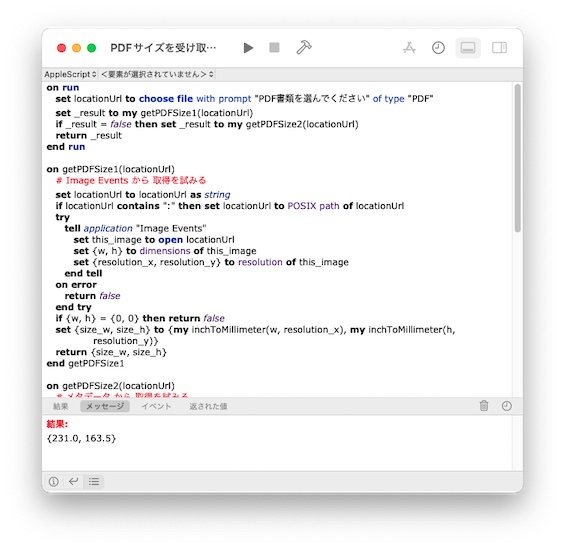
on run set locationUrl to choose file with prompt "PDF書類を選んでください" of type "PDF" set _result to my getPDFSize1(locationUrl) if _result = false then set _result to my getPDFSize2(locationUrl) return _result end run
on getPDFSize1(locationUrl) # Image Events から 取得を試みる set locationUrl to locationUrl as string if locationUrl contains ":" then set locationUrl to POSIX path of locationUrl try tell application "Image Events" set this_image to open locationUrl set {w, h} to dimensions of this_image set {resolution_x, resolution_y} to resolution of this_image end tell on error return false end try if {w, h} = {0, 0} then return false set {size_w, size_h} to ¬ {my inchToMillimeter(w, resolution_x), my inchToMillimeter(h, resolution_y)} return {size_w, size_h} end getPDFSize1
on getPDFSize2(locationUrl) # メタデータ から 取得を試みる set locationUrl to locationUrl as string if locationUrl contains ":" then set locationUrl to POSIX path of locationUrl try set {dot_w, dot_h} to words of (do shell script "w=`mdls '" & locationUrl & "' | grep -e PageWidth | cut -d '=' -f2` ; h=`mdls '" & locationUrl & "' | grep -e PageHeight | cut -d '=' -f2` ; echo $w','$h ;") on error return false end try set {w, h} to {dot_w as real, dot_h as real} tell application "Image Events" set this_image to open locationUrl set {resolution_x, resolution_y} to resolution of this_image end tell set {size_w, size_h} to ¬ {my inchToMillimeter(w, resolution_x), my inchToMillimeter(h, resolution_y)} return {size_w, size_h} end getPDFSize2
on inchToMillimeter(_inch, _resolution) # インチからミリメートルに変換 set _meter to (((_inch / _resolution) as inches) as meters) as real --解像度を計算したインチ表記の数字をメートル表記に計算 set _millimeter to (round (_meter * 10000) rounding as taught in school) / 10.0 -- メートル単位からミリメートル単位に計算し直してから、小数点1桁未満は四捨五入 return _millimeter end inchToMillimeter |
最初にとりあえずgetPDFSize1ハンドラで普通にイメージイベントで取得を試みる。
それで取得できなかった場合に、getPDFSize2ハンドラでメタデータを取得する方法をしてみる。
イメージイベントでもメタデータから取得した方法でも寸法がインチ法になってるので、
inchToMillimeterハンドラで、メートル法のミリ単位にに変換している。
今回取得したメタデータがこちら
|
|
_kMDItemDisplayNameWithExtensions = \"試験用.pdf\" kMDItemAuthors = ( \"OutlinePDF-Advance 2.10\" ) : : kMDItemFSName = \"試験用.pdf\" kMDItemFSNodeCount = (null) kMDItemFSOwnerGroupID = 20 kMDItemFSOwnerUserID = 501 kMDItemFSSize = 4746763 kMDItemFSTypeCode = \"TEXT\" kMDItemInterestingDate_Ranking = 2023-08-25 00:00:00 +0000 kMDItemKind = \"PDF書類\" kMDItemLastUsedDate = 2023-08-25 00:52:51 +0000 kMDItemLastUsedDate_Ranking = 2023-08-25 00:00:00 +0000 kMDItemLogicalSize = 4746763 kMDItemNumberOfPages = 1 kMDItemPageHeight = 463.464 kMDItemPageWidth = 654.802001953125 kMDItemPhysicalSize = 4747264 kMDItemSecurityMethod = \"None\" kMDItemUseCount = 2 kMDItemUsedDates = ( \"2023-08-24 15:00:00 +0000\" ) kMDItemVersion = \"1.6\" |
このデータの中から、幅と高さの部分を取得している。

書類がインチ法で、取得したい値がメートル法だという環境を前提にしているので、
他の地域では困ってしまうかもという余計な心配もしてしまっています。
入力モード切り替えをしてみる [AppleScript辞書はつくれるか?]
ちょうど一年前に作った、入力モード切り替えの改良をしてみた。
> https://start-mac.blog.ss-blog.jp/2022-08-23
改良というか考え直してみただけなのですが。
日本語入力モードに変更したり英語入力モードに切り替えたりできるものを作ってみた。
|
|
set aButton to button returned of (display dialog "入力モードを選んでください" buttons {"日本語", "英語", "キャンセル"})
tell application "System Events" if aButton = "日本語" then key code 104 --日本語入力へ else if aButton = "英語" then key code 102 --英語入力へ end if end tell
delay 0.5 --若干の遅延の発生を吸収
(* 入力モードの確認 *) tell application "System Events" tell process "TextInputMenuAgent" set inputMenuMode to description of menu bar item 1 of menu bar 2 --入力メニューの状態を取得 end tell end tell
inputMenuMode # 日本語になっていれば「日本語」(または「かな」) # 英語になっていれば「ABC」などを返してくる |
以前はキーコードの使用を拒絶していましたが、使っても良さそうなので使ってみました。
RGB値からCMYK値を計算してみる。 [AppleScript辞書はつくれるか?]
|
Apple Script |
|
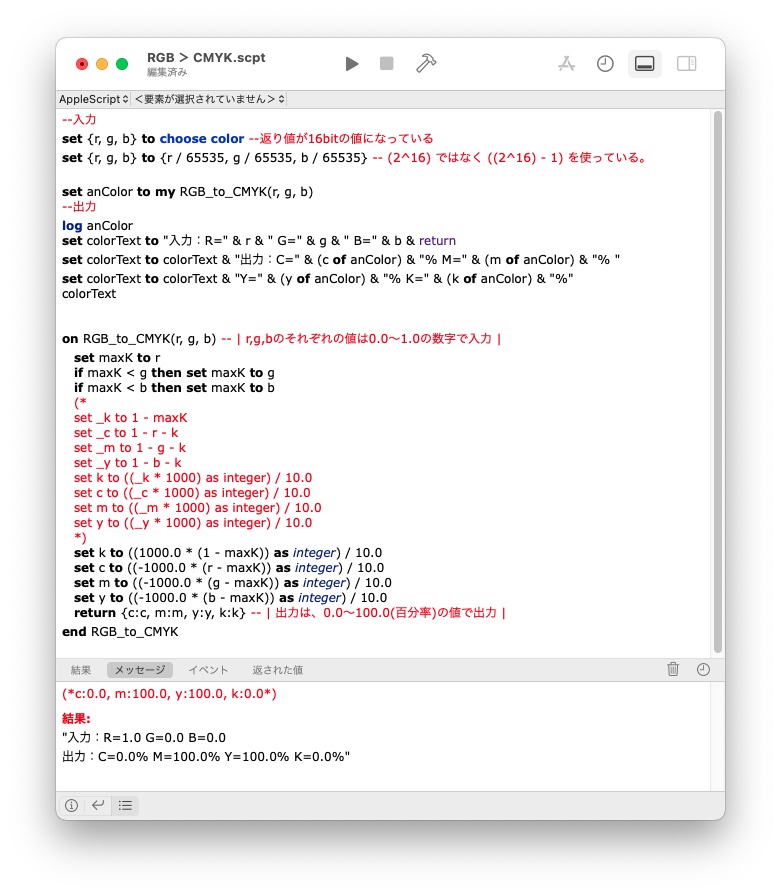
--入力 set {r, g, b} to choose color --返り値が16bitの値になっている set {r, g, b} to {r / 65535, g / 65535, b / 65535} -- (2^16) ではなく ((2^16) - 1) を使っている。
set anColor to my RGB_to_CMYK(r, g, b) --出力 log anColor set colorText to "入力:R=" & r & " G=" & g & " B=" & b & return set colorText to colorText & "出力:C=" & (c of anColor) & "% M=" & (m of anColor) & "% " set colorText to colorText & "Y=" & (y of anColor) & "% K=" & (k of anColor) & "%" colorText
on RGB_to_CMYK(r, g, b) -- | r,g,bのそれぞれの値は0.0~1.0の数字で入力 | set maxK to r if maxK < g then set maxK to g if maxK < b then set maxK to b (* set _k to 1 - maxK set _c to 1 - r - k set _m to 1 - g - k set _y to 1 - b - k set k to ((_k * 1000) as integer) / 10.0 set c to ((_c * 1000) as integer) / 10.0 set m to ((_m * 1000) as integer) / 10.0 set y to ((_y * 1000) as integer) / 10.0 *) set k to ((1000.0 * (1 - maxK)) as integer) / 10.0 set c to ((-1000.0 * (r - maxK)) as integer) / 10.0 set m to ((-1000.0 * (g - maxK)) as integer) / 10.0 set y to ((-1000.0 * (b - maxK)) as integer) / 10.0 return {c:c, m:m, y:y, k:k} -- | 出力は、0.0~100.0(百分率)の値で出力 | end RGB_to_CMYK |
しかし、カラープロファイルを反映していない理論値なので、CMYKで表現できない色なんかは物凄い濁った色の数値になっている。
参考:https://tomari.org/main/java/color/ccal.html
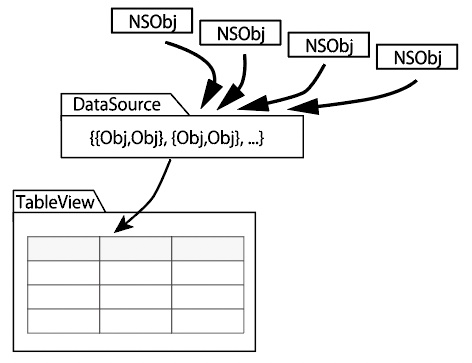
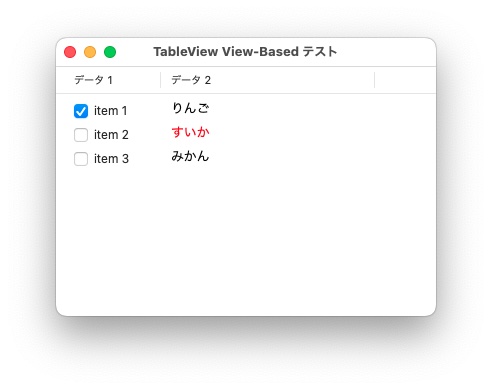
NSTableView View-Basedをコードで作りたい (3) [AppleScript辞書はつくれるか?]
TableView内のデータを読み取る。
列から取得する方法
set obj1 to item |行| of (theDataSource's |列|)
行から取得する方法
set obj1 to |列| of item |行| of theDataSource
2つあるけどどちらが便利なのだろう?
まぁ、列から取ってみる方法でやってみる。
setAllowsMultipleSelection_(true)
で複数行の選択を可能にし
set aList to {}
set firstNo to theSelection's firstIndex()
set nextIndex to firstNo
repeat selectionCount times
set data3 to theSelection's indexGreaterThanOrEqualToIndex:nextIndex
set aList to aList & {data3}
set nextIndex to data3 + 1
end repeat
で、選択された行のインデックスを取得
repeat with _lineNo in aList
set rowNo to _lineNo + 1
set obj1 to item rowNo of (theDataSource's data1)
set obj2 to item rowNo of (theDataSource's data2)
set obj3 to item rowNo of (theDataSource's data3)
set ans1 to (obj1's stringValue()) as text
set ans2 to obj2's state()
set ans3 to (obj3's value()) as real
log {ans1, ans2, ans3}
end repeat
で、それぞれの値を表示させている。
で、今回の全体のソースは『こちら』。
追加分: 
NSTableView View-Basedをコードで作りたい (2) [AppleScript辞書はつくれるか?]
on tableView:aTableView viewForTableColumn:aColumn row:aRow
~
end tableView:viewForTableColumn:row:
前回は上記の中に色々と入れていましたが、ここはシンプルにしていた方が良いみたいなので、改良します。
いろいろなサイトでは、ここで振り分けをしているのが多かったが、多様性が失われてしまうように思えました。
別なやり方として、データソースに直接オブジェクトをぶっ込んでしまいのが良いかと思ったのですが、
それぞれのコードが見にくくなるし、どこをいじっているのかわからず、扱い辛くなる気がします。
ですので、簡単なレシピ(設計図)から、オブジェクトを作り貼り付けていく方法でいきたいと思います。
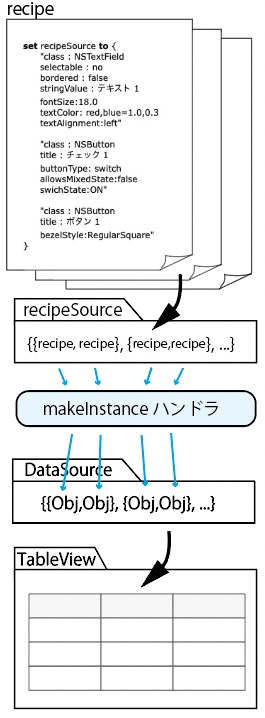
レシピは、クラスと必要最低限の要素を必要な分だけ書けば良いようにしてみた。
NSTableView View-Basedをコードで作りたい (1) [AppleScript辞書はつくれるか?]
FontBookを使わず、使用可能なフォントのリストを取得したい [AppleScript辞書はつくれるか?]
先日の使用できるフォントを取得したい件の続きとなりますが、
Font Bookを使わずにフォントを知るには、やっぱりシステムプロファイラーでしょうか?
|
|
do shell script "system_profiler SPFontsDataType ;" |
で、システムがらみのフォントのみの情報を取得します。しかし、結果は
|
|
Fonts:
Times New Roman Bold.ttf:
Kind: TrueType Valid: Yes Enabled: Yes Location: /System/Library/Fonts/Supplemental/Times New Roman Bold.ttf Typefaces: TimesNewRomanPS-BoldMT: Full Name: Times New Roman Bold Family: Times New Roman Style: ボールド Version: Version 5.01.4x Vendor: The Monotype Corporation Unique Name: Monotype:Times New Roman Bold:Version 5.01 (Microsoft) Designer: Monotype Type Drawing Office - Stanley Morison, Victor Lardent 1932 Copyright: (c) 2006 The Monotype Corporation. All Rights Reserved. Trademark: Times New Roman is a trademark of The Monotype Corporation in the United States and/or other countries. Outline: Yes Valid: Yes Enabled: Yes Duplicate: No Copy Protected: No Embeddable: Yes ・ ・ |
と、フォントの雑多な情報が詳細に入手できます。(雑多?詳細?)
しかし、この中で欲しい情報は、ポストスクリプト名とディスプレイでの表記名(Full Name)の二つ。
そして、使用できるかの判断コード(Enabled)くらいでしょうか
シェルスクリプトを使っているのだから、grepを使えば速そうなのだが、このままではポストスクリプト名の取得が難しい。
他の項目は(Full Name:)とか(Style:)や(Enabled:)といった項目名を抜き出してくれば良いのだが、ポストスクリプト名だけは、なぜか項目名が無い。
どうしよう?
これは幸いにも、ポスウトスクリプト名の一行前には必ず "Typefaces:" という文字が入っているので、それを利用しよう。
|
|
do shell script "system_profiler SPFontsDataType | grep -A2 -e 'Typefaces:' ;" |
|
|
Typefaces: TimesNewRomanPS-BoldMT: Full Name: Times New Roman Bold -- Typefaces: WeibeiSC-Bold: Full Name: Weibei SC Bold -- Typefaces: BMYEONSUNG-OTF: Full Name: BM YEONSUNG OTF -- Typefaces: AppleBraille-Pinpoint8Dot: Full Name: Apple Braille Pinpoint 8 Dot -- ・ ・ ・ |
ついでに、使用可判断コードも追加。
|
|
do shell script "system_profiler SPFontsDataType | grep -A2 -e 'Typefaces:' -e 'Enabled:' ;" |
|
|
Enabled: Yes Location: /System/Library/Fonts/Supplemental/Times New Roman Bold.ttf Typefaces: TimesNewRomanPS-BoldMT: Full Name: Times New Roman Bold -- Enabled: Yes Duplicate: No Copy Protected: No -- ・ ・ ・ |
と思ったらこれは失敗だ。
Typefaces:の行から辿って情報を取得することにしよう。
|
|
do shell script "system_profiler SPFontsDataType | grep -A2 -e 'Typefaces:' -e 'Enabled:' | grep -B4 -e 'Enabled: Yes' | grep -A4 -e 'Typefaces:' | grep -e ':' | grep -B2 -e 'Enabled:' | grep -v 'Enabled:' | cut -c9- ;" |
|
|
TimesNewRomanPS-BoldMT: Full Name: Times New Roman Bold
WeibeiSC-Bold: Full Name: Weibei SC Bold
BMYEONSUNG-OTF: Full Name: BM YEONSUNG OTF
AppleBraille-Pinpoint8Dot: Full Name: Apple Braille Pinpoint 8 Dot
Georgia-Bold: Full Name: Georgia Bold ・ ・ |
なんとかできたけど、なんかすごく格好の悪いものになってしまった。
同じテキストで辿って、切り捨てて・・・
Enabled: Yesの使用可能フォントの部分だけ抜き出してはいるはず。
もっと整理できたらしてみたい。
なんだと!?FontBookがApplescript対象外だと? [AppleScript辞書はつくれるか?]
MacOS12の頃には動いていたFontBook用のスクリプトが、MacOS13で認識しない。
|
MacOS 12 |
|
tell application "Font Book" tell every typeface set displayNames to displayed name set postScriptNames to PostScript name set styleNames to style name set enableds to enabled end tell end tell |
と使えていたはずなのだが、
|
MacOS 13 |
|
tell application "Font Book" tell every «class fbfc» set displayNames to displayed name set postScriptNames to «class fbps» set styleNames to «class fbsn» set enableds to «class fben» end tell end tell |
コードが扱いづらい形式に変化した上、実行不可能に。
スクリプトの用語が変更されたのかと、用語説明を見にいくと...

Font Bookが使いたいわけではなく、Font Bookを介して、使えるフォント使えないフォントを見分けたいと思ってただけなのに。
方法がないわけではないんど面倒くさいことになりそう。
そろそろ他のアプリケーションもスクリプトに対応していなくなってるのかな?
多重階層のフォルダ作成したかっただけなのに [AppleScript辞書はつくれるか?]
先日のプログラムコードの中での、新規フォルダを作る部分ですが
|
|
set cd to "$HOME/Library/Developer" try do shell script ("cd " & cd & " ; ls 'Xcode' ;") on error do shell script ("cd " & cd & " ; mkdir -m +w -p Xcode ;") with administrator privileges end try set cd to cd & "/Xcode" repeat with obj in {"Templates", "MacOS", "UserTemplates"} try do shell script ("cd " & cd & " ; ls " & obj & " ;") on error do shell script ("cd " & cd & " ; mkdir -m +w -p " & obj & " ;") end try set cd to cd & "/" & obj end repeat |
と、書いたのですが
|
|
do shell script ("mkdir -m +w -p ~/Library/Developer/Templates/MacOS/UserTemplates ;") ¬ with administrator privileges |
の1行で済むんだと気づいた時の悲しさ...。
フォルダを何階層も作る場合には、その度に繰り返して作らなければいけないと勘違いしてました。
mkdir -m +w -p の -pというオプションは2階層までしか作れないと勘違いして、3階層作るかもしれないと
思っていましたら、ちゃんと足りない階層は自動で全部補ってくれるということに改めて気づきましたね。
ためしに、
|
|
do shell script ("mkdir -m +w -p ~/Downloads/test1/test2/test3/test4/test5 ;") |
とやると、
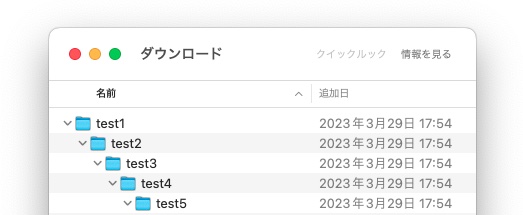
ちゃんとできてる。
しかし、なぜAppleScriptにある"make new folder"を使わず、shellスクリプトを使用したかというと、
パーミッション設定を一度にできるので、手っ取り早かったからですね。
『-m +w』これを加えるだけで書き込み可能に設定できるから便利。
XcodeにApplescriptテンプレートを入れようシリーズ [AppleScript辞書はつくれるか?]
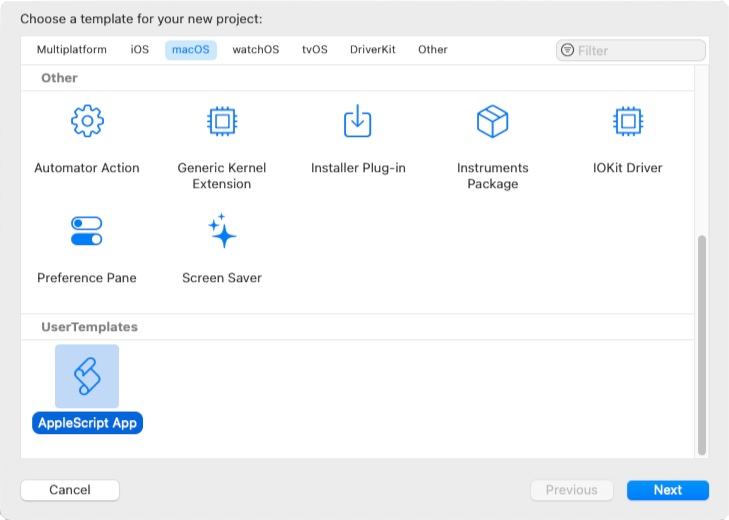
先日の記事(2023-03-27)にコメントをいただきまして、
アプリケーション内のテンプレートフォルダに直接入れるのではなく、ユーザーライブラリーに入れるのが、
最良ではないかということでしたので、考察してみました。
(参考サイト:http://piyocast.com/as/archives/15582)
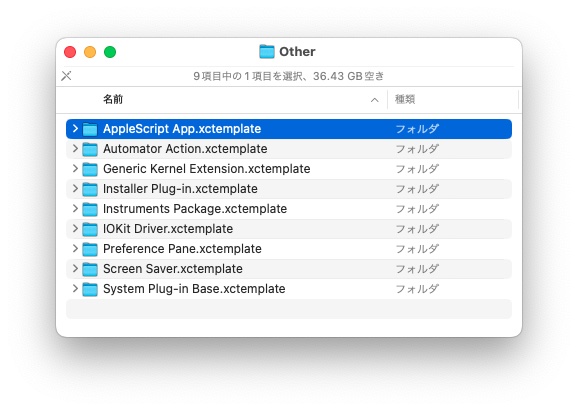
・アプリケーション側に入れる方法
『/Applications/Xcode.app/Contents/Developer/Library/Xcode/Templates/Project Templates/macOS/Other/』
このフォルダに入れると、アプリケーションを入れ直した際に元に戻ってしまうので、毎回入れ直さなければ
いけませんでした。(頻繁にバージョンアップしてるようですし)
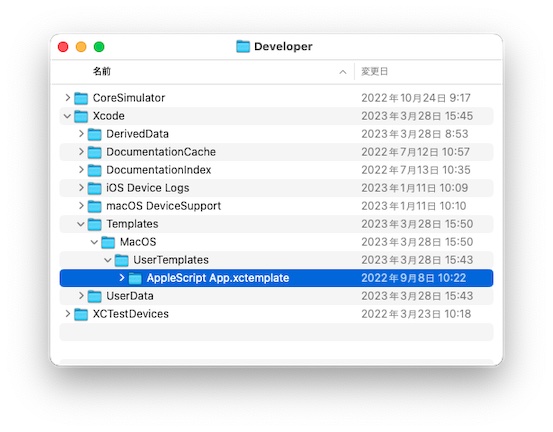
・コメントでいただいた、ユーザーライブラリーに入れる方法
『(ユーザー)/Library/Developer/Xcode/』
このフォルダに入れると、ユーザーが変更されたり作り直しでもしない限りは、Xcodeがバージョンアップされても
反映されるようです。
ということで、反映するためのスクリプトを作ってみることにしました。
|
|
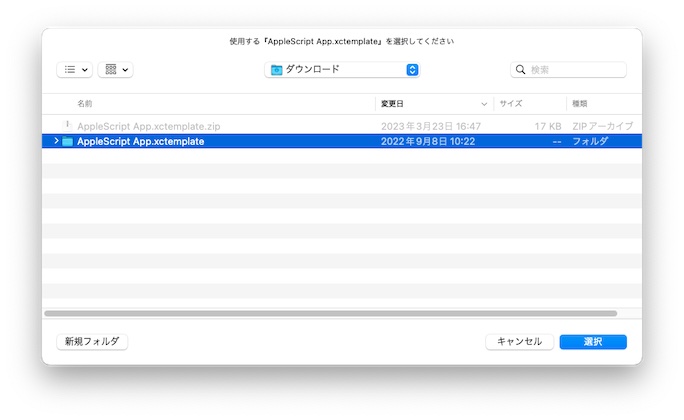
(* コピー元のアイテムを取得 *) set add to "" try set ans to choose folder with prompt "使用する『AppleScript App.xctemplate』を選択してください" default location (path to (downloads folder)) if ans ≠ false then set add to ans as text end try if add = "" then display alert "中止しました" message "ユーザーによってキャンセルされました" as critical return "中止しました" end if tell application "Finder" to set aName to name of folder add if aName ≠ "AppleScript App.xctemplate" then display alert "対象外のアイテムが選ばれました" message "もう一度、正しいファイルを選択してください" as critical return "対象外のアイテムが選ばれました" end if
(* コピー先の選択 *) set theList to {"システム・・・(全ユーザーに有効です)", "ユーザー・・・(現在のユーザーのみに適用します)", "Xcode.app・・・(現在のバージョンのみに適用します)"} set ans to choose from list theList if ans = false then display alert "中止しました" message "ユーザーによってキャンセルされました" as critical return "中止しました" end if set ans to ans as string
(* コピー先へアイテムを複製:保存先のフォルダも無ければ作成 *) if (character 1 of ans) = "シ" then --●●●全ユーザー向け●●● -- /Library/Developer/Xcodeフォルダの作成 -- set cd to "/Library/Developer" try do shell script ("cd " & cd & " ; ls 'Xcode' ;") on error do shell script ("cd " & cd & " ; mkdir -m +w -p Xcode ;") with administrator privileges end try -- /Library/Developer/Xcode/Templates/MacOS/UserTemplatesフォルダの作成 -- set cd to cd & "/Xcode" repeat with obj in {"Templates", "MacOS", "UserTemplates"} try do shell script ("cd " & cd & " ; ls " & obj & " ;") on error do shell script ("cd " & cd & " ; mkdir -m +w -p " & obj & " ;") end try set cd to cd & "/" & obj end repeat tell application "Finder" to copy folder add to folder ((cd as POSIX file) as string)
else if (character 1 of ans) = "ユ" then --●●●現在のユーザー向け●●● -- (ユーザー)/Library/Developer/Xcodeフォルダの作成 -- set cd to "$HOME/Library/Developer" try do shell script ("cd " & cd & " ; ls 'Xcode' ;") on error do shell script ("cd " & cd & " ; mkdir -m +w -p Xcode ;") with administrator privileges end try -- (ユーザー)/Library/Developer/Xcode/Templates/MacOS/UserTemplatesフォルダの作成 -- set cd to cd & "/Xcode" repeat with obj in {"Templates", "MacOS", "UserTemplates"} try do shell script ("cd " & cd & " ; ls " & obj & " ;") on error do shell script ("cd " & cd & " ; mkdir -m +w -p " & obj & " ;") end try set cd to cd & "/" & obj end repeat set currentFolder to do shell script ("echo " & cd & " ;") --ホームフォルダの変換 tell application "Finder" to copy folder add to folder ((currentFolder as POSIX file) as string)
else if (character 1 of ans) = "X" then --●●●個別アプリケーション向け●●● -- 全てのアプリケーション情報を取得 -- set systemProfilerList to do shell script "system_profiler SPApplicationsDataType ;" -- 上で取得した中からXcode.appのアドレスを抽出 -- set addressList to {} repeat with oneLine in (paragraphs of systemProfilerList) set oneLine to oneLine as string if oneLine contains "Location:" then if (oneLine ends with "/Xcode.app") or (oneLine ends with "/Xcode-beta.app") then set n to offset in oneLine of ":" set add1 to text (n + 2) thru -1 of oneLine set addressList to addressList & {add1} end if end if end repeat if addressList = {} then return "Xcodeが見つけられませんでした。" -- 選択 -- set ans to choose from list addressList with prompt "対象となるXcodeを選択してください" OK button name "選択" cancel button name "中止" if ans = false then display alert "見つかりませんでした" message "キャンセルされました" as critical return "中止しました" end if -- テンプレートフォルダの作成-- set targetFolder to "" tell application "Finder" set folderAdd to folder (((ans as string) & "/Contents/Developer/Library/Xcode/Templates/Project Templates") as POSIX file as string) set itemList to every folder of folderAdd repeat with aFolder in itemList if (name of aFolder) contains "mac" then activate try select folder "Other:AppleScript App.xctemplate" of aFolder display dialog "すでにテンプレートが存在します" buttons "OK" default button 1 return "すでにテンプレートが存在します" end try set cd to POSIX path of (aFolder as string) try do shell script ("cd \"" & cd & "\" ; ls UserTemplates ;") on error do shell script ("cd \"" & cd & "\" ; mkdir -m +w -p UserTemplates ;") with administrator privileges end try set targetFolder to ((cd & "/UserTemplates") as POSIX file) as string end if end repeat end tell if targetFolder ≠ "" then -- テンプレートフォルダへ複製 -- try tell application "Finder" to copy folder add to folder targetFolder on error errText display alert "続行不能" message errText as critical return "エラーが発生" end try else -- Xcodeがインストールされていないか不明のエラー -- display alert "対象が見つかりませんでした" message "キャンセルされました" as critical return "中止しました" end if end if
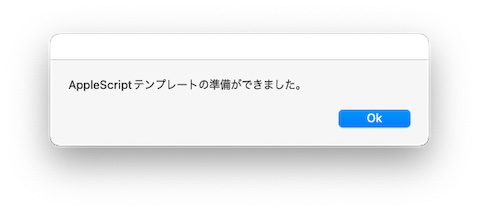
activate display dialog "AppleScriptテンプレートの準備ができました。" buttons "Ok" default button 1 "End"
|
※あらかじめAppleScript App.xctemplateは用意しておかなければなりません。
1)テンプレートアイテムを選択
2)コピー先の選択
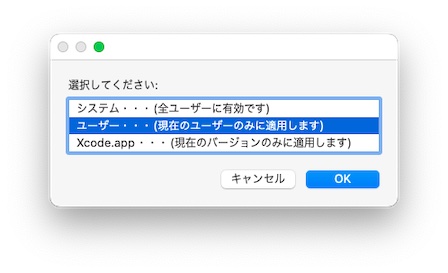
『全ユーザー対象』『現在のユーザーのみ』『現在のアプリケーションのみ』の3つのモードを用意しました。
3)『現在のアプリケーションのみ』を選択した場合のみどのアプリケーションが対象なのかの選択ウインドウが
出ます。
4)新たにテンプレートフォルダを作るので、1度だけユーザー認証のダイアログが出ますので認証してください。
5)準備ができましたのメッセージが出ましたら終了です。
作成されたフォルダー内にテンプレートがコピーされているはずです。
で、Xcodeを起動して新規作成画面でAppleScriptのテンプレートが表示されれば成功ですね。
いや、一度やってしまえばもう使わないだろう?...と思われるでしょうが、スクリプトを組みたいという趣味の部分
ですから、お気になさらず。
XcodeのAppleScriptのテンプレートを使えるようにする [AppleScript辞書はつくれるか?]
以前にXcodeからAppleScriptのテンプレートが消えたことがあり、解決方法を探していたことがありましたが、自分なりに解決方法を探してなんとかしてたのですが、どうやったかまではブログでかいていませんでした。
まぁ、色々な人が解決方法を上げていますので、詳しくは書きませんが、古いXcode12以前のXcode内からテンプレートを探し、新しいXcodeのテンプレートフォルダ内にコピーをすると使えるようです。
ということで、以前に解決していたのですが、Mac本体やOSを新しくした時や、Xcodeのバージョンが変わるたびにAppleScriptのテンプレートを、いちいち探してコピーするのがめんどくさくなってきたので、テンプレートを探したり、コピー先を開いたりする動作を自動化してみたりするスクリプトを書いてみました。
さすがにアプリケーションフォルダ内にコピーすることまでは、セキュリティーの問題があるのでしませんでしたが、これでだいぶ楽になると思います。
Shellスクリプトを利用したら簡単ではないかと思って、まずは書いてみた。
|
|
do shell script "add=`system_profiler SPApplicationsDataType | grep 'Location:' | cut -d ':' -f2 | grep -e 'Xcode.app' -e 'Xcode-beta.app'| head -n 1 | cut -d ' ' -f2- ;` ; foo=`du -a $add/Contents/Developer/Library/Xcode/Templates/ | grep -e 'AppleScript App.xctemplate' | cut -d ' ' -f2- | sort | head -n 1 ;` ; cp -R \"$foo\" $HOME/Downloads/ ; echo $foo ;" |
無理やり1行で収まるようにしてみましたが、ちゃんと探して見つかったテンプレートファイルをダウンロードフォルダにコピーするところまでやってます。
まぁ、乱暴な部分がありますので、見つからなかった場合など、不具合があればエラーを吐きますけどね。
それも含めてアップルスクリプトで書き直してみる。
|
|
(*全てのアプリケーション情報を取得*) set systemProfilerList to do shell script "system_profiler SPApplicationsDataType ;" -- ここだけはShell使用 (*上で取得した中からXcode.appのアドレスを抽出*) set addressList to {} repeat with oneLine in (paragraphs of systemProfilerList) set oneLine to oneLine as string if oneLine contains "Location:" then if (oneLine ends with "/Xcode.app") or (oneLine ends with "/Xcode-beta.app") then set n to offset in oneLine of ":" set add to text (n + 2) thru -1 of oneLine set addressList to addressList & {add} end if end if end repeat if addressList = {} then return "Xcodeが見つけられませんでした。" (*選択*) set ans to choose from list addressList with prompt "対象となるXcodeを選択してください" OK button name "選択" cancel button name "中止" if ans = false then return "中止しました" (*テンプレートフォルダを開く*) tell application "Finder" set folderAdd to folder (((ans as string) & "/Contents/Developer/Library/Xcode/Templates/Project Templates") as POSIX file as string) set itemList to every folder of folderAdd repeat with aFolder in itemList if (name of aFolder) contains "mac" then activate try select folder "Other:AppleScript App.xctemplate" of aFolder display dialog "テンプレートを選択しました" buttons "OK" default button 1 return "テンプレートを選択" on error select folder "Other" of aFolder -- 修正しました display dialog "テンプレートフォルダを開きました" buttons "OK" default button 1 return "テンプレートフォルダ" end try end if end repeat end tell display dialog "見つかりませんでした。" buttons "残念" default button 1 "End" |
(ミスがあり2023/3/28に修正しました)
Xcodeのテンプレートフォルダを探しAppleScriptのテンプレートがあれば選んで表示し、なければテンプレートフォルダを開きます。
1)古い(AppleScriptのテンプレートがある)Xcode.appを選び、テンプレートが表示されるので、それをどこか別な場所にコピーをしておく。
2)新しい(AppleScriptのテンプレートがある)Xcode.appを選び、開いたテンプレートフォルダに前のテンプレートを移動してくる。
これで使えるようになります。
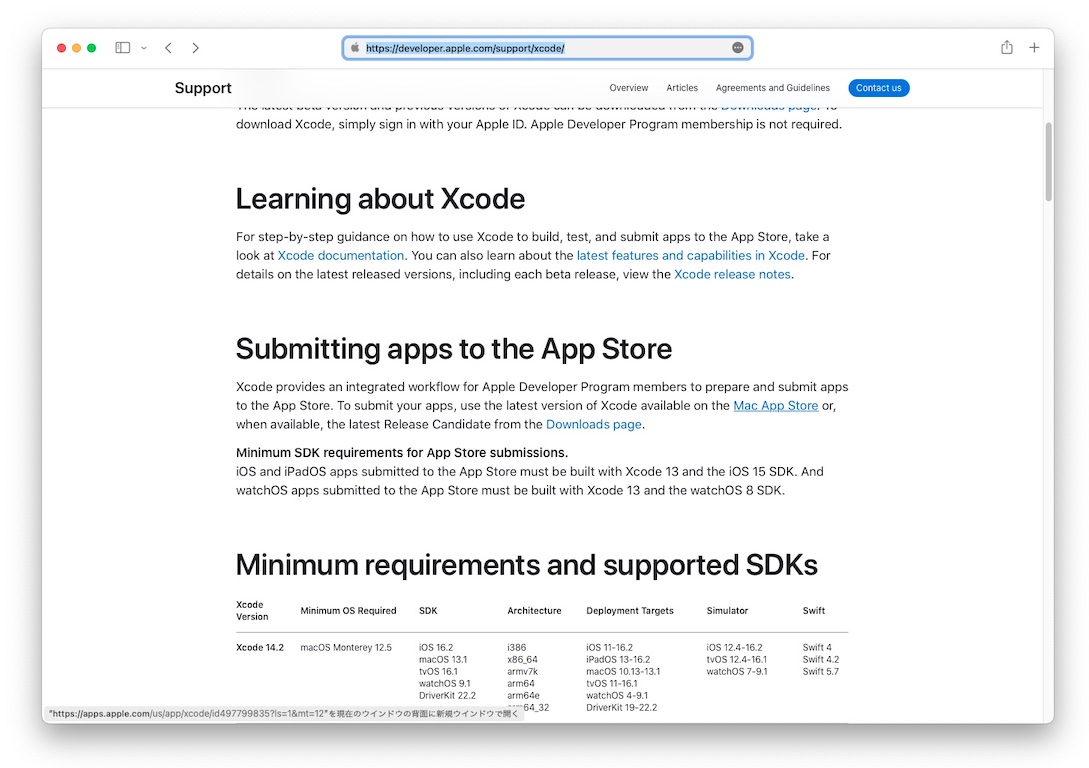
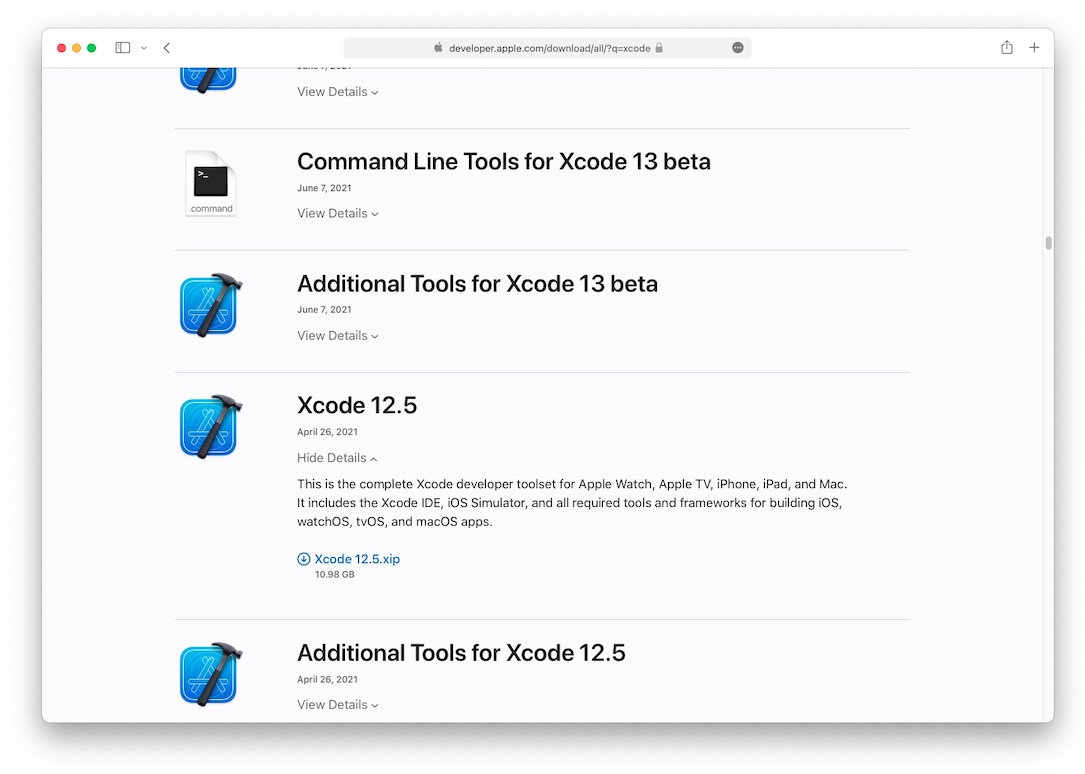
もし、古いXcodeを持っていないのであれば下記からダウンロードできます。
https://developer.apple.com/support/xcode/
(AppleのDeveloperのサイトでAppleIDでのログインが必要となります)
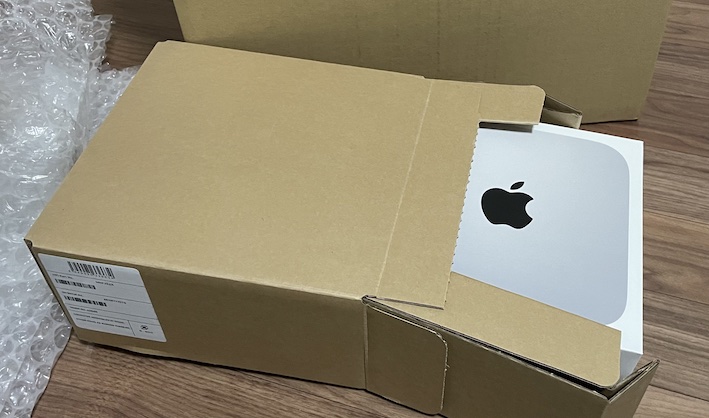
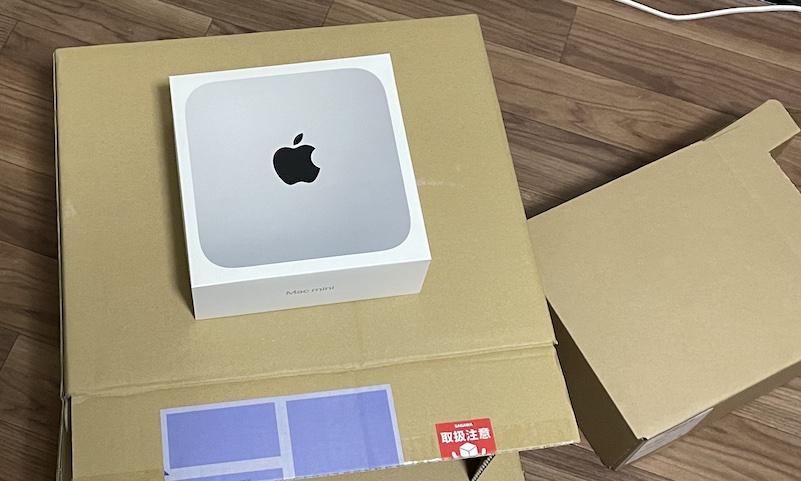
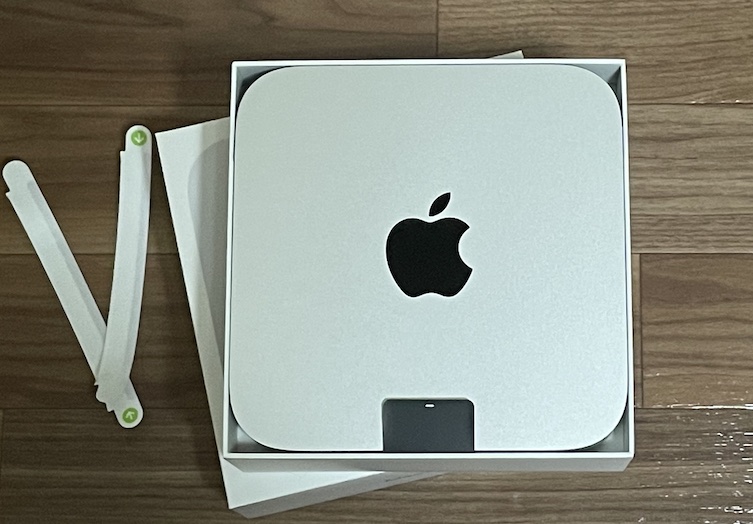
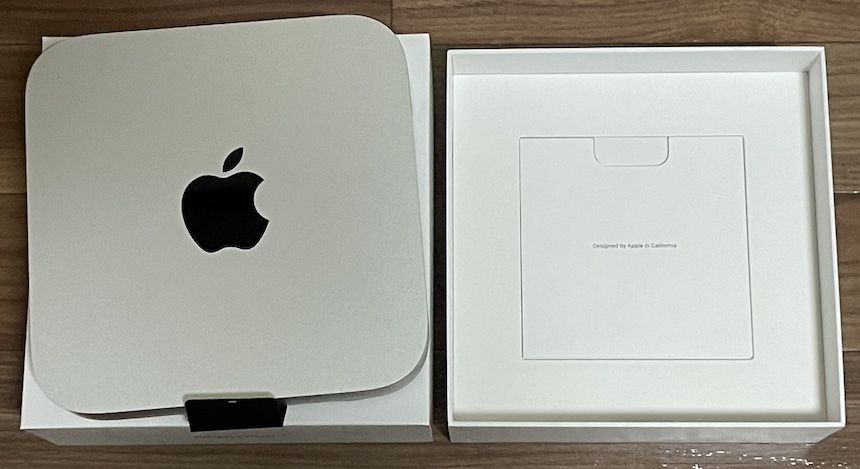
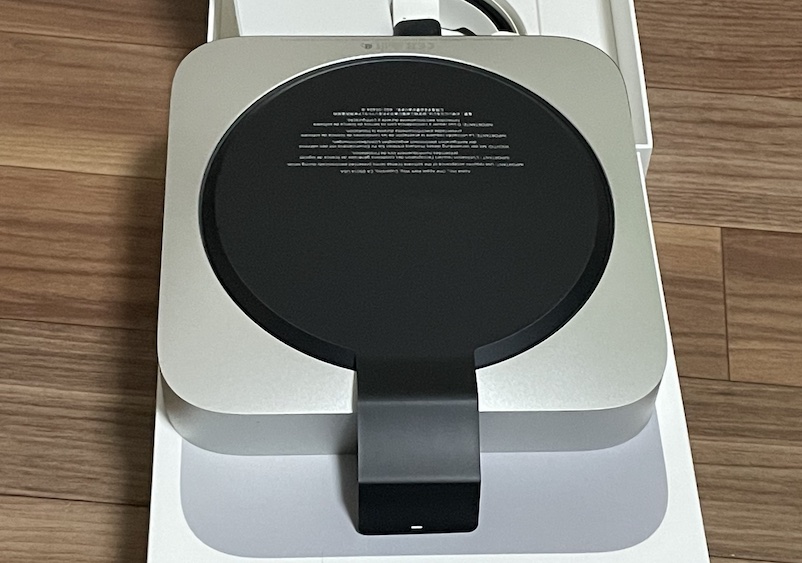
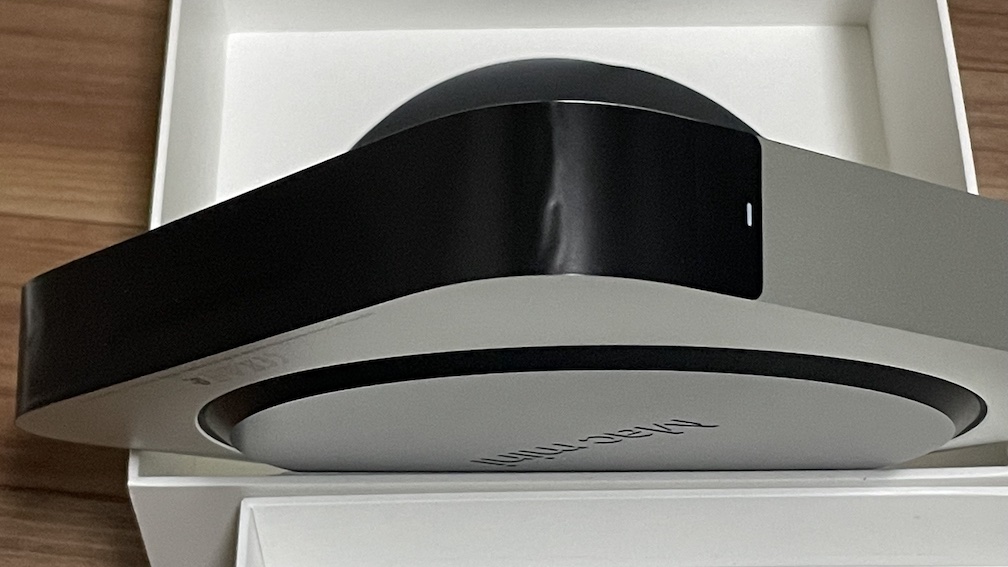
PCボンバーさんからMacMini M2買った話 [Mac日記]
ウインドウは端から端まで使いたい [AppleScript辞書はつくれるか?]
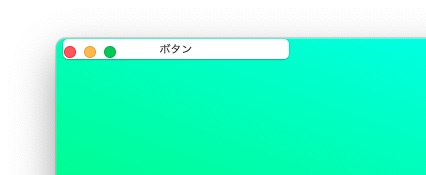
自作のアプリケーションでは、ウインドウの上部にタイトルバーがセットで表示されていると思います。

このタイトルバーの部分を消して、端から端まで全部使いたい。と思ったことはありませんか?
それについてやり方をご紹介します。
(今回使用したコードの参考資料ページ)
・NSWindowStyleMask
(https://applescript.web.fc2.com/reference2022/reference_NSWindowStyleMask.html)
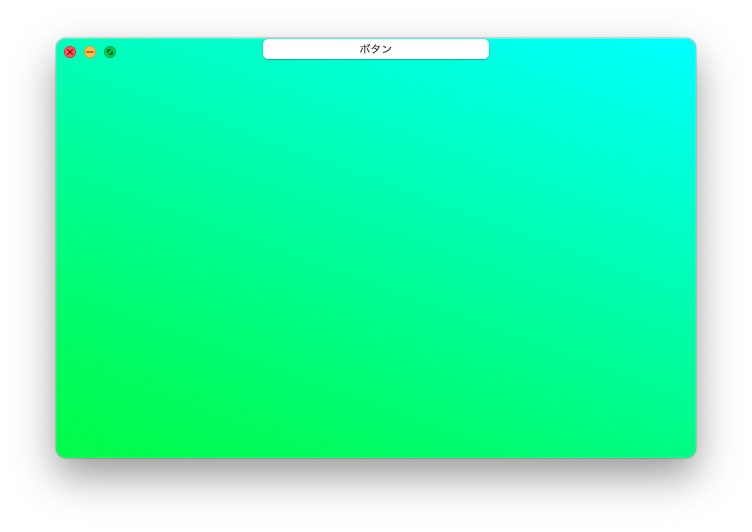
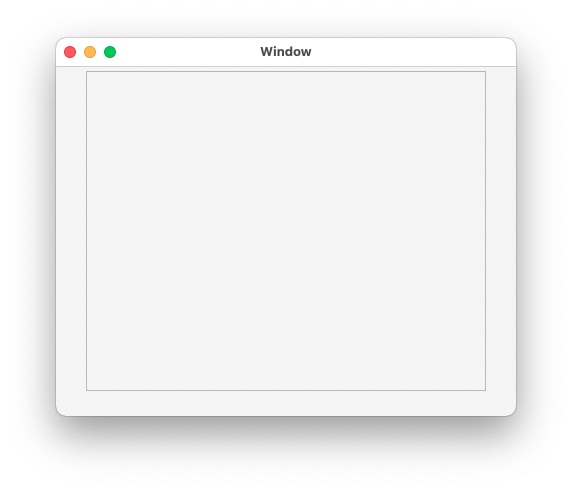
1)タイトルバーの背景を消してみる
タイトルバーの背景を非表示にするというコードがある。
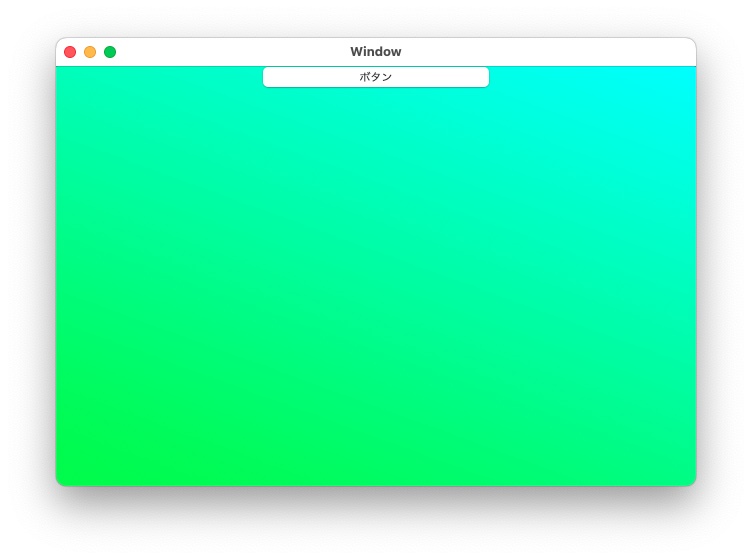
上記のウインドウでは、ボタンが表示可能な領域の最上部に来るようにしてある。
|
|
tell theWindow setTitlebarAppearsTransparent_(true) end tell |
これを実行すると...
ベースのウインドウの背景は、見やすいように濃いグレーにしてあるのですが、その背景が見えているだけで、オブジェクトがそこを使用していないのがわかる。
2)いっそのことウインドウからタイトルバーを完全に外してみる。
ウインドウスタイルから強制的にタイトルバーをなくす処理をしてみることにすると...
|
|
tell theWindow setStyleMask_(0) end tell |
これを実行すると...
確かにバーはなくなり、一番上にボタンオブジェクトが来ているから成功か?
と思われるが、これは使わない方が良い。
というのも、実はタイトルバーの部分の分だけ狭くなっている上に、このウインドウを閉じるにはアプリケーションを終了する以外方法がなくなっている。
クローズボタンごと排除しているためだ。それでも良いというのであれば止めはしないが、お勧めはしない。
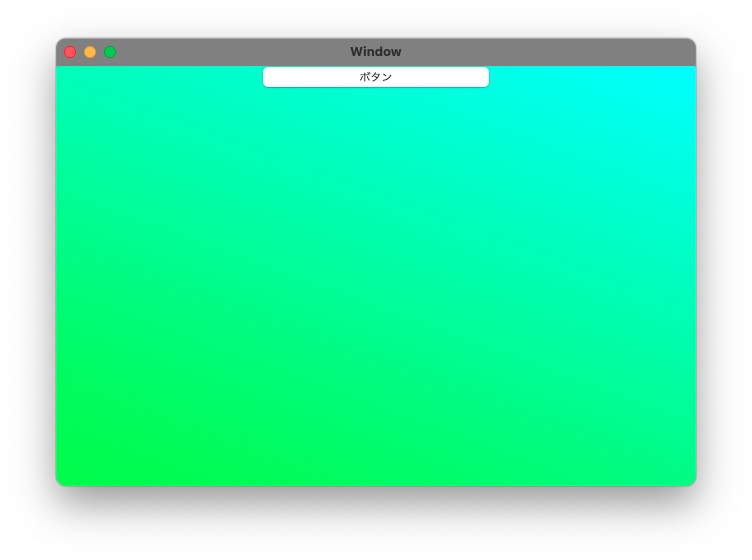
3)タイトルバーの部分も表示領域として使えという命令で許可をする。
上の1)や2)のような無駄な話をあえてしましたが、ちゃんと使えるようになるコード(定数)があります。
|
|
NSWindowStyleMaskFullSizeContentView |
ウインドウのスタイルマスクにこの定数を送れば良いのですが、これを単独で送れば良いというわけではありません。
間違って送ると大変なことが起きます。
それは、スタイルマスクが他の部分も一緒に請け負っているため、それに配慮して他の情報も反映する必要があります。
ウインドウのスタイルマスクには、主に以下の情報が反映されています。
|
|
NSWindowStyleMaskTitled ・・・タイトルバー部分の表示 NSWindowStyleMaskClosable ・・・タイトルバー部分のクローズボタンの有効化 NSWindowStyleMaskMiniaturizable ・・・タイトルバー部分の縮小化ボタンの有効化 NSWindowStyleMaskResizable ・・・タイトルバー部分のリサイズボタンの有効化 |
などがあります。
これをふまえ、
|
|
set aStyle to (current application's NSWindowStyleMaskTitled as integer) set aStyle to aStyle + (current application's NSWindowStyleMaskClosable as integer) set aStyle to aStyle + (current application's NSWindowStyleMaskMiniaturizable as integer) set aStyle to aStyle + (current application's NSWindowStyleMaskResizable as integer) set aStyle to aStyle + (current application's NSWindowStyleMaskFullSizeContentView as integer) tell theWindow setStyleMask_(aStyle) end tell |
として、実行すると
おっと、うまくいったのだけど、ボタンオブジェクトが、タイトルバーの後ろに隠れてしまったようだ。
タイトルバーの背景の非表示を追加で
|
|
tell theWindow setTitlebarAppearsTransparent_(true) end tell |
おっと、ウインドウタイトルが表示されたままなので邪魔になっているじゃないか。
|
|
tell theWindow setTitleVisibility_(current application's NSWindowTitleHidden) end tell |
これで完成です。
追記)ちなみに、クローズボタンの後ろにも配置ができるようになる。
グラデーションを使ってみよう。 [AppleScript辞書はつくれるか?]
Apple Scriptでグラデーションを扱いたいと思い、基本的なやり方をまとめてみた。
(今回使用したコードの参考資料ページ)
・NSImageView (https://applescript.web.fc2.com/reference2022/reference_NSImageView.html)
・NSImage (https://applescript.web.fc2.com/reference2022/reference_NSImage.html)
・NSGradient (https://applescript.web.fc2.com/reference2022/reference_NSGradient.html)
・NSBezierPath (https://applescript.web.fc2.com/reference2022/reference_NSBezierPath.html)
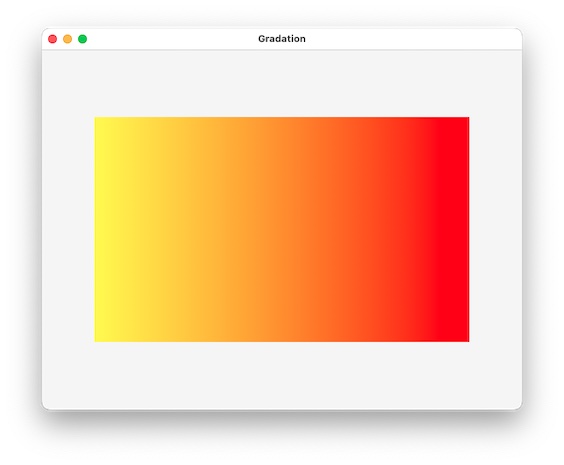
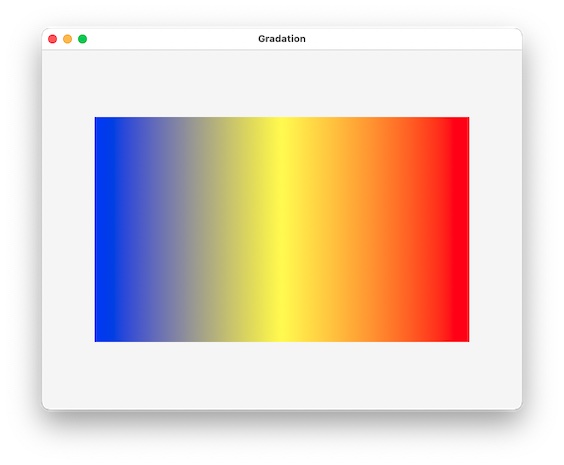
グラデーション(1)長方形内に直線的なグラデーションを作成
|
|
-- |カレントアプリケーションの登録| set myApp to current application -- |イメージビュー(NSImageView)の設置| set theRect to theWindow's contentView()'s frame() -- メインウインドウ(theWindow)の表示可能部分全面のサイズを取得 set imageView1 to myApp's class "NSImageView"'s alloc()'s initWithFrame:theRect --オブジェクトを作成 tell imageView1 setImageFrameStyle_(myApp's NSImageFrameNone) -- フレームの表示は無し setImageAlignment_(myApp's NSImageAlignCenter) -- イメージをフレーム内の中心に表示 setImageScaling_(myApp's NSImageScaleNone) -- イメージの拡大縮小はしない end tell theWindow's contentView()'s addSubview:imageView1 -- theWindowに作ったイメージビューを貼り付け -- |グラデーションを作成して表示| set {x, y, w, h} to {0, 0, 500, 300} set theSize to myApp's NSMakeSize(w, h) set anImage to myApp's class "NSImage"'s alloc()'s initWithSize:theSize -- 画像(NSImage)を作成 anImage's lockFocus() -- 画像の編集を開始 set aColor1 to myApp's class "NSColor"'s yellowColor() -- aColor1を黄色として登録 set aColor2 to myApp's class "NSColor"'s redColor() -- aColor2を赤色として登録 set theGradient to myApp's class "NSGradient"'s alloc()'s initWithStartingColor:aColor1 endingColor:aColor2 --aColor1・aColor2からグラデーションを作成 set theRect to myApp's NSMakeRect(x, y, w, h) set aAngle to 0 -- 角度用(中心から真右が0度で、数字が増えると反時計回りに回転する) theGradient's drawInRect:theRect angle:aAngle -- theRectの大きさの長方形に、aAngleの角度でグラデーションを描画 anImage's unlockFocus() -- 画像の編集を終了 -- imageView1's setImage:anImage --画像をイメージビューに表示させる |
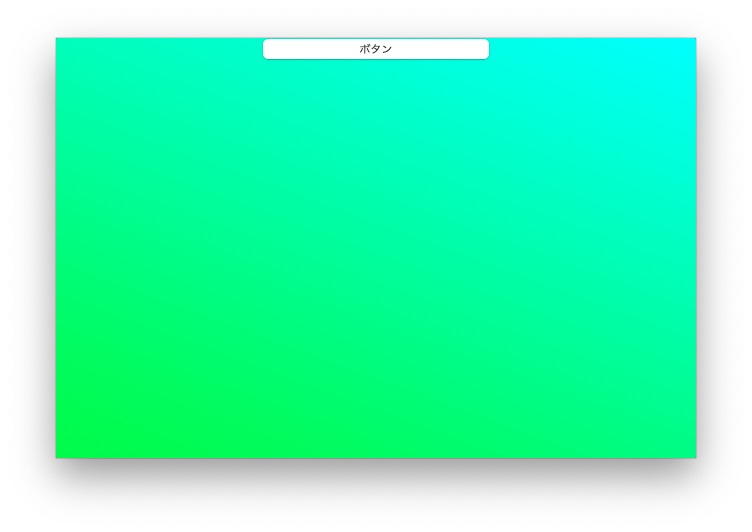
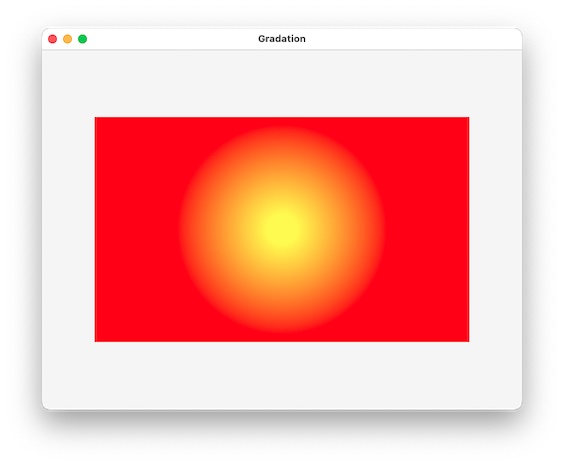
グラデーション(2)イメージビューの中心に円形のグラデーションを作成
※ グラデーション(1)の黄色い地の部分のみを編集(以下同様)
|
|
anImage's lockFocus() set startPoint to myApp's NSMakePoint(w / 2, h / 2) --1つ目の円の中心位置 set startRadius to 20 --1つ目の円の大きさ set aColor1 to myApp's class "NSColor"'s yellowColor() --1つ目の円の色(黄色) set endPoint to myApp's NSMakePoint(w / 2, h / 2) --2つ目の円の中心位置 set endRadius to 150 --2つ目の円の大きさ set aColor2 to myApp's class "NSColor"'s redColor() --2つ目の円の色(赤色) set theGradient to myApp's class "NSGradient"'s alloc()'s initWithStartingColor:aColor1 endingColor:aColor2 set aOptions to 0 --円の外のはみ出し設定(はみ出し無し) theGradient's drawFromCenter:startPoint radius:startRadius toCenter:endPoint radius:endRadius options:aOptions --円状のグラデーションを描画 anImage's unlockFocus() |
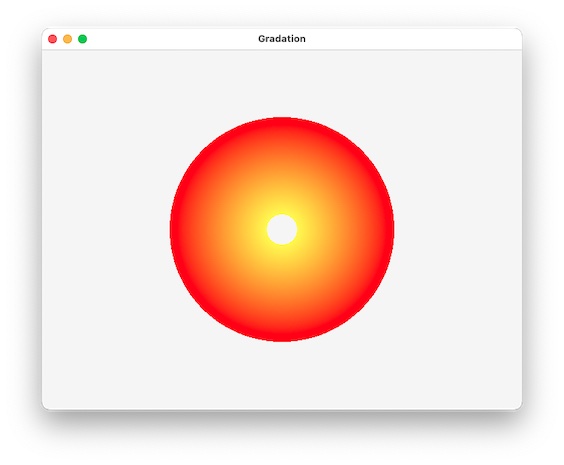
オプション:
aOptionsに NSGradientDrawsBeforeStartingLocation を設定すると一つ目の円の内側に一つ目の色が入り、
NSGradientDrawsAfterEndingLocationを設定すると2つ目の円の外側に2つ目の色が入ります。
|
|
set aOptions to ((myApp's NSGradientDrawsBeforeStartingLocation) as integer) ¬ + ((myApp's NSGradientDrawsAfterEndingLocation) as integer) |
グラデーション(3)部分部分でグラデーションの色を変える
|
|
anImage's lockFocus() set colorArray to {(myApp's class "NSColor"'s blueColor()), (myApp's class "NSColor"'s yellowColor()), (myApp's class "NSColor"'s redColor())} -- グラデーションで採用したい色のリスト化 set theGradient to myApp's class "NSGradient"'s alloc()'s initWithColors:colorArray set theBezierPath to myApp's class "NSBezierPath"'s bezierPath() set theRect to myApp's NSMakeRect(x, y, w, h) theBezierPath's appendBezierPathWithRect:theRect set aAngle to 0 theGradient's drawInBezierPath:theBezierPath angle:aAngle -- カラーリストを元にグラデーションの描画 anImage's unlockFocus() |
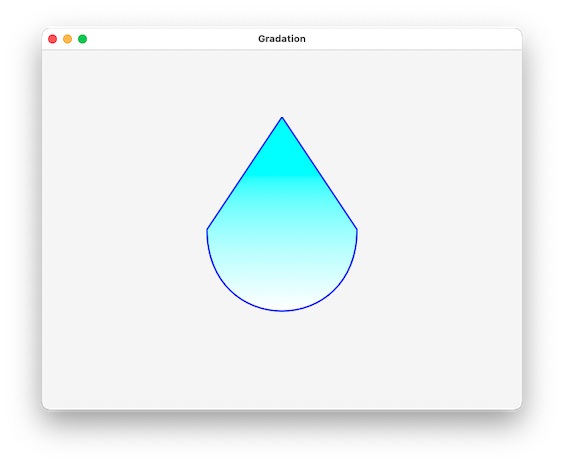
グラデーション(4)自由な図形の中にグラデーションを描く
|
|
anImage's lockFocus() -- |雨だれの図形を作成| set theBezierPath to myApp's class "NSBezierPath"'s bezierPath() tell theBezierPath -- 始まりの点 set aPoint to myApp's NSMakePoint(250, 300) moveToPoint_(aPoint) -- 直線 set aPoint to myApp's NSMakePoint(350, 150) lineToPoint_(aPoint) -- 曲線 set aPoint to myApp's NSMakePoint(150, 150) set aControlPoint1 to myApp's NSMakePoint(350, 5) set aControlPoint2 to myApp's NSMakePoint(150, 5) curveToPoint_controlPoint1_controlPoint2_(aPoint, aControlPoint1, aControlPoint2) -- 最初と最後の点を繋いで図形の線を閉じる closePath() end tell -- |グラデーションで塗りつぶす| set aColor1 to myApp's class "NSColor"'s whiteColor() set aColor2 to myApp's class "NSColor"'s cyanColor() set aAngle to 90 set theGradient to myApp's class "NSGradient"'s alloc()'s initWithStartingColor:aColor1 endingColor:aColor2 theGradient's drawInBezierPath:theBezierPath angle:aAngle -- |枠の罫線を描く| set strokeColor to myApp's class "NSColor"'s blueColor() strokeColor's |set|() theBezierPath's setLineWidth:2 theBezierPath's stroke() anImage's unlockFocus() |
これってもしかして・・・(ご注意ください) [Mac日記]


あれ?Appleのサイトが開かない [Mac日記]
何かと不具合が多くなってきたSoundFlowerに変わってGroundControlを使ってみよう [Mac日記]
Macではデスクトップで発せられる音声を録音できないという仕様があるわけですが、以前はSoundFlowerというアプリケーションを仲介して録音を可能にしていました。
しかし、すでにSoundFlowerは開発によるバージョンアップやサポートが終了しており、新しいMacOSへの対応ができなくなっていました。
少し前まではそれでも使えていたのですが、最近とうとう使えなくなってしまいました。
(インストールも失敗したまま、正常な動作もできなくなっていた)
という事で代わりのものを探してみた。
(とりあえず、不具合もあるかもしれないので、SoundFlowerインストールをしていた場合の方は、先にアンインストーラーを使用して削除をしておく事をお薦めします。)
下記のサイトへ行きます。
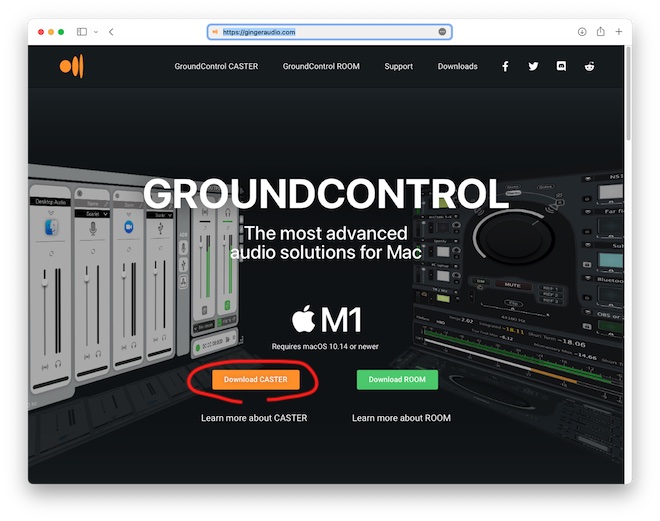
『GroundControl CASTER』のインストーラーをダウンロードする。
サイトの丸部分をクリックするとダウンロードが始まります。
ダウンロード後にインストーラーを起動しインストールをして、インストール後に再起動が促されますので、Macを再起動をしたら完了です。
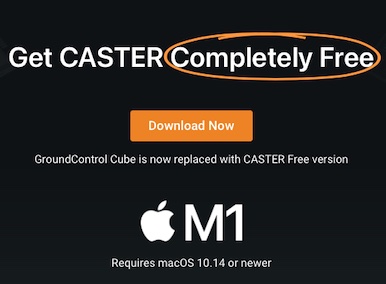
以前は有料だったようですが、現在はフリー(無料)になっていますね。メールの登録も不要になっているようです。
このアプリケーションは、IntelCPUでも、M1でも対応しているようです。
これで、デスクトップの音を拾うことができます。
この後には、SoundFlowerの時のように、LadioCastを使用して、音声の入力元、出力先を自分のやりたいように指示してやると使えるようになります。
例)
システム環境設定の サウンドの入力を『CASTER』にします。

サウンド出力を『CASTER Stream Mix 1』に変更

LadioCastを起動し、入力側(入力1)を『CASTER Stresm Mix 1』に
出力メインを内蔵出力、または、HDMIにする。
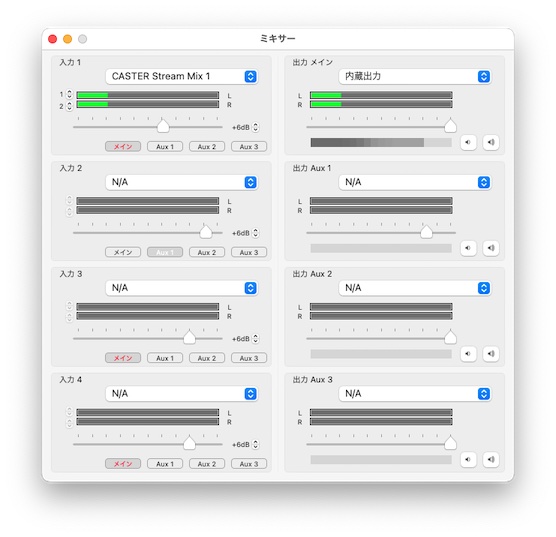
これによって、録音するチャンネル『CARTER Stream Mix 1』を使用しながら、モニターやヘッドホンから音を聞くことができます。
最後に、やっぱり止めるという場合のための、アンインストーラーの入手の方法もご紹介しておきます。
サイト上部にあるSupport(サポート)ページのリンクをクリックし、開いたページの下の方にUNINSTALL(アンインストーラー)についての文章がありますので、そこからアンインストーラをダウンロードして削除できます。
macで無料で使える音声合成ソフトのご紹介 [Mac日記]
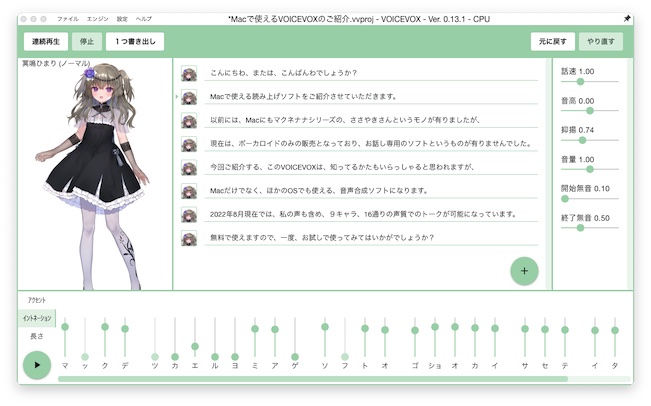

再生できない場合、ダウンロードは🎵こちら

URLエンコード&デコードを簡単に [AppleScript辞書はつくれるか?]
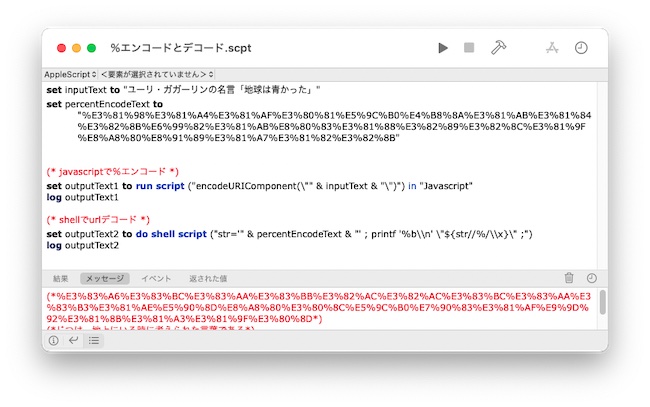
URLエンコード(%エンコード)を簡単にエンコードやデコードしたいと思い、いろいろ調べてみた。
なんと、それぞれ1行で作れるようだ。
|
Applescript |
|
|
|
|
set inputText to "ユーリ・ガガーリンの名言「地球は青かった」" set percentEncodeText to "%E3%81%98%E3%81%A4%E3%81%AF%E3%80%81%E5%9C%B0%E4%B8%8A%E3%81%AB%E3%81%84%E3%82%8B%E6%99%82%E3%81%AB%E8%80%83%E3%81%88%E3%82%89%E3%82%8C%E3%81%9F%E8%A8%80%E8%91%89%E3%81%A7%E3%81%82%E3%82%8B"
(* javascriptで%エンコード *) set outputText1 to run script ("encodeURIComponent(\"" & inputText & "\")") in "Javascript" log outputText1
(* shellでデコード *) set outputText2 to do shell script ("str='" & percentEncodeText & "' ; printf '%b\\n' \"${str//%/\\x}\" ;") log outputText2 |
|
JavaScriptだったりShellスクリプトだったりと統一感がないが、簡単にするためだ、許してほしい。
参考サイト:
入力ソースを切り替える(MacOS12.x版) [AppleScript辞書はつくれるか?]
以前にも言語切り替えの入力メニューをApplescriptから操作するスクリプトを組んでいました。
『システムイベントを使って入力モードを変更する』 > https://start-mac.blog.ss-blog.jp/2019-03-27
Mac OS 10.13では今でも使えているのですが、現在のMac OS 12.4では使えなくなっていましたので、新しいものを考えてみます。
概要
MacOS 12.x環境で、Applescriptを使って入力ソースを『日本語』に変更したい
Contents
1)ショートカットがあれば疑似入力でできるのでは?
2)キーボードについている『かな』キーを擬似的に押した状態を作ったら?
3)メニューを擬似クリックしてみる
4)メニューを座標でクリック
5)入力ソースをキーボードショートカットで変更する
1)ショートカット入力で切り替える
仕方がないのでSystem Events経由でショートカットの疑似入力に変更しようかと思ったのですが、
公式サイトに書いてあるやり方
(https://support.apple.com/ja-jp/guide/japanese-input-method/jpimf6ffb247/6.3/mac/12.0)
『キーボード: Control+Shift+Jキー、またはOption+Shift+Zキーを押す』とあるのですが、なぜかこれでは動かなかった。
2)キーボードについている『かな』キーを擬似的に押した状態を作る
キーの番号を調べれば使えるかもしれないが、ふと思いました。
キーボード配列が変わってしまったら使えなくなるのでは?
この方法では環境によっては誤動作の原因になる可能性があるのでボツ。
3)システムイベントでメニューのクリックしてみる
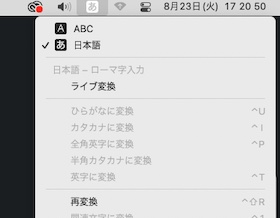
どうやら"SystemUIServer"ではなく、"TextInputMenuAgent"にかわっているようだったので、変更した。
click menu bar item を利用して直接に擬似クリックしてみる。
|
|
tell application "System Events" tell process "TextInputMenuAgent" click menu item "日本語" of menu 1 of menu bar item 1 of menu bar 2 -- ※ end tell end tell |
※ 右から menu bar 2(デスクトップ上部のメニュー右側)
menu bar item 1(メニューバー本体のアイテム)
menu 1(メニューバーの一つ目のメニューアイテムグループ(まぁ、一つしかないのだが...))
menu item "日本語"(メニューアイテムの中の一つ)
となる。
結果は、動作しなかった。
どうやら、メニューアイテムグループを表示してからでないと反応しないらしい。
なので、追加してみた。
|
|
tell application "System Events" tell process "TextInputMenuAgent" click menu bar item 1 of menu bar 2 click menu item "日本語" of menu 1 of menu bar item 1 of menu bar 2 end tell end tell |
これで動作はしたのだが、何と動作が終わるまでに6秒もかかってしまった。(なぜ?)
4)座標でクリックしてみる
クリックメニューバー命令が時間がかかるのか?と考え、座標を求めクリックしてみることにした。
|
|
tell application "System Events" tell process "TextInputMenuAgent" set {x, y} to position of menu bar item 1 of menu bar 2 click at {x + 8, 5} set aList to every UI element of menu 1 of menu bar item 1 of menu bar 2 repeat with lineNo from 1 to (count of aList) set obj to item lineNo of aList set aName to (name of obj) as string if aName = "日本語" then set {x, y} to position of obj click at {x + 50, y + 8} exit repeat end if end repeat end tell end tell |
これでも動作したのだが、やはり6秒もの時間がかかった。(残念!)
メニューバーのアイコンをクリックした後に、瞬時にメニューは表示されているのだけれど、
そこで6秒間ほど動きがピタッと止まってしまう。(原因不明)
5)キーボードショートカットで入力ソースを切り替える方法でやってみる
MacOS12.xではキーボードショートカット『control + スペース』で入力ソースの切り替えができる。
何だ、最初からこれでやればいいのでは? と思ったかもしれないが、じつはこのショートカットでは、切り替えた先の入力ソースが『日本語』なのか違うのかの判断ができないのです。
それを判断するためにTextInputMenuAgentのメニュー項目を読み込む必要があるのです。
入力ソースが『日本語』であるかどうかはメニューの中に日本語ソースに存在する「再変換」の項目があるかどうかで判断しています。
(中国語や韓国語など他のソースにあるかは調べていません。(すまん。)少なくとも英語には無い。)
|
|
tell application "System Events" tell process "TextInputMenuAgent" set aList to name of UI elements of menu 1 of menu bar item 1 of menu bar 2 if not ((aList as text) contains "再変換") then key code 49 using control down end if end tell end tell |
日本語になっていなければ、key code 49 using control downを実行します。
この時、なぜkeystroke " " using control downの直接半角スペース文字を直接入力する方法を取らず、キーコードを使用したのかというと、キーストローク命令ではスペースはバグるので、使用しませんでした。(原因は不明)
※キーコードに関しては(サイト:https://eastmanreference.com/complete-list-of-applescript-key-codes)を参考にしました。
人によっては入力ソースが英語[ABC]と日本語ではない3つ以上の入力ソースがある人もいますが、それには対応していません。
メニューアイテムグループの内容が開かないと更新されないみたいで、それをしようとすると、魔の6秒間のフリーズが発生してしまうので、これは今後の課題とします。
スタートアッププログラムの情報を見る [AppleScript辞書はつくれるか?]
/Library/LaunchDaemons
~/Library/LaunchAgents
~/Library/LaunchDaemons
/System/Library/LaunchAgents
/System/Library/LaunchDaemons
にある、スタートアッププログラムを調べてリスト化してためのプログラムを作ってみました。

ついでに、ダブルクリックで選択した項目の情報を表示したり、ファイルのある場所を開くこともできるようにもしてみました。
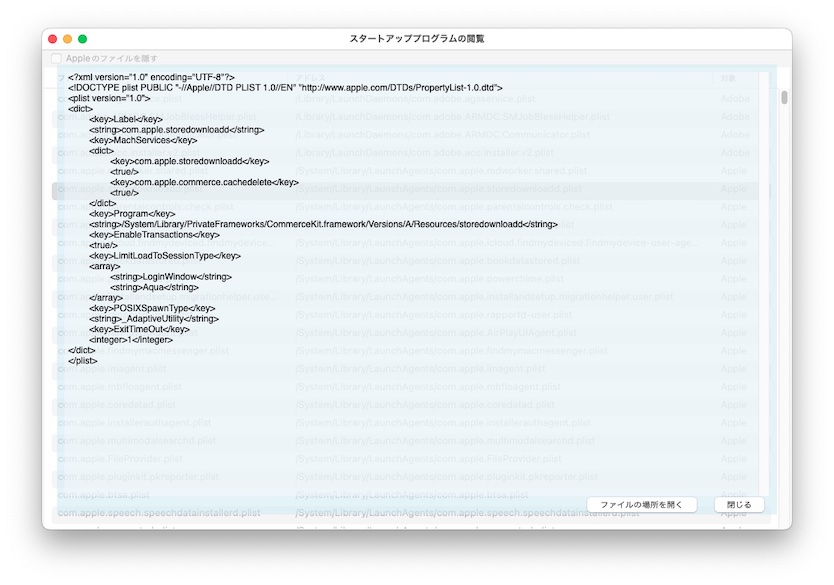
ソースはこちら。
ファイルを見つけることができるのですが、不用意にシステムで使っているファイルを消さないように注意してください。
Xcode14からAppleScriptが消えた? [Mac日記]
すでにこういう質問がされている。
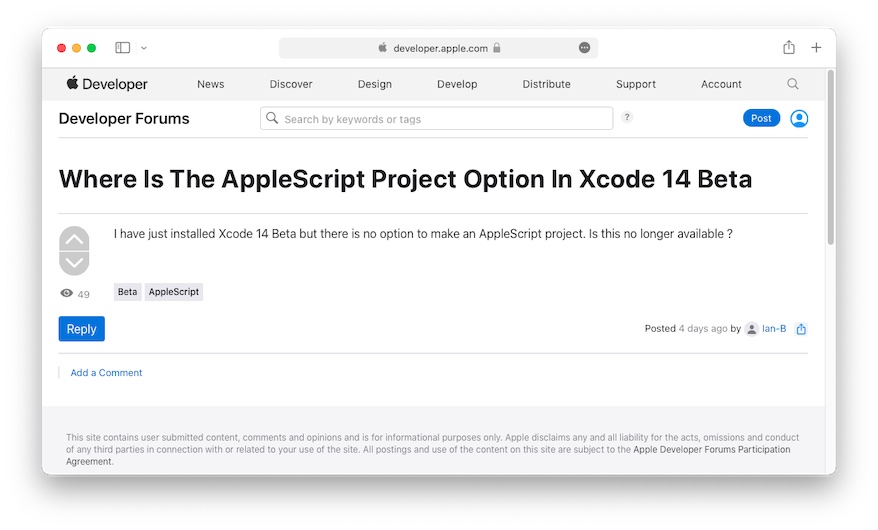
https://developer.apple.com/forums/thread/709916
Where Is The AppleScript Project Option In Xcode 14 Beta
I have just installed Xcode 14 Beta but there is no option to make an AppleScript project. Is this no longer available ?
Xcode14ベータ版のAppleScriptプロジェクトオプションはどこにありますか
Xcode 14 Betaをインストールしたばかりですが、AppleScriptプロジェクトを作成するオプションがありません。 これはもう利用できませんか?
たしかに、以前のバージョンでは有った、
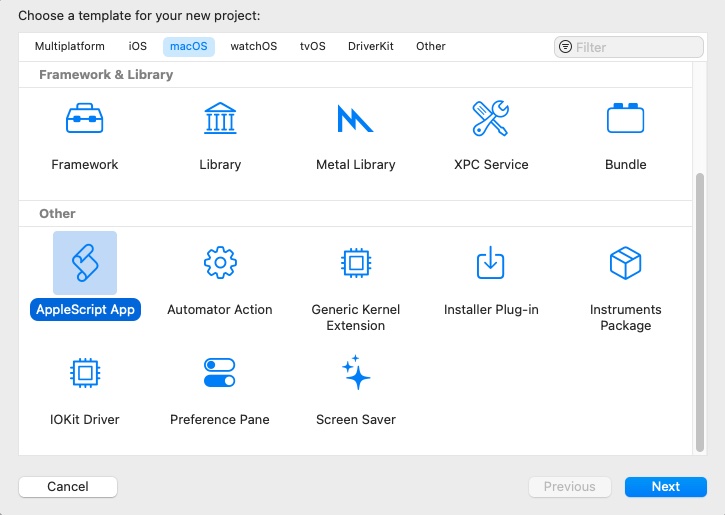
が、Xcode14Betaで作成しようとすると
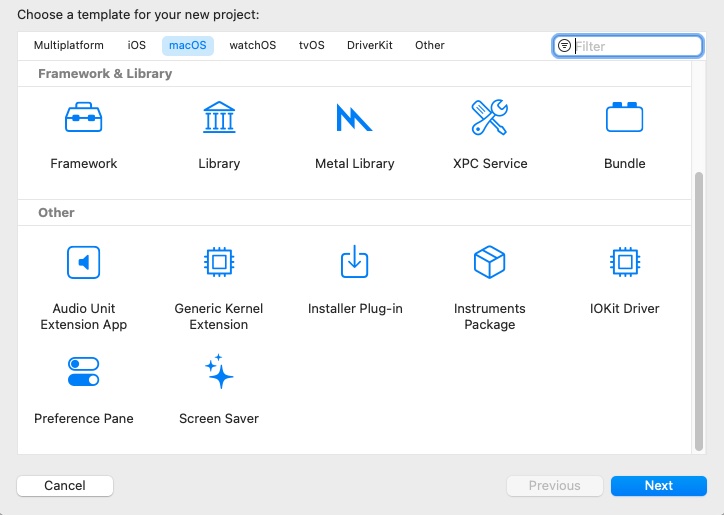
と、項目がどこにもない。
対応されなくなったのかと思えば、以前作ったApplescriptのプロジェクトは実行できて使える。
最悪、Emptyプロジェクトを作成して1から構築していかなければならないのか?
なんて、恐怖が芽生えています。
https://developer.apple.com/documentation/Xcode-Release-Notes/xcode-14-release-notes
Xcode14 Beta 3 リソースノートでは
『The Cocoa AppleScript application template has been removed in Xcode 14. (20633478)』
--CocoaAppleScriptアプリケーションテンプレートはXcode14で削除されました。
とある。
本当に廃止になってしまったのだろうか・・・。
テキスト(String)を画像(NSImage)化する [AppleScript辞書はつくれるか?]
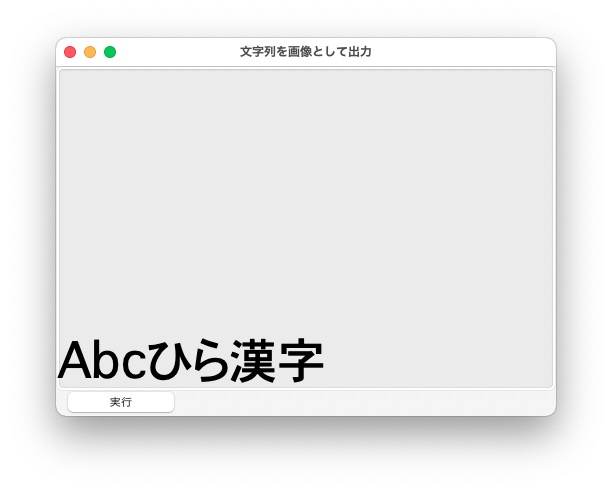
簡単にテキストを画像化する方法は2つある。
・drawAtPoint
決められたポイントから文字を書き出す
|
|
set aText to "Abcひら漢字" set {{x, y}, {w, h}} to imageView1's frame()
set myApp to current application set theSize to myApp's NSMakeSize(w, h) --set fontObj to myApp's class "NSFont"'s userFontOfSize:24.0 --|Font A| set fontObj to myApp's class "NSFont"'s fontWithName:"Osaka" |size|:24.0 --|Font B| set sizeValue to fontObj as list set fontAttribute to (myApp's NSFontAttributeName) as list set attributes to myApp's class "NSDictionary"'s dictionaryWithObjects:sizeValue forKeys:fontAttribute set aString to myApp's class "NSString"'s stringWithString:aText set anImage to myApp's class "NSImage"'s alloc()'s initWithSize:theSize anImage's lockFocus() aString's drawAtPoint:(myApp's NSMakePoint(1, 1)) withAttributes:attributes anImage's unlockFocus() imageView1's setImage:anImage |
・drawInRect
決められた範囲内に文字を書き出す
|
|
set aText to "Abcひら漢字" set setSize to 48 set myApp to current application set {{x, y}, {w, h}} to imageView1's frame() set theSize to myApp's NSMakeSize(w, h) --set fontObj to myApp's class "NSFont"'s userFontOfSize:setSize --|Font A| set fontObj to myApp's class "NSFont"'s fontWithName:"Osaka" |size|:setSize --|Font B| set sizeValue to fontObj as list set fontAttribute to (myApp's NSFontAttributeName) as list set attributes to myApp's class "NSDictionary"'s dictionaryWithObjects:sizeValue forKeys:fontAttribute set aString to myApp's class "NSString"'s stringWithString:aText set {width:w, height:h} to aString's sizeWithAttributes:attributes --|大きさを計測| set anImage to myApp's class "NSImage"'s alloc()'s initWithSize:theSize anImage's lockFocus() aString's drawInRect:(myApp's NSMakeRect(1, 1, w, h)) withAttributes:attributes anImage's unlockFocus() imageView1's setImage:anImage |
drawAtPointは範囲を気にしなくても書き出せるが、drawInRectは書き出す範囲を指示しなければいけない。
逆に言えば、drawAtPointでは結果がどこまで書き出しているかを把握できないが、drawInRectなら把握することができる。
どちらを使うかは、その時の状況によるのでしょう。
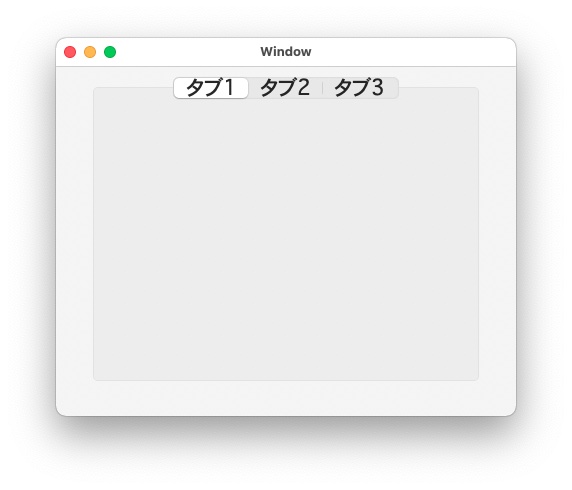
TabViewの研究 [AppleScript辞書はつくれるか?]
https://applescript.web.fc2.com/reference2022/reference_tabView.html
新しくTabViewを作る(TabViewItemが2つあるタイプ)
|
|
set theRect to current application's NSMakeRect(50, 70, 400, 320) set tabView1 to current application's class "NSTabView"'s alloc()'s initWithFrame:theRect theWindow's contentView()'s addSubview:tabView1 -- set tabViewItem1 to current application's class "NSTabViewItem"'s alloc's initWithIdentifier:"tab1" tabViewItem1's setLabel:"タブ1" tabView1's addTabViewItem:tabViewItem1 -- set tabViewItem2 to current application's class "NSTabViewItem"'s alloc's initWithIdentifier:"tab2" tabViewItem2's setLabel:"タブ2" tabView1's addTabViewItem:tabViewItem2 |
・通常タイプのTabView表示なら
|
|
tell tabView1 setTabViewType_(current application's NSTopTabsBezelBorder) end tell |
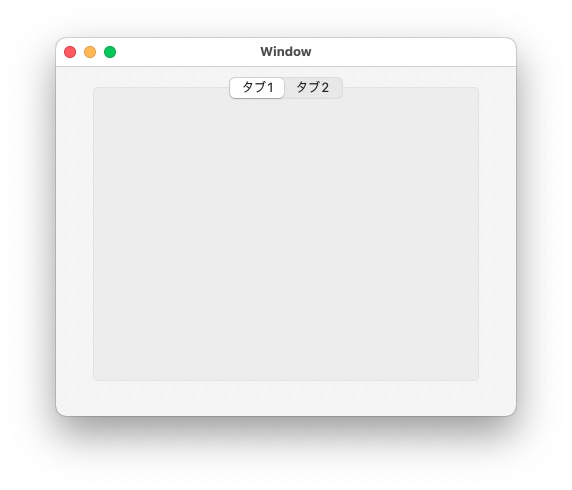
TabViewタイプの"NSTopTabsBezelBorder"の部分を下記に変更すると
・NSBottomTabsBezelBorder
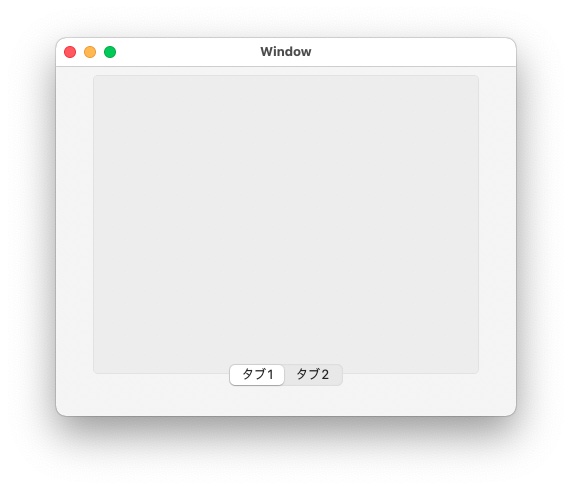
(下に付く)
・NSLeftTabsBezelBorder
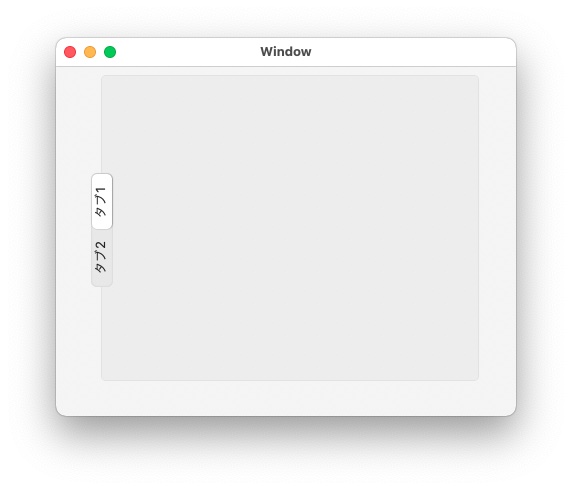
(左に付く)
・NSRightTabsBezelBorder
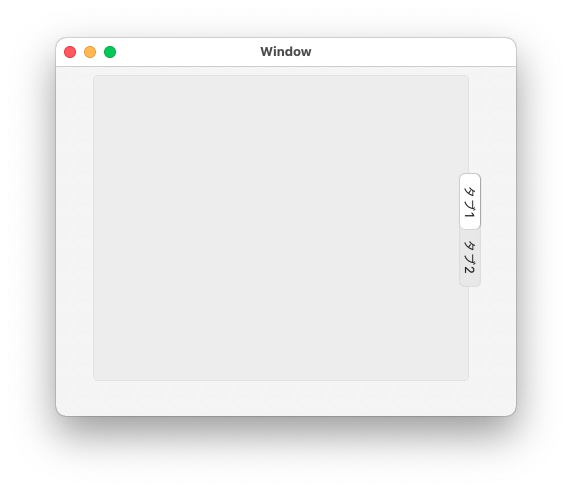
(右に付く)
・NSNoTabsBezelBorder
(ベゼルな枠だけ残る)え?タブの意味はどこへいったの?
・NSNoTabsLineBorder
(枠線だけ残る)ええぇ!?タブの意味...(省略)
・NSNoTabsNoBorder

(枠線すら無い)はぁ?タブビューですら...(省略)
タブビューアイテムの追加(一番後ろ)
|
|
addTabViewItem_(theTabViewItem) |
タブビューアイテムの挿入(0が一番前で、あとは数字ぶんのタブの後ろに挿入される)
|
|
set aIndexNo to 1 insertTabViewItem_atIndex_(theTabViewItem, aIndexNo) |
アイテムに該当するタブを削除
|
|
removeTabViewItem:theTabViewItem |
指定番号のタブを削除(一番前は0)
|
|
set aIndexNo to 1 tabView1's removeTabViewItem:(tabView1's tabViewItemAtIndex:aIndexNo) |
(あれ?一度アイテムを呼び出さないといけない、この方法しかないのかなぁ?)
前のタブを選択
|
|
selectPreviousTabViewItem:me |
次のタブを選択
|
|
selectNextTabViewItem:me |
指定された番号のタブを選択
|
|
set aIndexNo to 1 selectTabViewItemAtIndex:aIndexNo |
指定された識別子のタブを選択
|
|
selectTabViewItemWithIdentifier:"tab2" |
選択されているタブのタイトル(label)を取得
|
|
set aTitle to ({} & ((tabView1's selectedTabViewItem())'s label())) as text |
※ 変な方法で求めています。
選択されたタブのインデックス(番号)を取得
|
|
set aIndex to tabView1's indexOfTabViewItem:(tabView1's selectedTabViewItem()) |
タブの表示フォントを変更する
|
|
tabView1's setFont:(current application's class "NSFont"'s fontWithName:"HiraMinProN-W6" |size|:24.0) |
※ ちなみにフォント名はFont Book.appでフォントの情報から『PostScript名』を参考に
タブビューアイテムにオブジェクトを配置する(例はtextField1というオブジェクトを貼り付けている)
|
|
tabViewItem1's view()'s addSubview_(textField1) |
※ タブビューアイテムのビューの上に貼り付ける指示をしなければならない
などなど。
Apple Developerのページが新しくなっていたようなので作り直してみるか [Xcode]
何か使いやすい表示になっていたんですね。
https://developer.apple.com/documentation/appkit?language=objc
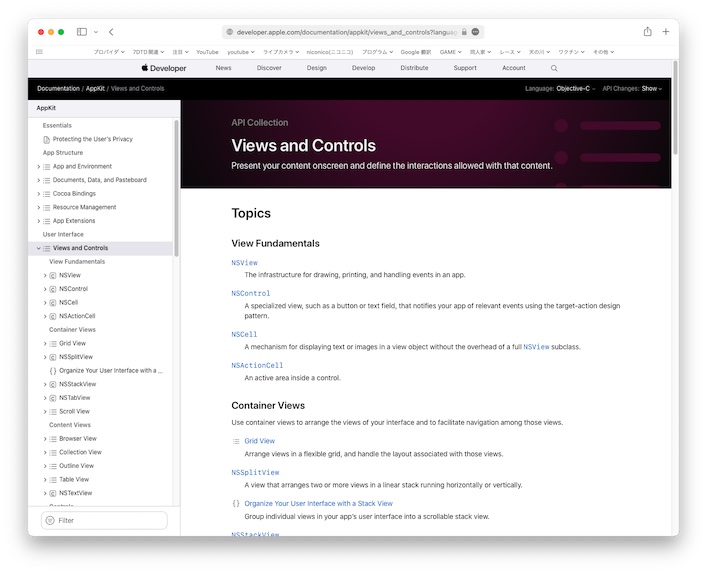
いろいろな項目が更新されているようなので、研究用の日本語化のページを作り直してみようかと思ってます。
また大変なことを・・・。
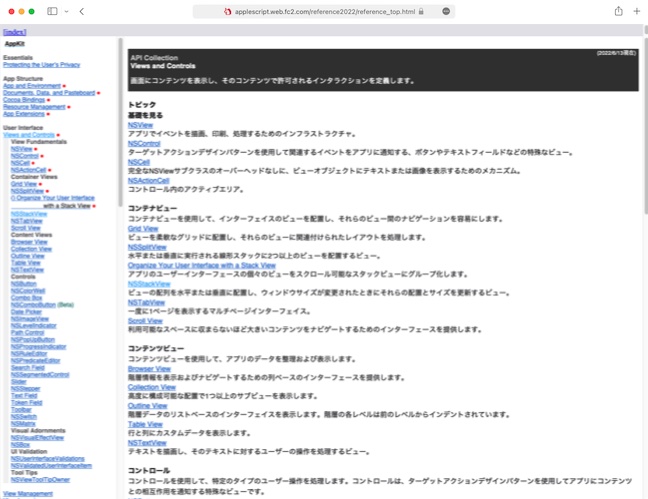
https://applescript.web.fc2.com/reference2022/reference_top.html
できた部分には●をつけて・・・って、いくつあるんだろう・・・。
前は無かったBETA版のコードがあるので、調べていくのが楽しみです。
(まぁ、悩みも増えていくのですけどね)
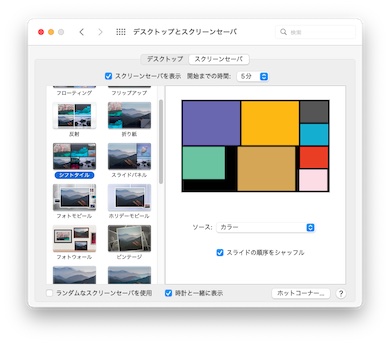
スクリーンセーバーの起動やスリープを阻止する [AppleScript辞書はつくれるか?]
自作のAppが起動している間だけ、スクリーンセーバーの起動をさせたくなかったり、スリープをさせないようにしたい場合があったとしたら、どうしたら良いのでしょう?
システム環境設定で動かないように設定したら、それで動かなくなりますが、自作のAppが起動している、していないにかかわらず、ずっとその状態になってします。
Appから環境設定を変更して、終了時には戻すというプログラムを組んだとしても、意図していない時にAppが強制終了してしまうと、元に戻らない場合が発生したりします。
つまり、Appに常に管理させておく必要があると思われます。
ではどのように管理をするかいくつか試してみよう。
1)定期的にスクリーンセーバーの停止命令を送ってみたら?
定期的に
|
|
on idle tell application "System Events" to stop current screen saver return 30 end idle |
という、スクリーンセーバーを停止するシステムイベントを送り続けてみる方法があります。
しかし、これでは起動しているスクリーンセーバーを止めるだけなので、一度スクリーンセーバーが起動してしまいます。しかも、スクリーンセーバーの起動までの時間を延長させるものではないので、環境設定で入力されている時間がくれば毎回画面がちらつく事になります。
さらに、スリープに関してはスルーなので、時間がくればコンピューターがスリープ状態に入ってしまうでしょう。
2)常にAppが演算状態にしたらどうか?
これは意味がありません。Appが何かの演算を延々としていたとしても、スクリーンセーバーはお構いなしで動いてしまいます。もし演算状態でスクリーンセーバーが起動しないのであれば、バックグラウンドで動いている、システムのアプリケーションにも反応するはずなのですが、そんなことがないのは言うまでの無いことだと思います。
3)スクリーンセーバーが起動しない条件を探してみる。
スクリーンセーバーが起動しない状態とは、ユーザーが何かしらのキーボード作業やマウス作業をしている場合か、インターネットブラウザーや動画のプレーヤーで動画を見ている状態などが考えられます。
まぁ、延々と動画を流しておくというのは、今回適切では無いので省きます。
4)疑似的にキーボード入力をしている状態を作る。
・システムイベントで疑似的に入力をし続けてみた場合
|
|
tell application "System Events" to keystroke "a" |
Appで他にどんな作業をしているのかが不明な状態で、文字の入力を繰り返すのは、Appでさせている別の処理を阻害してしまう可能性があるので、これは無理があるでしょう。
・システムイベントで疑似的にシフトキーを押した状態にしてみた場合。
|
|
tell application "System Events" to keystroke using shift down |
シフトキーではスクリーンセーバーの起動を阻止はできませんでした。
5)マウスポインターを移動してみる。
・システムイベントで疑似的にクリックをさせる
|
|
tell application "System Events" to click at {100, 100} |
マウスポインターを移動させるものでは無く、そのポイントをクリックした場所の処理をさせるだけで、実際はマウスをクリックした動作をさせているわけでは無いようで、スクリーンセーバーの起動を阻止できなかった。
アップルメニューなどのメニューバーをクリックしておけばいけるかもしれないが、メニューが開いて画面がチラついてしまうので使えるとは思えない。
・Objective-Cの力を借りてポインターを移動してみる
|
|
tell current application CGPostMouseEvent({x:mouseX, y:mouseY}, 1, 1, 0) end tell |
これで初めてスクリーンセーバーの起動を阻止することができました。
CGPostMouseEventを使うと、実際にマウスポインターが動きます。そしてシステムもマウスを動かした作業をしたと認識してくれているようです。
このイベントはCGPostMouseEvent({x:100, y:100}, 1, 1, 1)とすると、デスクトップの座標{x:100,y:100}でマウスの左ボタンを押した状態を再現します。
CGPostMouseEvent({x:100, y:100}, 1, 1, 0)とすると、マウスの左ボタンを離した状態を再現します。
つまり、押した状態の後に離した状態を作ってあげればクリックしたことを再現したことになります。
今回はクリックする必要はなく、離したままの状態で移動だけをすれば、なんの処理も邪魔せずスクリーンセーバーの起動を阻止できるようになるのではないでしょうか。
とは言うものの、ただマウスポインターが無差別に動いてしまう動作をしてしまうと、ユーザーが別の作業している時に邪魔になる可能性があります。
ユーザーが作業している状態、マウスが盛んに移動している場合はプログラムでは動かさないという回避行動が必要でしょう。
常にマウスポインターの位置を監視し、位置が変わっていない時のみ実行するようにします。
|
|
set {x:mouseX, y:mouseY} to current application's class "NSEvent"'s mouseLocation() |
これで、現在のマウスポインターがいる座標を取得し監視します。
では、実際にユーザーが作業していない(マウスが動いていない)状態になったら、マウスポインターを動かすわけですが、
マウスポインターをどのように動かすか考えてみましょう。
例えば、座標 {x:0, y:0} (画面左上)のような決まった位置に移動してしまうと、ユーザーが作業に戻ってきた時に、迷ったり困ってしまうかもしれません。
今のポインターの位置から少し右か左に動かすとした方が良いでしょう。ですが画面の端にポイントがいた場合はポインターがそれ以上動かないと言う場合がある可能性もあります。
なので、右と左に2箇所に動かしてみる方が良いと思います。
できれば、最後に元に戻っていた方が良いと思いますので、これを含めた3ヶ所ほどマウスポインターを動かしてみましょう。
|
|
CGPostMouseEvent({x:mouseX + 2, y:mouseY}, 1, 1, 0) CGPostMouseEvent({x:mouseX - 2, y:mouseY}, 1, 1, 0) CGPostMouseEvent({x:mouseX, y:mouseY}, 1, 1, 0) |
1行目で元の位置からX方向の +2 移動(右)
2行目で元の位置からX方向へ -2 移動(左)
3行目で元の位置に戻る動作をさせています。
以上で、マウスポインターを動かしてスクリーンセーバーが動くのを阻止することができるようになるのですが、OSのバージョンによっては不具合が発生することがあります。
不具合(1)
プログラミングをしていく上で避けられない状況での問題となるのですが、繰り返しコードを作り直して保存をし直す、入力作業&デバグ作業をすると、最初は動いていたCGPostMouseEventが、なぜか動作しなくなってしまう不具合。
これは、最初にプログラムを実行するとセキュリティーのアクセシビリティが反応して実行しても良いプログラムですか?とお伺いのダイアログが出てくると思います。
ですが、2回目以降は聞いてこないのですが、コードを変更して保存し直すとApp名は残ってるものの、実行して良いプロセスではないと静かに除外され実行されなくなります。
改善するには、一度アクセシビリティからApp名を外し再登録し直さなければいけません。
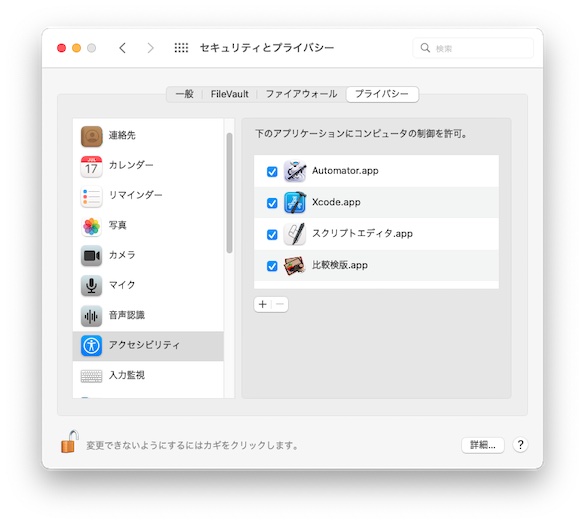
でも、気づかずになっている場合があるので実行されているかのチェックが必要になります。
|
|
if (my security()) then quit me
on security() set {x:mouseX, y:mouseY} to current application's class "NSEvent"'s mouseLocation() tell current application CGPostMouseEvent({x:mouseX + 2, y:mainScreenHeight - mouseY}, 1, 1, 0) end tell set {x:mouseX2, y:mouseY2} to current application's class "NSEvent"'s mouseLocation() if {mouseX, mouseY} = {mouseX2, mouseY2} then display alert "アクセシビリティをの再設定が必要です" message "システム環境設定のセキュリティー>アクセシビリティに、Appを再登録する必要があります" as warning buttons "cancel" default button 1 return true end if return false end security |
試しにマウスを動かしてみたけど座標が変わっていなかった(CGPostMouseEventが動作することができなかった)場合にアラートを表示して終了するとコードを作ります。
この後ユーザーが手動で登録し直すわけですが、将来的には安全なAppとして登録するか、又は、安全な証明書を作ってみるのも良いでしょう。
不具合(2)
古いOS(MacOSX10.13~10.14)で発生するCGPostMouseEventが認識されない現象への対応。
最近のOSでは解消されていますが、Apple developerのサイトではCGPostMouseEventが非推奨扱いになっています。そのため一度外れたのか何かは不明ですが使えなくなっていた頃がありました。
ですが、今後、再発する可能性が無いとは言い切れませんので、回避させるコードを追加しておきます。
|
|
set codeText to "import sys; from Quartz.CoreGraphics import CGEventCreateMouseEvent,CGEventPost,CGPointMake; " set codeText to codeText & "x = float(" & (mouseX - 2) & "); y = float(" & (mainScreenHeight - mouseY) & "); po = CGPointMake(x, y); event = CGEventCreateMouseEvent(None, 2, po, 0); CGEventPost(0, event); " do shell script "python -c " & quoted form of codeText |
python言語でコードを作り、シェルスクリプト経由で実行をします。CGPostMouseEventで動作しないと分かった時点で切り替えて実行します。
これなら、最初からCGEventCreateMouseEventを使えば良いと思われるかもしれませんが、このコードは動作が遅いので避難措置用です。
不具合(3)
不具合というのとは違うかもしれませんが、mouseLocation()で取得するY座標と、CGPostMouseEventで疑似クリックをするためのY座標が逆という仕様が存在します。
mouseLocation()ではメインスクリーンの左下が{x:0, y:0}の原点で上にのぼるほど座標が加算されていきます。
CGPostMouseEventではメインスクリーンの左上が原点で下へ降りるほど加算されます。
この逆向きの座標の数値を調整してやる必要があります。
|
|
set mainScreenHeight to item 2 of item 2 of ((item 1 of (current application's class "NSScreen"'s screens()))'s frame()) |
class "NSScreen"'s screens()でメインやサブを含むデスクトップのすべてのフレーム情報を取得します。
(複数のモニターがあった場合にも対応します)
(item 1 of ...)'s frame()でメインのスクリーン(主となるデスクトップ)のフレームサイズを取得します。
(複数のモニターがあってもメインのスクリーンの原点がすべてのモニター原点となります)
フレームのサイズの情報は{{原点のx座標, 原点のy座標}, {横幅, 高さ}}(例:{{0.0, 0.0}, {1920.0, 1080.0}})と二重の階層で収められています。
item 2 of item 2 of ... で2番目の情報を取得して、さらに2番目の数値を取得すると、メインスクリーンの高さが求められます。
そこから引き算でY座標を求めればクリックするy座標が得られます。
|
|
mainScreenHeight - mouseY |
とりあえず、ようやくこれですべて解決です。
AppleScriptで取得する時間を操ってみる-NSDate- [AppleScript辞書はつくれるか?]
AppleScriptでオブジェクトを使うと、日時の値がまちまちな時がある。
あるときは『スタンダードなDate値』だったり、『NSDate型』だったりと変化してしまいます。
しかも、NSDateの値だとそのままではAppleScriptで使うことができない。時間などを直接に取り出すことができない。
なので、どの型であっても自動で統一させてみようかと思った。
|
スクリプトエディタ.app |
|
use scripting additions use framework "Foundation"
set aDate to current date -- "12:05" でも、date "2022/5/24" でも、NSDate形式でも可能 set output to my dateTextFormatter(aDate) output
on dateTextFormatter(aDate) (* date形式、日時テキスト、NSDate形式 に対応した フォーマッター経由の日時テキストへの変換 *) try if (class of aDate) = text then set aDate to date aDate --"12:34"のようなTEXTで入力された場合に対応 on error log "日時への変換に失敗しました" return false end try set aFormatter to current application's class "NSDateFormatter"'s alloc()'s init() aFormatter's setLocale:(current application's class "NSLocale"'s alloc()'s initWithLocaleIdentifier:"ja_JP") aFormatter's setDateFormat:"yyyy年M月d日 EEEE H:m:s" set theTimeString to (aFormatter's stringFromDate:aDate) as string return theTimeString --テキスト形式で返します end dateTextFormatter
-- 結果:"2022年05月24日 火曜日 12:34:46" |
上記では、入力がどんな形のDate値でもテキストとして出力できるようにした一例だが、下記のような設定を
色々いじれば、さまざまなカタチで作れるはずだ。
(色々な設定のしかた)
--set aDate to current application's class "NSDate"'s alloc()'s init() --(current date) NSDateの初期化時に現在の日時が入る
set aDate to current application's class "NSDate"'s |date|() --(current date)現在の日時の取得
set aFormatter to current application's class "NSDateFormatter"'s alloc()'s init()
-- ×:YYYY ◯:yyyy --YYYYはなぜか年末に年の数字だけが変わる場合がある (*1)
-- aFormatter's setDateFormat:"yyyy年M月d日 H時間m分s秒" --"2022年05月24日 11時間42分44秒"
-- aFormatter's setDateFormat:"yy年M月d日 H時間m分s秒" --"22年05月24日 11時間42分44秒"
-- aFormatter's setDateFormat:"yyyy/M/d H:m:s" --"2022/05/24 11:42:44"
-- aFormatter's setDateFormat:"yyyy/M/d H:m:s.SSS" --"2022/05/24 11:42:44.789"
aFormatter's setDateFormat:"yyyy年M月d日 EEEE H:m:s" --"2022年05月24日 火曜日 11:42:44"
-- aFormatter's setDateFormat:"E" -- "E"~"EEE" --> "火"
-- aFormatter's setDateFormat:"EEEE" --"火曜日"
aFormatter's setTimeZone:(current application's class "NSTimeZone"'s timeZoneWithAbbreviation:"JST")
--日本時間に設定
--aFormatter's setLocale:(current application's class "NSLocale"'s systemLocale())
--"2022年05月24日 Tue 11:42:44" (システム)
aFormatter's setLocale:(current application's class "NSLocale"'s alloc()'s initWithLocaleIdentifier:"ja_JP")
--"2022年05月24日 火曜日 11:42:44" (日本語)(*2)
-- (*1) 参考-日付がずれる:https://www.mt-megami.com/article/295203529
-- (*2) 参考-Locale:https://colo-ri.jp/develop/2011/12/ios-objective-c-get-each-locale-information.html (*2)
(Formatterで使える記号)
|
用途 |
文字 |
説明 例 |
|
紀元 |
G |
西暦 AD H S T M |
|
GGGG |
令和 平成 昭和 大正 明治 *和暦は和暦用Locateを指定 |
|
|
年 |
yy |
年の2桁 09 |
|
yyyy |
年の4桁 2009 |
|
|
月 |
M MM |
数字2桁 01 ~ 12 |
|
MMM |
数字2桁 英字3字 Jan ~ Dec |
|
|
MMMM |
1月 ~ 12月 英字 January ~ December |
|
|
日 |
d |
数字2桁 01~31 |
|
曜日 |
E |
日 月 火 水 木 金 土 Sun Mon Tue Wed Thu Fri Sut |
|
EEEE |
日曜日 ~ 土曜日 Sunday, Monday, Tuesday, Wednesday、 Thursday, Friday, Saturday |
|
|
午前/午後 |
a |
午前 午後 PM |
|
時(0~23) |
H |
|
|
時(1~24) |
k |
|
|
午前/午後の時(0~11) |
K |
|
|
午前/午後の時(1~12) |
h |
|
|
分 |
m |
00 ~ 59 |
|
秒 |
s |
00 ~ 59 |
|
ミリ秒 |
S |
0 ~ 999 |
|
タイムゾーン |
z zzzz |
JST Japan Standard Time |
|
年における週 |
w |
1月第1週からの週 |
|
月における週 |
W |
当月の第何週か |
|
年における日 |
D |
1月1日からの日数 |
|
月における曜日 |
F |
当月の何回目の曜日か |
一度覚えてしまえば、他にも色々と使い所があるかもしれない。
大人とは、封印してしまいたい秘密がいくつかあるのではないでしょうか?(えっ?) [AppleScript辞書はつくれるか?]
理由は様々だとは思いますが、Macでの特定のフォルダを非表示にしてみたいと思って人は少なからずいるのではないでしょうか?
消去するわけにもいかず、置いておくこともできないようなファイルがあったら隠したいですよね?
Macはフォルダの頭文字に"."(ピリオド)を加えるだけで非表示になるので、考え方としては簡単です。
じゃぁ、デスクトップで直接フォルダ名を変更したら済むのか?
と思うかもしれませんが、直接やろうとすると
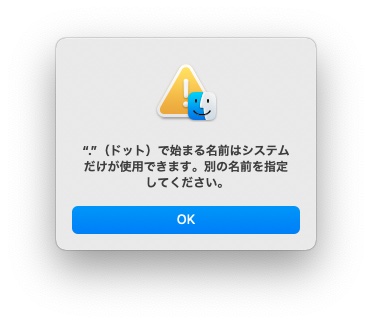
と、勝手にシステム扱いのフォルダを作んな!と怒られてしまいます。
これを回避するには、Applescriptやターミナルなどのスクリプトを介して変更しなければなりません。
めんどくさいですね。
ということで、好きな時にすぐフォルダを隠し、すぐに表示させるができるスクリプトを書いてみました。
Applescript
|
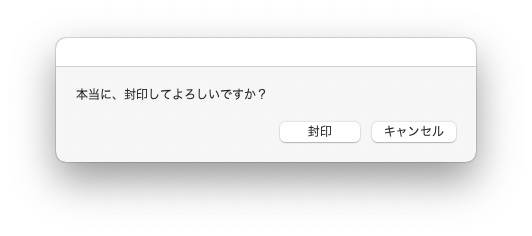
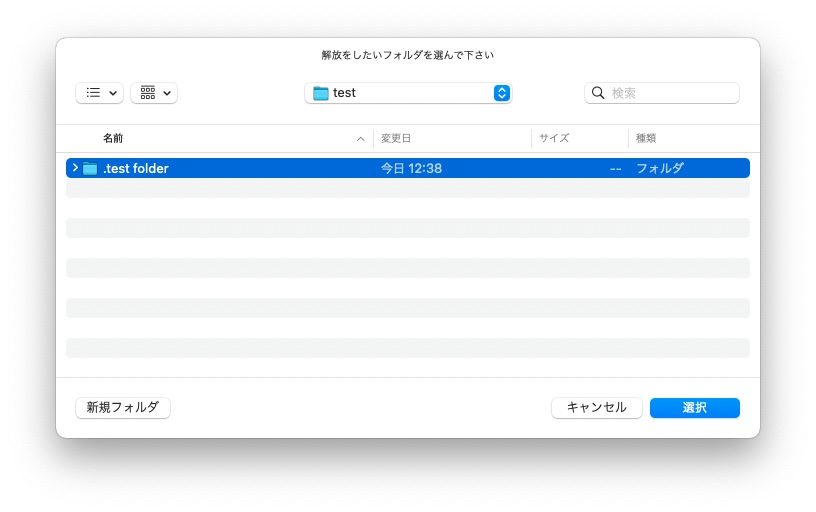
set aKey to character id {0, 32, 0} --このプログラムで封印されたフォルダなのかの判定用 tell application "Finder" set aButton to button returned of (display dialog "コースを選んでください" buttons {"封印", "解放", "キャンセル "} default button 3) if aButton = "キャンセル " then return "何も変更せず、キャンセルしました。" if aButton = "封印" then set aFolder to choose folder with prompt "封印をしたいフォルダを選んで下さい" set aButton to button returned of (display dialog "本当に、封印してよろしいですか?" buttons {"封印", "キャンセル "}) if aButton = "キャンセル " then return "キャンセルしました。" set aComment to comment of aFolder if not (aComment contains aKey) then set comment of aFolder to aComment & aKey set name of aFolder to "." & (name of aFolder) return "封印しました" else if aButton = "解放" then try set aFolder to choose folder with prompt "解放をしたいフォルダを選んで下さい" with invisibles on error return "キャンセルしました" end try set aName to name of aFolder if (character 1 of aName) = "." then set aComment to comment of aFolder if aComment contains aKey then try set folderText to aFolder as text set aName to text 2 thru -1 of aName set name of aFolder to aName set aText to "『" & aName & "』は、" & return & "解放されました" display dialog aText buttons "終了" default button 1 return aText on error errText display dialog "エラーが発生しました。ログを確認してください" buttons "終了" default button 1 return errText end try else set aText to "このフォルダは、このプログラムで封印したものではありませんので、解放できません。" display dialog aText buttons "終了" default button 1 return aText end if end if end if end tell |
(流れ)
1)スクリプトを実行すると、すぐに『封印』するか『解放』ダイアログが表示されます。
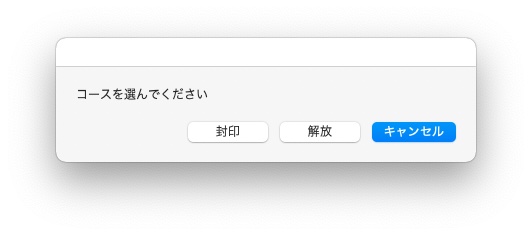
2)a.『封印』を選んだ場合、次に費用時にしたいフォルダのダイアログが出ますので選びます。

その後改で非表示にして良いかのダイアログが出るので『封印』をクリックすると非表示になります、
b.『解放』を選んだ場合は、隠れたフォルダを探すダイアログが表示されますので、探して選ぶと表示されます。
(タイミングによってはスグに表示されない場合がありますがウインドウを開き直すと見えてくるはずです)
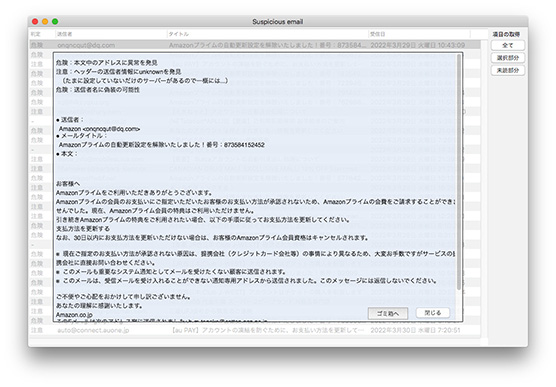
危険なメールを調べて弾こう [AppleScript辞書はつくれるか?]
Safariで表示された英文を自動で翻訳する [AppleScript辞書はつくれるか?]
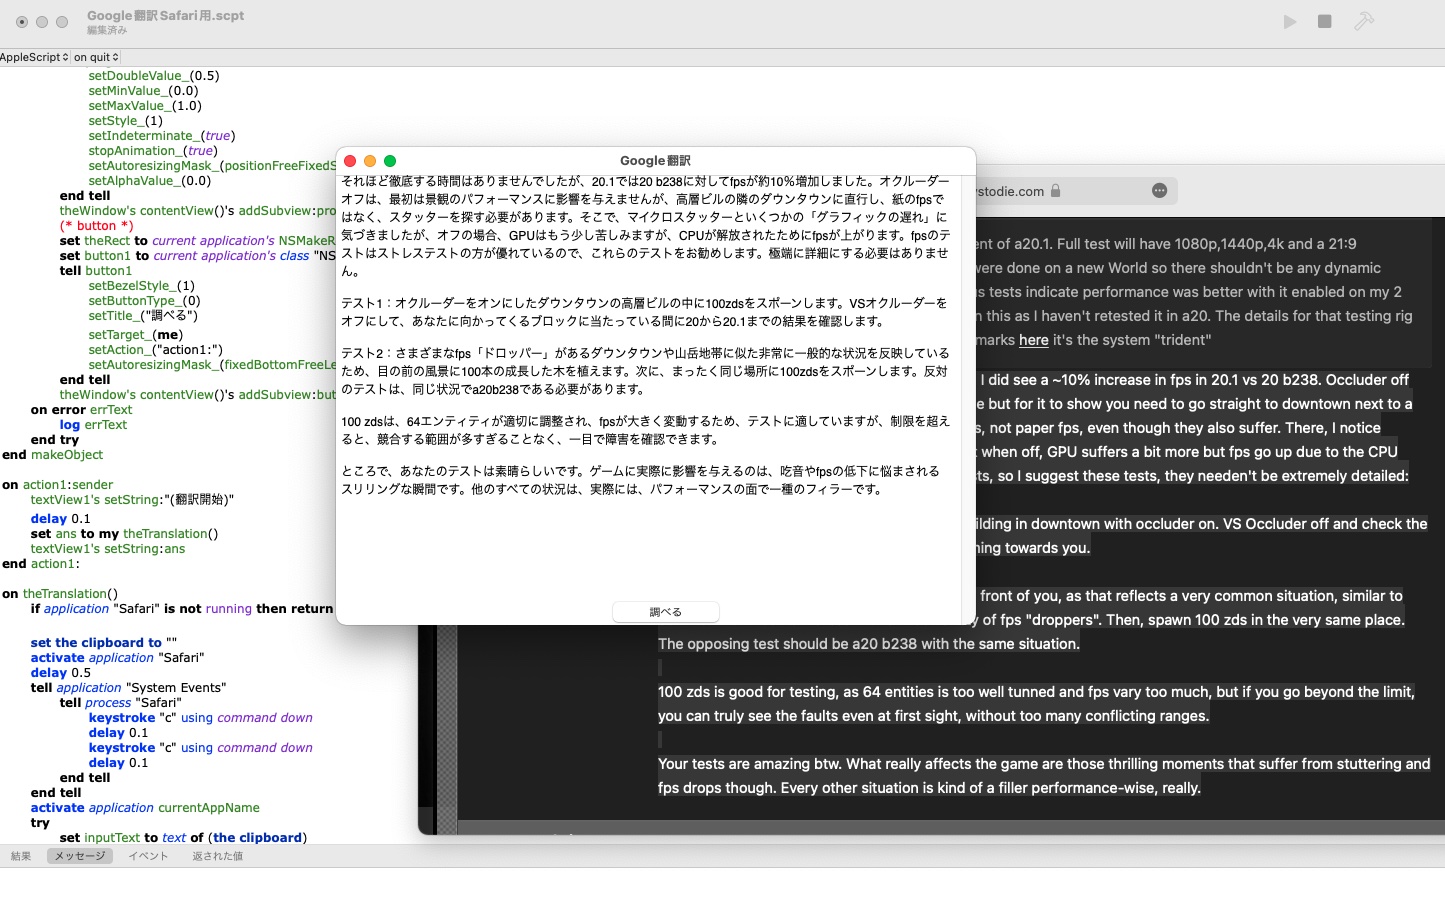
Safariで開いているページの、選択した部分を自動で翻訳して表示するスクリプトを作ってみた。
|
use AppleScript version "2.7" use scripting additions use framework "Foundation" use framework "AppKit" use framework "WebKit"
global theWindow, mainView global closeFlg global currentAppName
global windowTitle global textView1, webView1, progressIndicator1
on run my performSelectorOnMainThread:"mainMakeObject:" withObject:(missing value) waitUntilDone:true log "End" end run
on mainMakeObject:inputObj set currentAppName to name of (current application) set closeFlg to false set windowTitle to "Google翻訳" set aRect to {0, 0, 640, 450} set theWindow to my makeNewWindow(windowTitle, aRect, true) my makeObject() theWindow's setAlphaValue:1.0 repeat if closeFlg then my closeWin:theWindow exit repeat end if delay 0.2 end repeat end mainMakeObject:
on makeNewWindow(aTitle, aRect, moveCenter) set {windowX, windowY, windowW, windowH} to aRect set theRect to current application's NSMakeRect(windowX, windowY, windowW, windowH) set aScreen to current application's class "NSScreen"'s mainScreen() set aStyle to (current application's NSWindowStyleMaskTitled as integer) set aStyle to aStyle + (current application's NSWindowStyleMaskClosable as integer) set aStyle to aStyle + (current application's NSWindowStyleMaskMiniaturizable as integer) set aStyle to aStyle + (current application's NSWindowStyleMaskResizable as integer) set aBacking to current application's NSBackingStoreBuffered set aWindow to current application's class "NSWindow"'s alloc()'s initWithContentRect:theRect styleMask:aStyle backing:aBacking defer:false screen:aScreen tell aWindow setAlphaValue_(0.0) setDelegate_(me) setTitle_(aTitle) setMinSize_(current application's NSMakeSize(360, 250)) setMaxSize_(current application's NSMakeSize(10000, 10000)) setBackgroundColor_(current application's class "NSColor"'s colorWithCalibratedRed:0.95 green:0.95 blue:0.95 alpha:1.0) setDisplaysWhenScreenProfileChanges_(true) setReleasedWhenClosed_(true) makeKeyAndOrderFront_(me) end tell -- if moveCenter then set theScreen to current application's class "NSScreen"'s screens() set {windowCenterX, winsowCenterY} to {windowX + (windowW / 2), windowY + (windowH / 2)} repeat with screenNo from 1 to (count of theScreen) set {{screenX1, screenY1}, {screenWidth, screenHeight}} to (item screenNo of theScreen)'s frame() set {screenX2, screenY2} to {screenX1 + screenWidth, screenY1 + screenHeight} if (windowCenterX > screenX1) and (windowCenterX < screenX2) and (winsowCenterY > screenY1) and (winsowCenterY < screenY2) then set originX to screenX1 + (screenWidth / 2) - (windowW / 2) set originY to screenY1 + (screenHeight / 2) - (windowH / 2) (aWindow's setFrameOrigin:(current application's NSMakePoint(originX, originY))) exit repeat end if end repeat end if -- return aWindow end makeNewWindow
(* 各オブジェクトの配置 *) on makeObject() set mainView to theWindow's contentView set theWindowFrame to mainView's frame() set {{windowX, windowY}, {windowWidth, windowHeight}} to theWindowFrame set minXMargin to (current application's NSViewMinXMargin) as integer set maxXMargin to (current application's NSViewMaxXMargin) as integer set minYMargin to (current application's NSViewMinYMargin) as integer set maxYMargin to (current application's NSViewMaxYMargin) as integer set widthSizable to (current application's NSViewWidthSizable) as integer set heightSizable to (current application's NSViewHeightSizable) as integer set freeSizeWidthHeight to widthSizable + heightSizable set fixedBottomFreeLeftAndRight to maxYMargin + minXMargin + maxXMargin -- 下を固定して左右センターに set positionFreeFixedSize to minXMargin + maxXMargin + minYMargin + maxYMargin -- 天地左右のサイズを柔軟に -- try (* webView *) set theRect to current application's NSMakeRect(0, -700, 600, 800) set webView1 to current application's class "WKWebView"'s alloc()'s initWithFrame:theRect theWindow's contentView()'s addSubview:webView1 webView1's setAlphaValue:0.5 set locationUrl to "https://translate.google.co.jp" set aUrl to current application's class "NSURL"'s URLWithString:locationUrl set aRequest to current application's class "NSURLRequest"'s requestWithURL:aUrl webView1's loadRequest:aRequest
(* textView *) set {x, y, w, h} to {windowX, windowY, windowWidth, windowHeight} set theRect to current application's NSMakeRect(x, y, w, h) set scrollview1 to current application's class "NSScrollView"'s alloc()'s initWithFrame:theRect tell scrollview1 setBorderType_(0) setHasVerticalScroller_(true) setHasHorizontalScroller_(false) setAutoresizingMask_(freeSizeWidthHeight) end tell set textView1 to current application's class "NSTextView"'s alloc()'s initWithFrame:theRect tell textView1 setMinSize_(current application's NSMakeSize(0, h)) setMaxSize_(current application's NSMakeSize(10000, 10000)) setVerticallyResizable_(true) setHorizontallyResizable_(false) setAutoresizingMask_(widthSizable) textContainer()'s setContainerSize:(current application's NSMakeSize(w - 20, 10000)) textView1's setString:"" end tell textView1's textContainer's setWidthTracksTextView:true scrollview1's setDocumentView:textView1 theWindow's contentView()'s addSubview:scrollview1 (* ProgressIndicator *) set theRect to current application's NSMakeRect((w / 2) - 15, (h / 2) - 15, 30, 30) set progressIndicator1 to current application's class "NSProgressIndicator"'s alloc()'s initWithFrame:theRect tell progressIndicator1 setDoubleValue_(0.5) setMinValue_(0.0) setMaxValue_(1.0) setStyle_(1) setIndeterminate_(true) stopAnimation_(true) setAutoresizingMask_(positionFreeFixedSize) setAlphaValue_(0.0) end tell theWindow's contentView()'s addSubview:progressIndicator1 (* button *) set theRect to current application's NSMakeRect(270, 0, 120, 24) set button1 to current application's class "NSButton"'s alloc()'s initWithFrame:theRect tell button1 setBezelStyle_(1) setButtonType_(0) setTitle_("調べる") setTarget_(me) setAction_("action1:") setAutoresizingMask_(fixedBottomFreeLeftAndRight) end tell theWindow's contentView()'s addSubview:button1 on error errText log errText end try end makeObject
on action1:sender textView1's setString:"(翻訳開始)" delay 0.1 set ans to my theTranslation() textView1's setString:ans end action1:
on theTranslation() if application "Safari" is not running then return "Error : Safariが起動していません"
set the clipboard to "" activate application "Safari" delay 0.5 tell application "System Events" tell process "Safari" keystroke "c" using command down delay 0.1 keystroke "c" using command down delay 0.1 end tell end tell activate application currentAppName try set inputText to text of (the clipboard) if inputText = "" then return "Error : 選択されたテキストがありません" on error return "Error : テキストの読み取りができませんでした" end try
progressIndicator1's startAnimation:true progressIndicator1's setAlphaValue:1.0 set logText to "--- 翻訳中の元の文章 ---" & return & inputText & return textView1's setString:(logText) set appName to name of (current application) set outputData to "" repeat with oneLine in (paragraphs of inputText) set oneLine to oneLine as string set f to true if (count of oneLine) > 0 then repeat with oneChara in (characters of oneLine) set aId to id of (oneChara as string) if (aId ≠ 9) and (aId ≠ 32) then set f to false exit repeat end if end repeat end if if f = true then set outputData to outputData & oneLine & return else tell application "System Events" tell process appName try set oldText to name of static text 1 of group 1 of combo box 1 ¬ of group 4 of UI element 1 of scroll area 1 of group 1 of group 1 of window windowTitle on error set oldText to "No Data" end try end tell end tell set urlText to my keywordDelimiter(oneLine) set locationUrl to "https://translate.google.co.jp/?hl=ja&sl=en&tl=ja&text=" & urlText & "&op=translate" set aUrl to (current application's class "NSURL"'s URLWithString:locationUrl) set aRequest to (current application's class "NSURLRequest"'s requestWithURL:aUrl) (webView1's loadRequest:aRequest) tell application "System Events" tell process appName repeat 20 times delay 0.2 try set uiChack to name of static text 1 of UI element 1 of group 12 of group 4 ¬ of UI element 1 of scroll area 1 of group 1 of group 1 of window windowTitle exit repeat end try end repeat repeat 20 times delay 0.2 try set newText to name of static text 1 of group 1 of combo box 1 ¬ of group 4 of UI element 1 of scroll area 1 of group 1 of group 1 of window windowTitle if newText ≠ oldText then set aText to name of every UI element of group 1 of group 12 of group 4 ¬ of UI element 1 of scroll area 1 of group 1 of group 1 of window windowTitle set outputData to outputData & aText & return exit repeat end if end try end repeat end tell end tell end if end repeat set outputData to text 1 thru -2 of outputData progressIndicator1's stopAnimation:true progressIndicator1's setAlphaValue:0.0 return outputData end theTranslation
on keywordDelimiter(aText) set aText to aText as string if (aText contains (character id 37)) then -- % set aText to my setDelimiter(aText, (character id 37), "%25") end if if (aText contains (character id 34)) then -- ダブルクオート set aText to my setDelimiter(aText, (character id 34), "%22") end if if (aText contains (character id 92)) then -- バックスラッシュ set aText to my setDelimiter(aText, (character id 92), "%5C") end if if (aText contains (ASCII character 9)) or (aText contains (ASCII character 32)) then -- タブ&空白 set aText to my setDelimiter(aText, {ASCII character 9, ASCII character 32}, "%20") end if set keyword to "# %23 $ %24 & %26 ' %27 + %2B , %2C / %2F : %3A ; %3B < %3C = %3D > %3E ? %3F @ %40 [ %5B ] %5D ^ %5E ` %60 { %7B | %7C } %7D" repeat with obj in (paragraphs of keyword) set obj to obj as string set key1 to character 1 of obj set key2 to text 3 thru -1 of obj if aText contains key1 then set aText to my setDelimiter(aText, key1, key2) end if end repeat return aText end keywordDelimiter
on setDelimiter(textItem, oldText, newText) set textItem to textItem as string set lastDelimit to AppleScript's text item delimiters set AppleScript's text item delimiters to oldText set obj to every text item of textItem set AppleScript's text item delimiters to newText set textItem to obj as string set AppleScript's text item delimiters to lastDelimit return textItem end setDelimiter
on windowShouldClose:sender set closeFlg to true end windowShouldClose:
on closeWin:aWindow aWindow's orderOut:me if currentAppName ≠ "Script Editor" then quit me end closeWin:
on quit continue quit end quit
|
書籍販売

『ApplescriptBasicMagazine Vol1』(販売中)
時計を作ることから理解するオブジェクトプログラミング編です。

 『ApplescriptBasicMagazine Vol2』
フォトショップの操作を自動化してみよう!編です。
販売サイト


