コードだけでNSTableViewを作る(1) [AppleScript辞書はつくれるか?]
TableViewの基本的な表示のさせ方をご紹介します。
TableViewの基本的な表示のさせ方をご紹介します。
初期で用意されたウインドウを使用する以外はインターフェースビルダーの情報は使いません。
(というか、何もないところからウインドウを用意するのは、まだ面倒なので)
TableViewの構造から行きますが、
ウインドウの上に直接に表示するというものではなく、いろいろと積み重ねてテーブルビューというオブジェクトが構成されています。
テーブルビューには、1列か複数列の左から右へ並んでいく『コラム』で構成した内容に、下方向に情報が増えていく行の情報を、全ての列(コラム)で同期して表示させいくものです。(なんか余計ややこしいな)
それを画面に収まらない時用にスクロールビュー(上下または左右に移動できるビュー)の上に配置します。
そのスクロールビューを、ウインドウのコンテンツビューに貼り付ければ、テーブルビューは完成しますので、あとはそこにデータベースとしての情報を表示させるだけです。
上で書いた通り、テーブルビューには色々なオブジェクトが重なって初めて機能しています。
コードを順に書いていきましょう。
1)コラム(NSTableColumn)を用意する。(今回は2つ)
|
set aColumn1 to current application's class "NSTableColumn"'s alloc()'s ¬ initWithIdentifier_("data1") tell aColumn1 headerCell()'s setTitle_("タイトル 1") end tell
set aColumn2 to current application's class "NSTableColumn"'s alloc()'s ¬ initWithIdentifier_("data2") tell aColumn2 headerCell()'s setTitle_("タイトル 2") end tell |
2)テーブルビュー(NSTableView)を用意して2つのコラムを貼り付ける。
|
set aTableView to current application's class "NSTableView"'s alloc()'s ¬ initWithFrame_(current application's NSMakeRect(0, 0, w, h)) tell aTableView addTableColumn_(aColumn1) addTableColumn_(aColumn2) setDelegate_(me) setDataSource_(me) setBackgroundColor_(current application's class "NSColor"'s whiteColor) end tell |
3)スクロールビュー(NSScrollView)を用意してテーブルビューを貼り付ける
|
set aScroll to current application's class "NSScrollView"'s alloc()'s ¬ initWithFrame_(current application's NSMakeRect(x,y,w,h)) aScroll's setDocumentView_(aTableView) |
4)ウインドウ(NSWindow)のコンテンツビュー(NSView)にスクロールビューを貼り付ける。
|
set mainView to theWindow's contentView()
mainView's addSubview_(aScroll)
|
5)データベースを用意する。
|
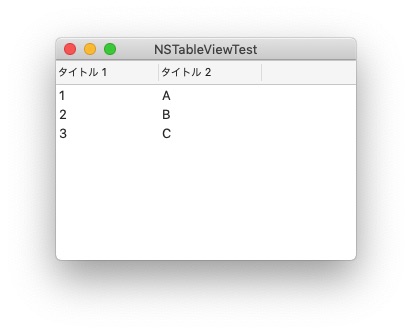
set sourceList to {{data1:1,data2:"A"},{data1:2,data2:"B"},{data1:3,data2:"C"}} set theDataSource to current application's class "NSMutableArray"'s alloc()'s init()
theDataSource's addObjectsFromArray_(sourceList) |
6)データベースの行数を取得してテーブルビューに教える。
|
on numberOfRowsInTableView_(aTableView) set c to count of (my theDataSource) return c end numberOfRowsInTableView_ |
7)データベースのコラムごとの情報をフィルターをかけて選び出し、テーブルビューに教える。
|
on tableView:aTableView objectValueForTableColumn:aColumn row:aRow set aRec to (my theDataSource)'s objectAtIndex_(aRow as number) set aIdentifier to (aColumn's identifier()) as string set aRes to aRec's valueForKey_(aIdentifier) return aRes end tableView:objectValueForTableColumn:row: |
8)テーブルビューが編集されているので最後にリロードして表示を更新する。
|
aTableView's reloadData() |
ここまでが基本となります。
ソース全体をまとめると
|
script AppDelegate property parent : class "NSObject" property theWindow : missing value global mainView property theDataSource : {} global sourceList
on applicationWillFinishLaunching_(aNotification) (* ウインドウの大きさを調整 *) set theSize to current application's NSMakeSize(300,200) tell theWindow setContentSize_(theSize) setMinSize_(theSize) --setMaxSize_(theSize) end tell
(* meinview (content view)の記憶 *) set mainView to theWindow's contentView()
set {x,y,w,h} to {0,0,300,200} set sourceList to {{data1:1,data2:"A"},{data1:2,data2:"B"},{data1:3,data2:"C"}} my makeTableView(x,y,w,h) end applicationWillFinishLaunching_
on makeTableView(x,y,w,h) (* ●●● NSTableView class ●●● *) (* データーソースを用意する *) set theDataSource to current application's class "NSMutableArray"'s alloc()'s init() theDataSource's addObjectsFromArray_(sourceList)
(* コラムデータ(列)を作成 *) set aColumn1 to current application's class "NSTableColumn"'s alloc()'s initWithIdentifier_("data1") tell aColumn1 headerCell()'s setTitle_("タイトル 1") setWidth_(100) end tell set aColumn2 to current application's class "NSTableColumn"'s alloc()'s initWithIdentifier_("data2") tell aColumn2 headerCell()'s setTitle_("タイトル 2") --setWidth_(200) end tell
(* コラムデータをテーブルデータにのせる *) set aTableView to current application's class "NSTableView"'s alloc()'s initWithFrame_(current application's NSMakeRect(0, 0, w, h)) tell aTableView addTableColumn_(aColumn1) addTableColumn_(aColumn2) setDelegate_(me) setDataSource_(me) setBackgroundColor_(current application's class "NSColor"'s whiteColor) end tell
(* スクロールビューにテーブルデータをのせてコンテンツビューに配置 *) set aScroll to current application's class "NSScrollView"'s alloc()'s initWithFrame_(current application's NSMakeRect(x,y,w,h)) aScroll's setDocumentView_(aTableView) mainView's addSubview_(aScroll)
aTableView's reloadData() --|変更されたテーブルの内容で再表示| end makeTableView
(* TableViewの表示行数処理(必須) *) on numberOfRowsInTableView_(aTableView) set c to count of (my theDataSource) return c end numberOfRowsInTableView_
(* TableViewデータの処理(必須) *) on tableView:aTableView objectValueForTableColumn:aColumn row:aRow set aRec to (my theDataSource)'s objectAtIndex_(aRow as number) set aIdentifier to (aColumn's identifier()) as string set aRes to aRec's valueForKey_(aIdentifier) return aRes end tableView:objectValueForTableColumn:row:
on applicationShouldTerminate_(sender) -- Insert code here to do any housekeeping before your application quits return current application's NSTerminateNow end applicationShouldTerminate_
end script |
となります。
今回はここまで。
『AppleScriptの穴』様を参考にさせていただきました。
書籍販売
Applescriptの同人誌です。

『ApplescriptBasicMagazine Vol1』(販売中)
時計を作ることから理解するオブジェクトプログラミング編です。

 『ApplescriptBasicMagazine Vol2』
フォトショップの操作を自動化してみよう!編です。
販売サイト

『ApplescriptBasicMagazine Vol1』(販売中)
時計を作ることから理解するオブジェクトプログラミング編です。
『ApplescriptBasicMagazine Vol2』フォトショップの操作を自動化してみよう!編です。
販売サイト


コメント 0