スクリプトエディタから新規NSWindowを作る [AppleScript辞書はつくれるか?]
XcodeでNSWindowを操作するのは簡単なのですが、スクリプトエディターから新しいNSWindowを作るのは、なかなか理解できませんでした。
自力で解決するのは諦め、『AppleScriptの穴』さんの情報から、なんとかして解読して作ってみました。
参考:http://piyocast.com/as/ (NSWindowタグ)
[目的]
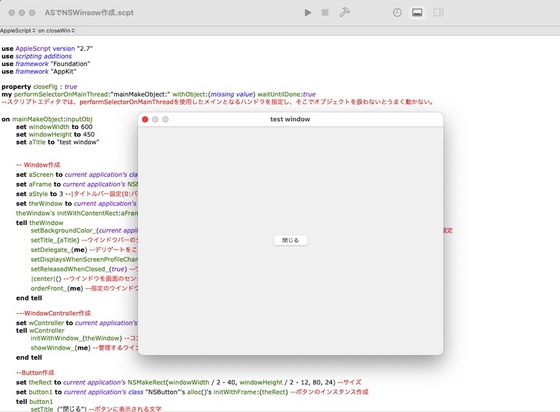
(1) 新しくNSWindowを作る。
(2) その中心に『閉じる』ボタンを作る。
(3) ボタンがクリックされるか、ウインドウを閉じたら終了する。
そして、四苦八苦しながらも作ったのがこれ、
|
use AppleScript version "2.7" use scripting additions use framework "Foundation" use framework "AppKit"
global closeFlg set closeFlg to true
my performSelectorOnMainThread:"mainMakeObject:" withObject:(missing value) waitUntilDone:true --スクリプトエディタでは、performSelectorOnMainThreadを使用したメインとなるハンドラを指定し、 --そこでオブジェクトを扱わないとうまく動かない。
on mainMakeObject:inputObj -- Window作成 set windowWidth to 600 set windowHeight to 450 set aTitle to "test window"
set aScreen to current application's class "NSScreen"'s mainScreen() --ウインドウを表示する画面(メインのデスクトップ)の取得 set aFrame to current application's NSMakeRect(0, 0, windowWidth, windowHeight) --ウインドウサイズ set aStyle to 3 --|タイトルバー設定(0:バー無 1:バー有 _ +2:クローズON +4:ミニマムON +8:リサイズON)| set theWindow to current application's class "NSWindow"'s alloc() --ウインドウのインスタンス作成 theWindow's initWithContentRect:aFrame styleMask:aStyle backing:false defer:false screen:aScreen --ウインドウの形状設定 tell theWindow setBackgroundColor_(current application's class "NSColor"'s colorWithCalibratedRed:0.95 green:0.95 blue:0.95 alpha:1.0) --地の色の設定 setTitle_(aTitle) --ウインドウバーのタイトルを設定 setDelegate_(me) --デリゲートをこのAppで設定 setDisplaysWhenScreenProfileChanges_(true) --スクリーンプロファイルが変更されたときウインドウの内容をアップデートする setReleasedWhenClosed_(true) --ウインドウを閉じたときにメモリを解放する |center|() --ウインドウを画面のセンターに設定(ちょい上になるけど) orderFront_(me) --指定のウインドウを最前面にする(これがないと表示されない場合がある) end tell
---WindowController作成 set wController to current application's class "NSWindowController"'s alloc() tell wController initWithWindow_(theWindow) --コントロールするウインドウの初期化 showWindow_(me) --管理するウインドウ end tell
--Button作成 set theRect to current application's NSMakeRect(windowWidth / 2 - 40, windowHeight / 2 - 12, 80, 24) --サイズ set button1 to current application's class "NSButton"'s alloc()'s initWithFrame:(theRect) --ボタンのインスタンス作成 tell button1 setTitle_("閉じる") --ボタンに表示される文字 setBezelStyle_(1) --ボタンの形状 setTarget_(me) --ボタンのアクションを受ける対象(ここのスクリプト) setAction_("clickAction:") --アクションが発生先のハンドラ end tell theWindow's contentView()'s addSubview:button1 --ウインドウのビュー(コンテンツビュー)の上にボタンを貼り付ける
repeat (*ウインドウが閉じた後に発生*) if (theWindow's isVisible()) = false then --ウインドウが表示されていなかったら... log "Exit 1" exit repeat --ループから出る --quit me end if (* オブジェクトからクローズアクションが発生した場合 *) if closeFlg = false then --閉じるフラグが立っていたら... log "Exit 2" exit repeat --quit me end if delay 0.01 --0.01秒待つ end repeat
my closeWin:theWindow --クローズハンドラの実行 end mainMakeObject:
--クリックアクション on clickAction:aSender set closeFlg to false end clickAction:
--ウインドウを閉じる on closeWin:aWindow log "close" aWindow's |close|() end closeWin: |
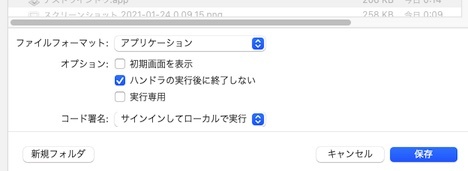
アプリケーション型で保存する場合は、2箇所の"exit repeat"を"quit me"に変更し、"ハンドラの実行後に終了しない"にチェックを入れて保存。
あとはこれをベースにオブジェクトを配置していけば夢が広がりそうです。


 『ApplescriptBasicMagazine Vol2』


コメント 0