PDF書類の寸法が知りたい [AppleScript辞書はつくれるか?]
PDF書類のドキュメントの寸法を取得するのに、以前はImage Eventsのdimensionsを使えば得られていたのだが、
いつからか求められる数値が 無かったり、{0, 0} で返ってくるようになっていた。
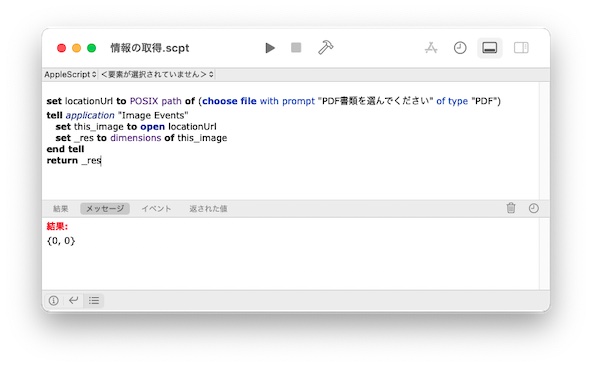
しかし、dimensions は読めなくなったが、resolutionは問題なく読めているところが不思議なところ。
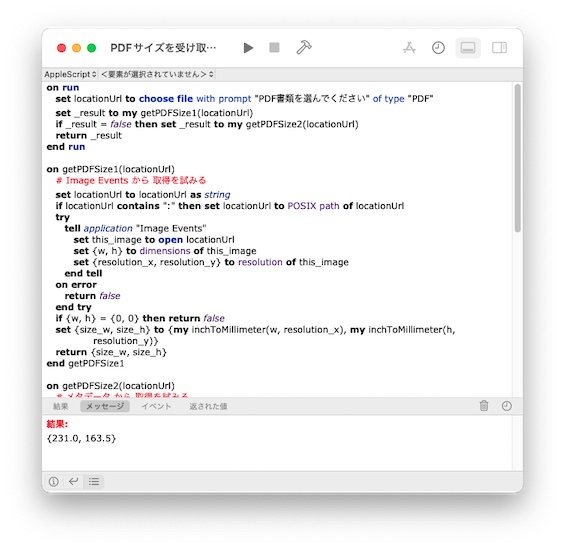
イメージイベントで取得できないなら、書類のメタデータから取得する方法をとってみた。
|
on run set locationUrl to choose file with prompt "PDF書類を選んでください" of type "PDF" set _result to my getPDFSize1(locationUrl) if _result = false then set _result to my getPDFSize2(locationUrl) return _result end run
on getPDFSize1(locationUrl) # Image Events から 取得を試みる set locationUrl to locationUrl as string if locationUrl contains ":" then set locationUrl to POSIX path of locationUrl try tell application "Image Events" set this_image to open locationUrl set {w, h} to dimensions of this_image set {resolution_x, resolution_y} to resolution of this_image end tell on error return false end try if {w, h} = {0, 0} then return false set {size_w, size_h} to ¬ {my inchToMillimeter(w, resolution_x), my inchToMillimeter(h, resolution_y)} return {size_w, size_h} end getPDFSize1
on getPDFSize2(locationUrl) # メタデータ から 取得を試みる set locationUrl to locationUrl as string if locationUrl contains ":" then set locationUrl to POSIX path of locationUrl try set {dot_w, dot_h} to words of (do shell script "w=`mdls '" & locationUrl & "' | grep -e PageWidth | cut -d '=' -f2` ; h=`mdls '" & locationUrl & "' | grep -e PageHeight | cut -d '=' -f2` ; echo $w','$h ;") on error return false end try set {w, h} to {dot_w as real, dot_h as real} tell application "Image Events" set this_image to open locationUrl set {resolution_x, resolution_y} to resolution of this_image end tell set {size_w, size_h} to ¬ {my inchToMillimeter(w, resolution_x), my inchToMillimeter(h, resolution_y)} return {size_w, size_h} end getPDFSize2
on inchToMillimeter(_inch, _resolution) # インチからミリメートルに変換 set _meter to (((_inch / _resolution) as inches) as meters) as real --解像度を計算したインチ表記の数字をメートル表記に計算 set _millimeter to (round (_meter * 10000) rounding as taught in school) / 10.0 -- メートル単位からミリメートル単位に計算し直してから、小数点1桁未満は四捨五入 return _millimeter end inchToMillimeter |
最初にとりあえずgetPDFSize1ハンドラで普通にイメージイベントで取得を試みる。
それで取得できなかった場合に、getPDFSize2ハンドラでメタデータを取得する方法をしてみる。
イメージイベントでもメタデータから取得した方法でも寸法がインチ法になってるので、
inchToMillimeterハンドラで、メートル法のミリ単位にに変換している。
今回取得したメタデータがこちら
|
|
_kMDItemDisplayNameWithExtensions = \"試験用.pdf\" kMDItemAuthors = ( \"OutlinePDF-Advance 2.10\" ) : : kMDItemFSName = \"試験用.pdf\" kMDItemFSNodeCount = (null) kMDItemFSOwnerGroupID = 20 kMDItemFSOwnerUserID = 501 kMDItemFSSize = 4746763 kMDItemFSTypeCode = \"TEXT\" kMDItemInterestingDate_Ranking = 2023-08-25 00:00:00 +0000 kMDItemKind = \"PDF書類\" kMDItemLastUsedDate = 2023-08-25 00:52:51 +0000 kMDItemLastUsedDate_Ranking = 2023-08-25 00:00:00 +0000 kMDItemLogicalSize = 4746763 kMDItemNumberOfPages = 1 kMDItemPageHeight = 463.464 kMDItemPageWidth = 654.802001953125 kMDItemPhysicalSize = 4747264 kMDItemSecurityMethod = \"None\" kMDItemUseCount = 2 kMDItemUsedDates = ( \"2023-08-24 15:00:00 +0000\" ) kMDItemVersion = \"1.6\" |
このデータの中から、幅と高さの部分を取得している。

書類がインチ法で、取得したい値がメートル法だという環境を前提にしているので、
他の地域では困ってしまうかもという余計な心配もしてしまっています。
入力モード切り替えをしてみる [AppleScript辞書はつくれるか?]
ちょうど一年前に作った、入力モード切り替えの改良をしてみた。
> https://start-mac.blog.ss-blog.jp/2022-08-23
改良というか考え直してみただけなのですが。
日本語入力モードに変更したり英語入力モードに切り替えたりできるものを作ってみた。
|
|
set aButton to button returned of (display dialog "入力モードを選んでください" buttons {"日本語", "英語", "キャンセル"})
tell application "System Events" if aButton = "日本語" then key code 104 --日本語入力へ else if aButton = "英語" then key code 102 --英語入力へ end if end tell
delay 0.5 --若干の遅延の発生を吸収
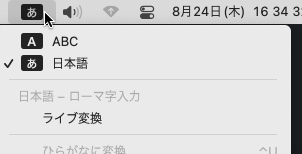
(* 入力モードの確認 *) tell application "System Events" tell process "TextInputMenuAgent" set inputMenuMode to description of menu bar item 1 of menu bar 2 --入力メニューの状態を取得 end tell end tell
inputMenuMode # 日本語になっていれば「日本語」(または「かな」) # 英語になっていれば「ABC」などを返してくる |
以前はキーコードの使用を拒絶していましたが、使っても良さそうなので使ってみました。
RGB値からCMYK値を計算してみる。 [AppleScript辞書はつくれるか?]
|
Apple Script |
|
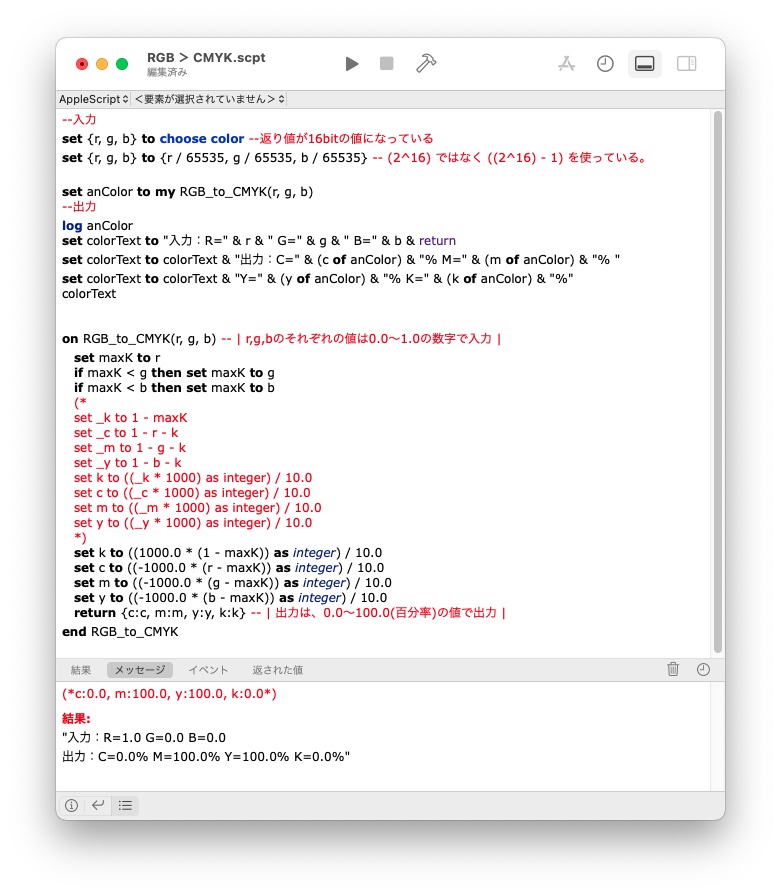
--入力 set {r, g, b} to choose color --返り値が16bitの値になっている set {r, g, b} to {r / 65535, g / 65535, b / 65535} -- (2^16) ではなく ((2^16) - 1) を使っている。
set anColor to my RGB_to_CMYK(r, g, b) --出力 log anColor set colorText to "入力:R=" & r & " G=" & g & " B=" & b & return set colorText to colorText & "出力:C=" & (c of anColor) & "% M=" & (m of anColor) & "% " set colorText to colorText & "Y=" & (y of anColor) & "% K=" & (k of anColor) & "%" colorText
on RGB_to_CMYK(r, g, b) -- | r,g,bのそれぞれの値は0.0~1.0の数字で入力 | set maxK to r if maxK < g then set maxK to g if maxK < b then set maxK to b (* set _k to 1 - maxK set _c to 1 - r - k set _m to 1 - g - k set _y to 1 - b - k set k to ((_k * 1000) as integer) / 10.0 set c to ((_c * 1000) as integer) / 10.0 set m to ((_m * 1000) as integer) / 10.0 set y to ((_y * 1000) as integer) / 10.0 *) set k to ((1000.0 * (1 - maxK)) as integer) / 10.0 set c to ((-1000.0 * (r - maxK)) as integer) / 10.0 set m to ((-1000.0 * (g - maxK)) as integer) / 10.0 set y to ((-1000.0 * (b - maxK)) as integer) / 10.0 return {c:c, m:m, y:y, k:k} -- | 出力は、0.0~100.0(百分率)の値で出力 | end RGB_to_CMYK |
しかし、カラープロファイルを反映していない理論値なので、CMYKで表現できない色なんかは物凄い濁った色の数値になっている。
参考:https://tomari.org/main/java/color/ccal.html
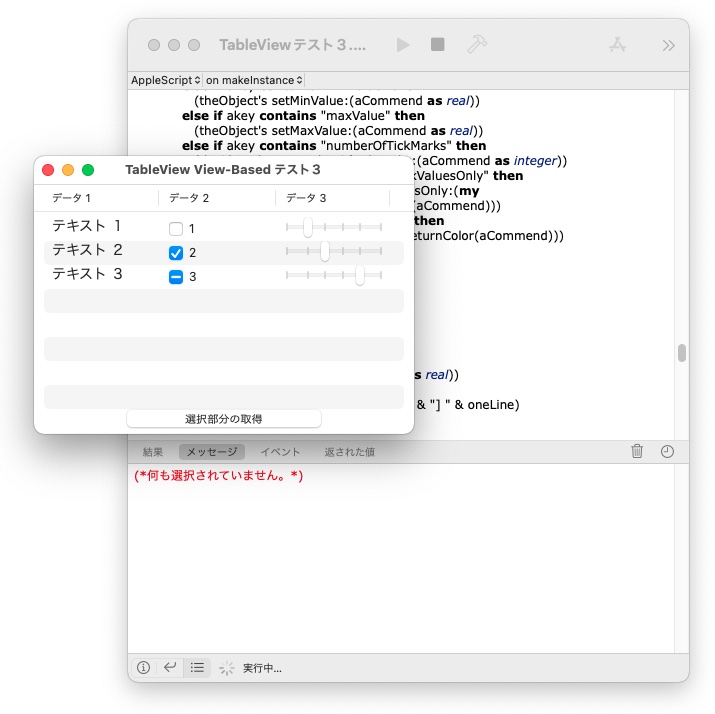
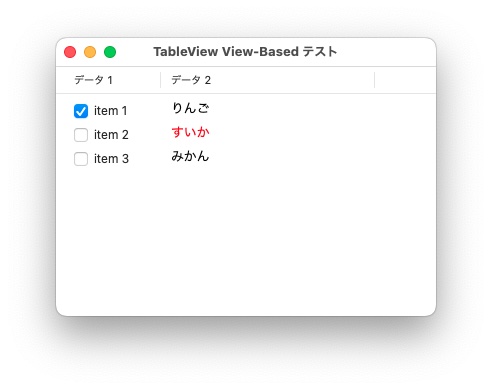
NSTableView View-Basedをコードで作りたい (3) [AppleScript辞書はつくれるか?]
TableView内のデータを読み取る。
列から取得する方法
set obj1 to item |行| of (theDataSource's |列|)
行から取得する方法
set obj1 to |列| of item |行| of theDataSource
2つあるけどどちらが便利なのだろう?
まぁ、列から取ってみる方法でやってみる。
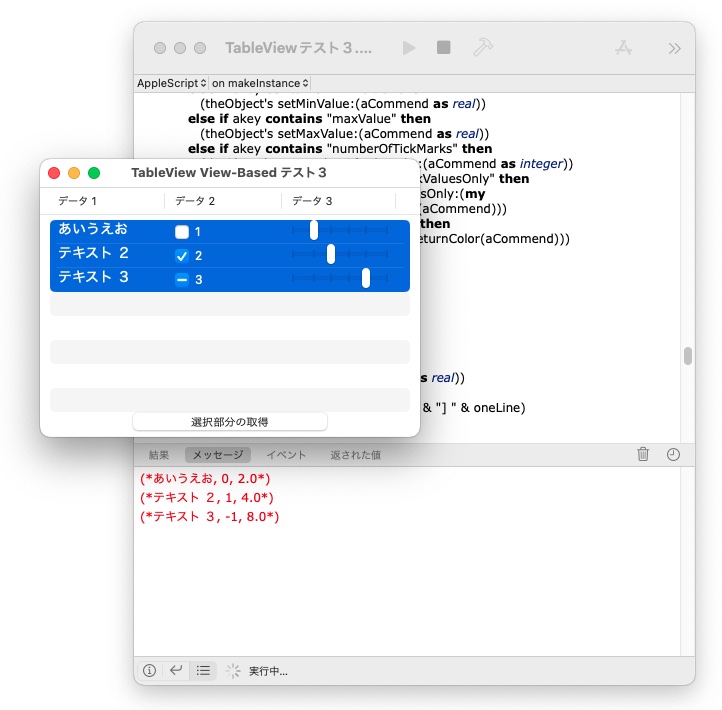
setAllowsMultipleSelection_(true)
で複数行の選択を可能にし
set aList to {}
set firstNo to theSelection's firstIndex()
set nextIndex to firstNo
repeat selectionCount times
set data3 to theSelection's indexGreaterThanOrEqualToIndex:nextIndex
set aList to aList & {data3}
set nextIndex to data3 + 1
end repeat
で、選択された行のインデックスを取得
repeat with _lineNo in aList
set rowNo to _lineNo + 1
set obj1 to item rowNo of (theDataSource's data1)
set obj2 to item rowNo of (theDataSource's data2)
set obj3 to item rowNo of (theDataSource's data3)
set ans1 to (obj1's stringValue()) as text
set ans2 to obj2's state()
set ans3 to (obj3's value()) as real
log {ans1, ans2, ans3}
end repeat
で、それぞれの値を表示させている。
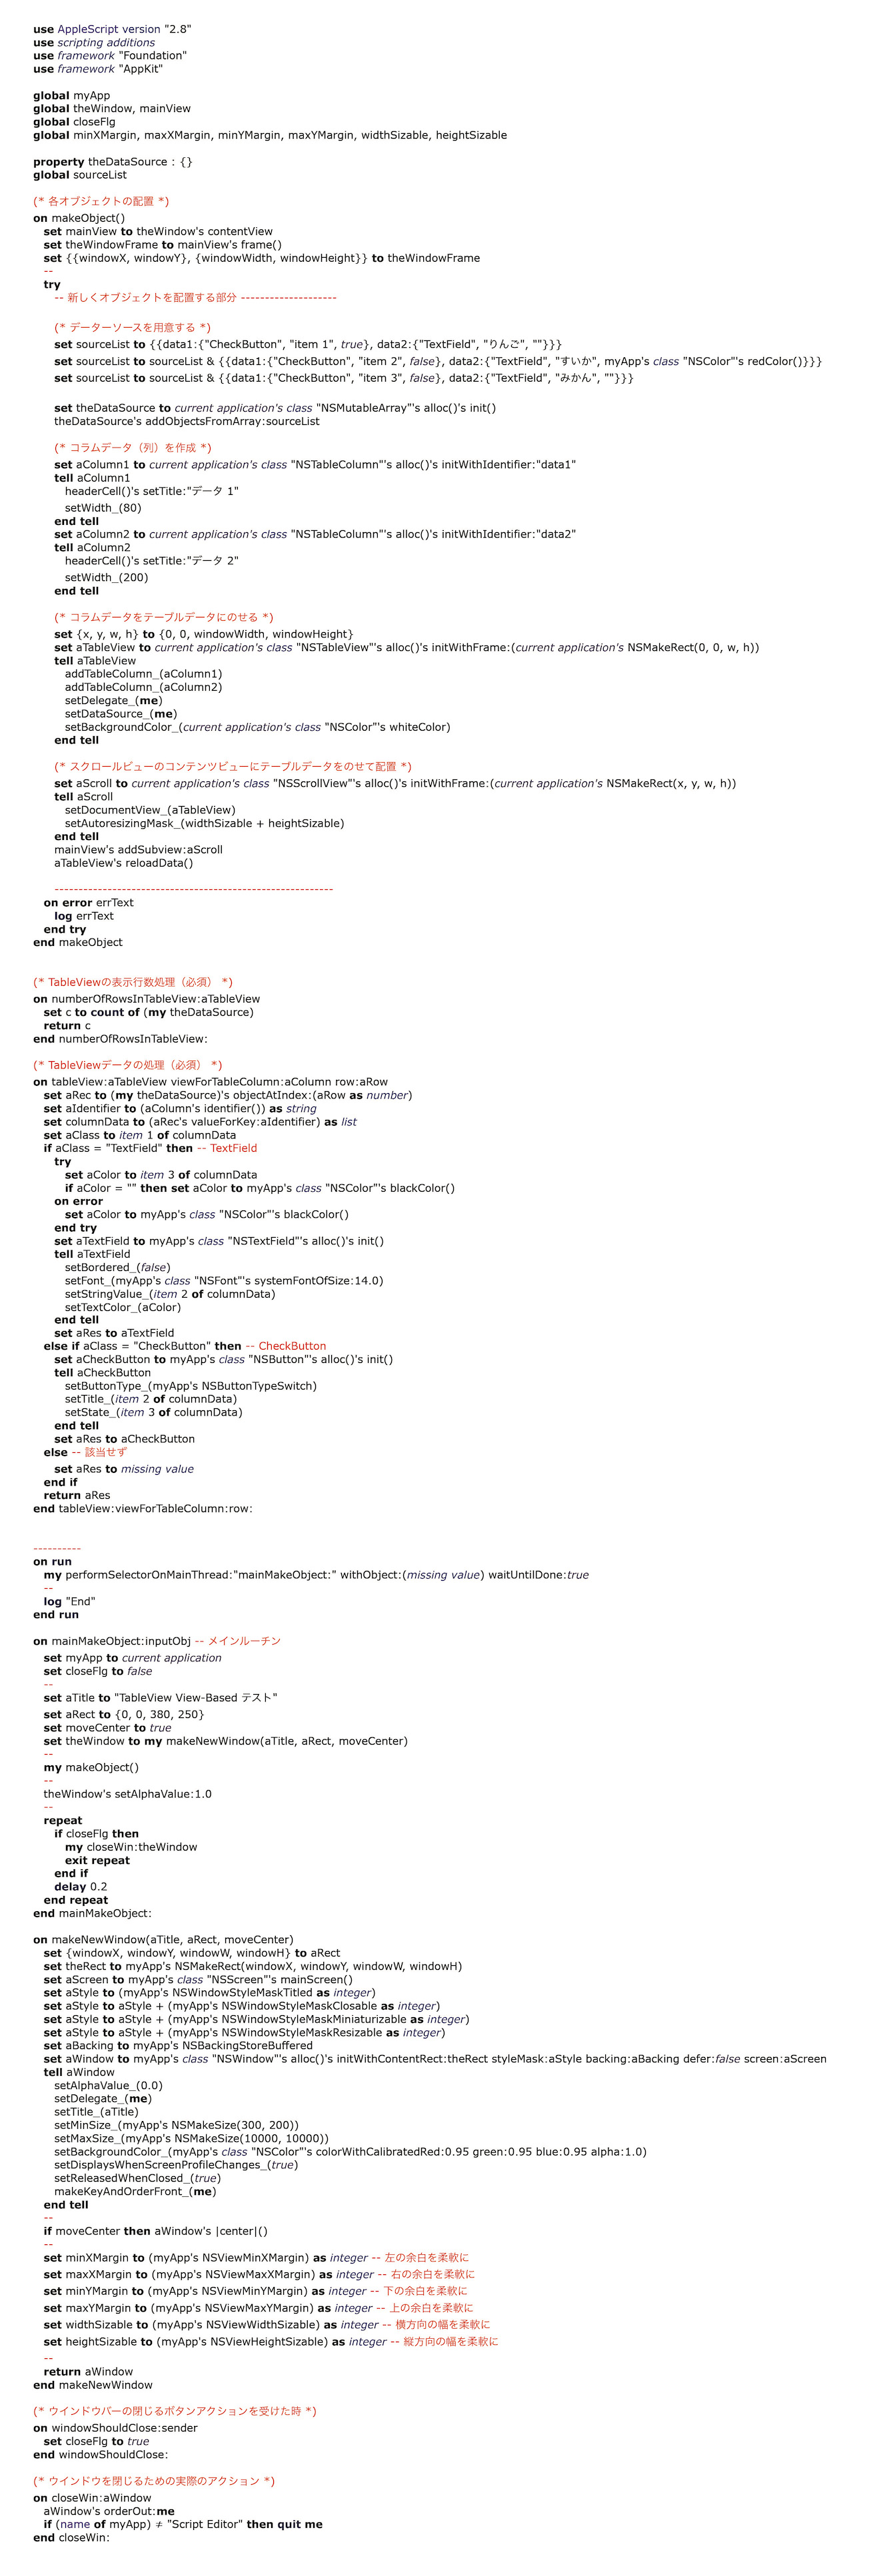
で、今回の全体のソースは『こちら』。
追加分: 
NSTableView View-Basedをコードで作りたい (2) [AppleScript辞書はつくれるか?]
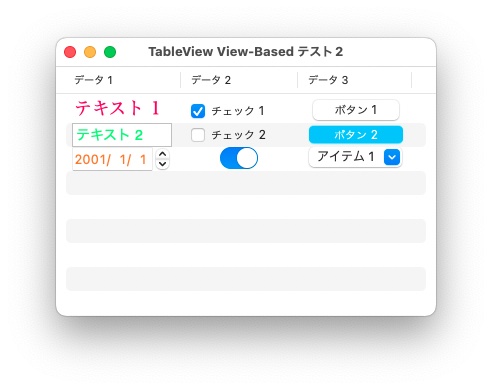
on tableView:aTableView viewForTableColumn:aColumn row:aRow
~
end tableView:viewForTableColumn:row:
前回は上記の中に色々と入れていましたが、ここはシンプルにしていた方が良いみたいなので、改良します。
いろいろなサイトでは、ここで振り分けをしているのが多かったが、多様性が失われてしまうように思えました。
別なやり方として、データソースに直接オブジェクトをぶっ込んでしまいのが良いかと思ったのですが、
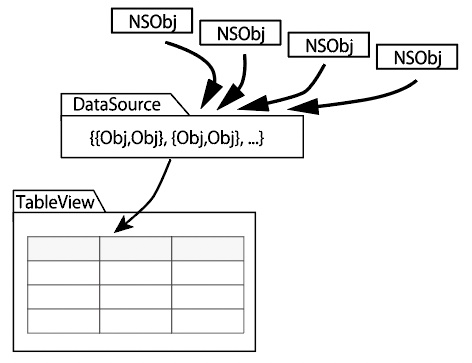
それぞれのコードが見にくくなるし、どこをいじっているのかわからず、扱い辛くなる気がします。
ですので、簡単なレシピ(設計図)から、オブジェクトを作り貼り付けていく方法でいきたいと思います。
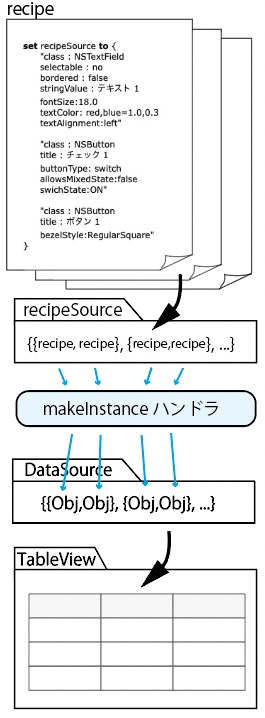
レシピは、クラスと必要最低限の要素を必要な分だけ書けば良いようにしてみた。
NSTableView View-Basedをコードで作りたい (1) [AppleScript辞書はつくれるか?]
FontBookを使わず、使用可能なフォントのリストを取得したい [AppleScript辞書はつくれるか?]
先日の使用できるフォントを取得したい件の続きとなりますが、
Font Bookを使わずにフォントを知るには、やっぱりシステムプロファイラーでしょうか?
|
|
do shell script "system_profiler SPFontsDataType ;" |
で、システムがらみのフォントのみの情報を取得します。しかし、結果は
|
|
Fonts:
Times New Roman Bold.ttf:
Kind: TrueType Valid: Yes Enabled: Yes Location: /System/Library/Fonts/Supplemental/Times New Roman Bold.ttf Typefaces: TimesNewRomanPS-BoldMT: Full Name: Times New Roman Bold Family: Times New Roman Style: ボールド Version: Version 5.01.4x Vendor: The Monotype Corporation Unique Name: Monotype:Times New Roman Bold:Version 5.01 (Microsoft) Designer: Monotype Type Drawing Office - Stanley Morison, Victor Lardent 1932 Copyright: (c) 2006 The Monotype Corporation. All Rights Reserved. Trademark: Times New Roman is a trademark of The Monotype Corporation in the United States and/or other countries. Outline: Yes Valid: Yes Enabled: Yes Duplicate: No Copy Protected: No Embeddable: Yes ・ ・ |
と、フォントの雑多な情報が詳細に入手できます。(雑多?詳細?)
しかし、この中で欲しい情報は、ポストスクリプト名とディスプレイでの表記名(Full Name)の二つ。
そして、使用できるかの判断コード(Enabled)くらいでしょうか
シェルスクリプトを使っているのだから、grepを使えば速そうなのだが、このままではポストスクリプト名の取得が難しい。
他の項目は(Full Name:)とか(Style:)や(Enabled:)といった項目名を抜き出してくれば良いのだが、ポストスクリプト名だけは、なぜか項目名が無い。
どうしよう?
これは幸いにも、ポスウトスクリプト名の一行前には必ず "Typefaces:" という文字が入っているので、それを利用しよう。
|
|
do shell script "system_profiler SPFontsDataType | grep -A2 -e 'Typefaces:' ;" |
|
|
Typefaces: TimesNewRomanPS-BoldMT: Full Name: Times New Roman Bold -- Typefaces: WeibeiSC-Bold: Full Name: Weibei SC Bold -- Typefaces: BMYEONSUNG-OTF: Full Name: BM YEONSUNG OTF -- Typefaces: AppleBraille-Pinpoint8Dot: Full Name: Apple Braille Pinpoint 8 Dot -- ・ ・ ・ |
ついでに、使用可判断コードも追加。
|
|
do shell script "system_profiler SPFontsDataType | grep -A2 -e 'Typefaces:' -e 'Enabled:' ;" |
|
|
Enabled: Yes Location: /System/Library/Fonts/Supplemental/Times New Roman Bold.ttf Typefaces: TimesNewRomanPS-BoldMT: Full Name: Times New Roman Bold -- Enabled: Yes Duplicate: No Copy Protected: No -- ・ ・ ・ |
と思ったらこれは失敗だ。
Typefaces:の行から辿って情報を取得することにしよう。
|
|
do shell script "system_profiler SPFontsDataType | grep -A2 -e 'Typefaces:' -e 'Enabled:' | grep -B4 -e 'Enabled: Yes' | grep -A4 -e 'Typefaces:' | grep -e ':' | grep -B2 -e 'Enabled:' | grep -v 'Enabled:' | cut -c9- ;" |
|
|
TimesNewRomanPS-BoldMT: Full Name: Times New Roman Bold
WeibeiSC-Bold: Full Name: Weibei SC Bold
BMYEONSUNG-OTF: Full Name: BM YEONSUNG OTF
AppleBraille-Pinpoint8Dot: Full Name: Apple Braille Pinpoint 8 Dot
Georgia-Bold: Full Name: Georgia Bold ・ ・ |
なんとかできたけど、なんかすごく格好の悪いものになってしまった。
同じテキストで辿って、切り捨てて・・・
Enabled: Yesの使用可能フォントの部分だけ抜き出してはいるはず。
もっと整理できたらしてみたい。
なんだと!?FontBookがApplescript対象外だと? [AppleScript辞書はつくれるか?]
MacOS12の頃には動いていたFontBook用のスクリプトが、MacOS13で認識しない。
|
MacOS 12 |
|
tell application "Font Book" tell every typeface set displayNames to displayed name set postScriptNames to PostScript name set styleNames to style name set enableds to enabled end tell end tell |
と使えていたはずなのだが、
|
MacOS 13 |
|
tell application "Font Book" tell every «class fbfc» set displayNames to displayed name set postScriptNames to «class fbps» set styleNames to «class fbsn» set enableds to «class fben» end tell end tell |
コードが扱いづらい形式に変化した上、実行不可能に。
スクリプトの用語が変更されたのかと、用語説明を見にいくと...

Font Bookが使いたいわけではなく、Font Bookを介して、使えるフォント使えないフォントを見分けたいと思ってただけなのに。
方法がないわけではないんど面倒くさいことになりそう。
そろそろ他のアプリケーションもスクリプトに対応していなくなってるのかな?
多重階層のフォルダ作成したかっただけなのに [AppleScript辞書はつくれるか?]
先日のプログラムコードの中での、新規フォルダを作る部分ですが
|
|
set cd to "$HOME/Library/Developer" try do shell script ("cd " & cd & " ; ls 'Xcode' ;") on error do shell script ("cd " & cd & " ; mkdir -m +w -p Xcode ;") with administrator privileges end try set cd to cd & "/Xcode" repeat with obj in {"Templates", "MacOS", "UserTemplates"} try do shell script ("cd " & cd & " ; ls " & obj & " ;") on error do shell script ("cd " & cd & " ; mkdir -m +w -p " & obj & " ;") end try set cd to cd & "/" & obj end repeat |
と、書いたのですが
|
|
do shell script ("mkdir -m +w -p ~/Library/Developer/Templates/MacOS/UserTemplates ;") ¬ with administrator privileges |
の1行で済むんだと気づいた時の悲しさ...。
フォルダを何階層も作る場合には、その度に繰り返して作らなければいけないと勘違いしてました。
mkdir -m +w -p の -pというオプションは2階層までしか作れないと勘違いして、3階層作るかもしれないと
思っていましたら、ちゃんと足りない階層は自動で全部補ってくれるということに改めて気づきましたね。
ためしに、
|
|
do shell script ("mkdir -m +w -p ~/Downloads/test1/test2/test3/test4/test5 ;") |
とやると、
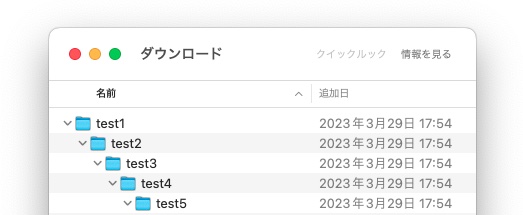
ちゃんとできてる。
しかし、なぜAppleScriptにある"make new folder"を使わず、shellスクリプトを使用したかというと、
パーミッション設定を一度にできるので、手っ取り早かったからですね。
『-m +w』これを加えるだけで書き込み可能に設定できるから便利。
XcodeにApplescriptテンプレートを入れようシリーズ [AppleScript辞書はつくれるか?]
先日の記事(2023-03-27)にコメントをいただきまして、
アプリケーション内のテンプレートフォルダに直接入れるのではなく、ユーザーライブラリーに入れるのが、
最良ではないかということでしたので、考察してみました。
(参考サイト:http://piyocast.com/as/archives/15582)
・アプリケーション側に入れる方法
『/Applications/Xcode.app/Contents/Developer/Library/Xcode/Templates/Project Templates/macOS/Other/』
このフォルダに入れると、アプリケーションを入れ直した際に元に戻ってしまうので、毎回入れ直さなければ
いけませんでした。(頻繁にバージョンアップしてるようですし)
・コメントでいただいた、ユーザーライブラリーに入れる方法
『(ユーザー)/Library/Developer/Xcode/』
このフォルダに入れると、ユーザーが変更されたり作り直しでもしない限りは、Xcodeがバージョンアップされても
反映されるようです。
ということで、反映するためのスクリプトを作ってみることにしました。
|
|
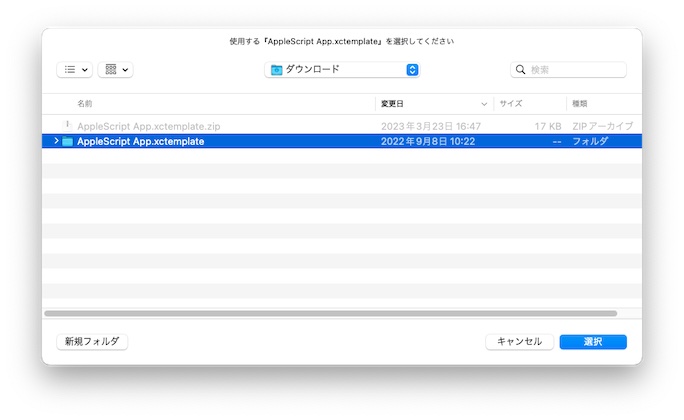
(* コピー元のアイテムを取得 *) set add to "" try set ans to choose folder with prompt "使用する『AppleScript App.xctemplate』を選択してください" default location (path to (downloads folder)) if ans ≠ false then set add to ans as text end try if add = "" then display alert "中止しました" message "ユーザーによってキャンセルされました" as critical return "中止しました" end if tell application "Finder" to set aName to name of folder add if aName ≠ "AppleScript App.xctemplate" then display alert "対象外のアイテムが選ばれました" message "もう一度、正しいファイルを選択してください" as critical return "対象外のアイテムが選ばれました" end if
(* コピー先の選択 *) set theList to {"システム・・・(全ユーザーに有効です)", "ユーザー・・・(現在のユーザーのみに適用します)", "Xcode.app・・・(現在のバージョンのみに適用します)"} set ans to choose from list theList if ans = false then display alert "中止しました" message "ユーザーによってキャンセルされました" as critical return "中止しました" end if set ans to ans as string
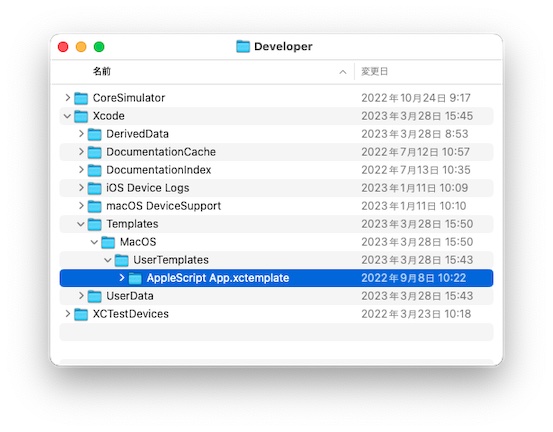
(* コピー先へアイテムを複製:保存先のフォルダも無ければ作成 *) if (character 1 of ans) = "シ" then --●●●全ユーザー向け●●● -- /Library/Developer/Xcodeフォルダの作成 -- set cd to "/Library/Developer" try do shell script ("cd " & cd & " ; ls 'Xcode' ;") on error do shell script ("cd " & cd & " ; mkdir -m +w -p Xcode ;") with administrator privileges end try -- /Library/Developer/Xcode/Templates/MacOS/UserTemplatesフォルダの作成 -- set cd to cd & "/Xcode" repeat with obj in {"Templates", "MacOS", "UserTemplates"} try do shell script ("cd " & cd & " ; ls " & obj & " ;") on error do shell script ("cd " & cd & " ; mkdir -m +w -p " & obj & " ;") end try set cd to cd & "/" & obj end repeat tell application "Finder" to copy folder add to folder ((cd as POSIX file) as string)
else if (character 1 of ans) = "ユ" then --●●●現在のユーザー向け●●● -- (ユーザー)/Library/Developer/Xcodeフォルダの作成 -- set cd to "$HOME/Library/Developer" try do shell script ("cd " & cd & " ; ls 'Xcode' ;") on error do shell script ("cd " & cd & " ; mkdir -m +w -p Xcode ;") with administrator privileges end try -- (ユーザー)/Library/Developer/Xcode/Templates/MacOS/UserTemplatesフォルダの作成 -- set cd to cd & "/Xcode" repeat with obj in {"Templates", "MacOS", "UserTemplates"} try do shell script ("cd " & cd & " ; ls " & obj & " ;") on error do shell script ("cd " & cd & " ; mkdir -m +w -p " & obj & " ;") end try set cd to cd & "/" & obj end repeat set currentFolder to do shell script ("echo " & cd & " ;") --ホームフォルダの変換 tell application "Finder" to copy folder add to folder ((currentFolder as POSIX file) as string)
else if (character 1 of ans) = "X" then --●●●個別アプリケーション向け●●● -- 全てのアプリケーション情報を取得 -- set systemProfilerList to do shell script "system_profiler SPApplicationsDataType ;" -- 上で取得した中からXcode.appのアドレスを抽出 -- set addressList to {} repeat with oneLine in (paragraphs of systemProfilerList) set oneLine to oneLine as string if oneLine contains "Location:" then if (oneLine ends with "/Xcode.app") or (oneLine ends with "/Xcode-beta.app") then set n to offset in oneLine of ":" set add1 to text (n + 2) thru -1 of oneLine set addressList to addressList & {add1} end if end if end repeat if addressList = {} then return "Xcodeが見つけられませんでした。" -- 選択 -- set ans to choose from list addressList with prompt "対象となるXcodeを選択してください" OK button name "選択" cancel button name "中止" if ans = false then display alert "見つかりませんでした" message "キャンセルされました" as critical return "中止しました" end if -- テンプレートフォルダの作成-- set targetFolder to "" tell application "Finder" set folderAdd to folder (((ans as string) & "/Contents/Developer/Library/Xcode/Templates/Project Templates") as POSIX file as string) set itemList to every folder of folderAdd repeat with aFolder in itemList if (name of aFolder) contains "mac" then activate try select folder "Other:AppleScript App.xctemplate" of aFolder display dialog "すでにテンプレートが存在します" buttons "OK" default button 1 return "すでにテンプレートが存在します" end try set cd to POSIX path of (aFolder as string) try do shell script ("cd \"" & cd & "\" ; ls UserTemplates ;") on error do shell script ("cd \"" & cd & "\" ; mkdir -m +w -p UserTemplates ;") with administrator privileges end try set targetFolder to ((cd & "/UserTemplates") as POSIX file) as string end if end repeat end tell if targetFolder ≠ "" then -- テンプレートフォルダへ複製 -- try tell application "Finder" to copy folder add to folder targetFolder on error errText display alert "続行不能" message errText as critical return "エラーが発生" end try else -- Xcodeがインストールされていないか不明のエラー -- display alert "対象が見つかりませんでした" message "キャンセルされました" as critical return "中止しました" end if end if
activate display dialog "AppleScriptテンプレートの準備ができました。" buttons "Ok" default button 1 "End"
|
※あらかじめAppleScript App.xctemplateは用意しておかなければなりません。
1)テンプレートアイテムを選択
2)コピー先の選択
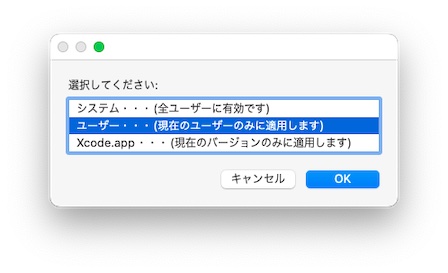
『全ユーザー対象』『現在のユーザーのみ』『現在のアプリケーションのみ』の3つのモードを用意しました。
3)『現在のアプリケーションのみ』を選択した場合のみどのアプリケーションが対象なのかの選択ウインドウが
出ます。
4)新たにテンプレートフォルダを作るので、1度だけユーザー認証のダイアログが出ますので認証してください。
5)準備ができましたのメッセージが出ましたら終了です。
作成されたフォルダー内にテンプレートがコピーされているはずです。
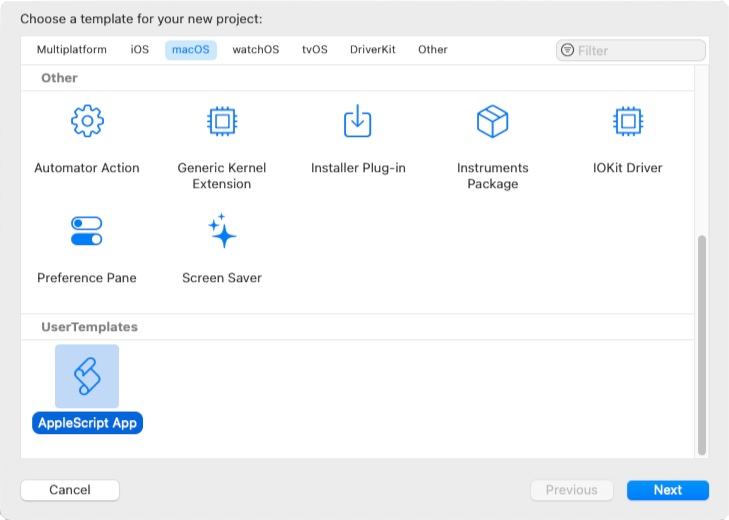
で、Xcodeを起動して新規作成画面でAppleScriptのテンプレートが表示されれば成功ですね。
いや、一度やってしまえばもう使わないだろう?...と思われるでしょうが、スクリプトを組みたいという趣味の部分
ですから、お気になさらず。
書籍販売

『ApplescriptBasicMagazine Vol1』(販売中)
時計を作ることから理解するオブジェクトプログラミング編です。

 『ApplescriptBasicMagazine Vol2』
フォトショップの操作を自動化してみよう!編です。
販売サイト


