Google翻訳を自動化してみる [AppleScript辞書はつくれるか?]
以前にもやっていましたが、自動でGoogle翻訳してテキストを差し替えるスクリプトをやり直してみた。
途中、みっともない部分もありますが、なんとか動いたことは評価してやりたい。

テキストエディタで翻訳したいテキストの部分を選択してから実行すると、Safariが立ち上がりGoogle翻訳が呼び出され翻訳します。その後にテキストが差し代わって終了する。それだけ。
|
(* Main *) -- テキストエディターのチェック set aText to my getText() if aText = false then return "テキストエディターが起動していません" if aText = "" then return "テキストが選ばれていないか、読み込みエラー" log ("元のテキスト ----------" & return & aText) -- Safariチェック set windowID to my SafariCheck() --Safariの準備 if windowID = false then return "Safari Err" -- テキストを翻訳用に最適化 set aText to keywordDelimiter(aText) -- 翻訳本体 set aText to my googleTranslate(windowID, aText) log ("翻訳後のテキスト ----------" & return & aText & return & "--------------------") -- 翻訳結果をテキストエディットに反映 set f to my changeText(aText) return f ----- Main End
on getText() if application "TextEdit" is not running then return false activate application "TextEdit" set aText to "" try tell application "System Events" keystroke "c" using command down delay 0.1 keystroke "c" using command down delay 0.1 end tell set aText to (the clipboard) as text end try return aText end getText
on SafariCheck() if application "Safari" is not running then tell application "Safari" launch repeat 30 times delay 0.2 try get current tab of window 1 exit repeat end try end repeat end tell end if set windowID to false tell application "Safari" repeat with aWindow in windows set aUrl to false try set aUrl to URL of current tab of aWindow on error exit repeat end try if aUrl contains "translate.google" then set windowID to id of aWindow exit repeat end if end repeat if windowID = false then repeat with aWindow in windows set aUrl to false try set aUrl to URL of current tab of aWindow on error exit repeat end try if aUrl contains missing value then set windowID to id of aWindow exit repeat end if end repeat end if if windowID = false then make new document delay 0.2 set windowID to id of window 1 end if delay 0.1 set aUrl to URL of current tab of window id windowID if not (aUrl contains "translate.google") then set URL of current tab of window id windowID to "https://translate.google.co.jp/?hl=ja&sl=en&tl=ja&op=translate" delay 0.5 end if set aUrl to URL of current tab of window id windowID if not (aUrl contains "translate.google") then make new document with properties {URL:"https://translate.google.co.jp"} delay 2.0 set windowID to id of window 1 set aUrl to URL of current tab of window id windowID if not (aUrl contains "translate.google") then return false end if end if end tell return windowID end SafariCheck
on keywordDelimiter(aText) if (aText contains (character id 37)) then -- % set aText to my setDelimiter(aText, (character id 37), "%25") end if if (aText contains (character id 34)) then -- ダブルクオート set aText to my setDelimiter(aText, (character id 34), "%22") end if if (aText contains (character id 92)) then -- バックスラッシュ set aText to my setDelimiter(aText, (character id 92), "%5C") end if if (aText contains (ASCII character 9)) or (aText contains (ASCII character 32)) then -- タブ&空白 set aText to my setDelimiter(aText, {ASCII character 9, ASCII character 32}, "%20") end if set keyword to "! %21 # %23 $ %24 & %26 ' %27 ( %28 ) %29 * %2A + %2B , %2C - %2D . %2E / %2F : %3A ; %3B < %3C = %3D > %3E ? %3F @ %40 [ %5B ] %5D ^ %5E _ %5F ` %60 { %7B | %7C } %7D ~ %7E" repeat with obj in (paragraphs of keyword) set obj to obj as text set key1 to character 1 of obj set key2 to text 3 thru -1 of obj if aText contains key1 then set aText to my setDelimiter(aText, key1, key2) end if end repeat return aText end keywordDelimiter
on setDelimiter(textItem, oldText, newText) set textItem to textItem as text set lastDelimit to AppleScript's text item delimiters set AppleScript's text item delimiters to oldText set obj to every text item of textItem set AppleScript's text item delimiters to newText set textItem to obj as text set AppleScript's text item delimiters to lastDelimit return textItem end setDelimiter
on googleTranslate(windowID, aText) set theData to "" repeat with oneLine in (paragraphs of aText) set oneLine to oneLine as text if oneLine ≠ "" then set aUrl to "https://translate.google.co.jp/?hl=ja&sl=en&tl=ja&text=" & oneLine & "&op=translate" tell application "Safari" set URL of current tab of window id windowID to "https://translate.google.co.jp/" delay 0.2 set aSource to source of current tab of window id windowID set URL of current tab of window id windowID to aUrl set theText to false repeat 20 times delay 0.2 try set aSource2 to source of current tab of window id windowID if aSource2 contains "/html" then if aSource ≠ aSource2 then delay 0.2 set theText to text of current tab of window id windowID if not (theText contains "翻訳を取得しています...") then set c1 to offset in theText of "翻訳結果" if c1 = 0 then set ans to "(Err)" else set ans to (paragraph 2 of (text c1 thru -1 of theText)) as text end if if ans = "翻訳" then set ans to "" --不具合があったので追記 set theData to theData & ans & return exit repeat end if end if end if end try end repeat end tell end if end repeat if (count of paragraphs of theData) > 1 then set theData to text 1 thru -2 of theData return theData end googleTranslate
on changeText(aText) set f to "失敗" if aText ≠ "" then set the clipboard to aText activate application "TextEdit" delay 0.2 try tell application "System Events" keystroke "v" using command down end tell set f to "成功" end try end if return f end changeText |
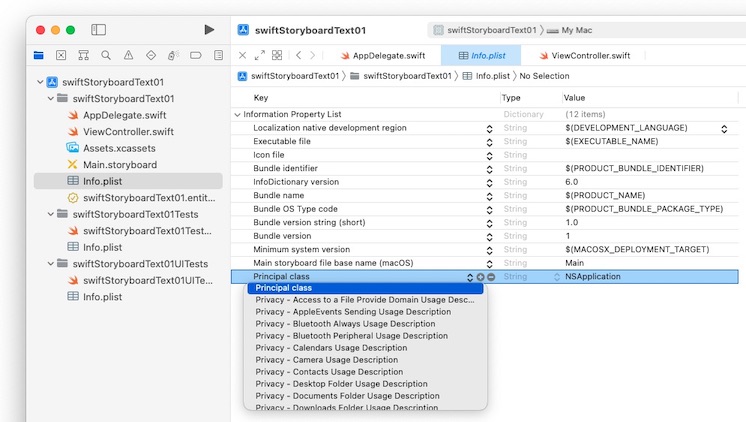
Information Property List (自分用のメモ) [Xcode]

外付けSSDをMacの起動ディスクにしようとしたら苦労した [Mac日記]

うちのMacに『macOS Monterey』を入れてやろうと思ったら、空き容量が足りないと言われてしまったので、新たに外付けのSSD を買って、そこに入れてみようと思った。
Amazonで安いSSDを見つけたのでポチってみた。

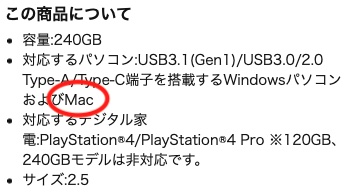
ちゃんとMacにも対応している。
インストールをするためにSSDの初期化をしてみた
『Mac OS拡張(ジャーナリング)』
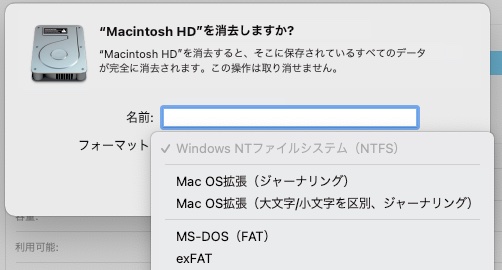
しかし、問題が起きた。
通常初期化のの『消去』では問題なかったが、セキュリティーレベルを上げて「2回消去する」ことにしました。
・・・おそい・・・・・・というか、途中でほぼ止まってる。
あれ? これって先日見た動画の詐欺SSDをつかまされたのか?
動画:https://www.youtube.com/watch?v=0h_cvjRyXYw
要点を掻い摘むと、中国製の安いSSDを買って分解したら、中身からはUSBメモリーが出てきた。
速度が遅いどころか、容量を偽装するチップ改造がされて、容量以上のファイルを入れると、最初に入れたファイルが上書きされて破損する仕組みになっていた。
なんて、そんな嫌な予感が頭をよぎりました。
・・・まさか・・・まさか、あの天下のBUFFALOさんがそんなことしないだろ? と疑心暗鬼。
それでも時間をかなりかけて終了はしてくれた。
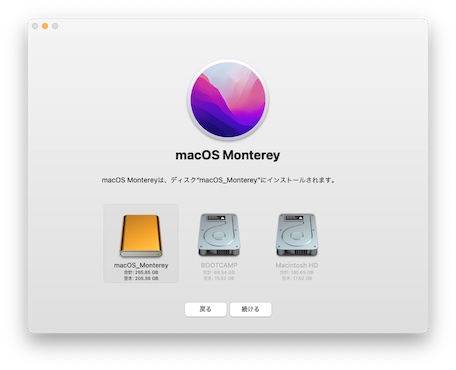
とりあえず一安心をし、 MacOS Montereyのインストーラーを起動して新しくフォーマットしたSSDを選択。
・・・
『このディスクにインストールできません。ジャーナリング形式に初期化したディスクを使ってください』みたいなメッセージが出る。
は?
さっきそれで初期化したはずだよなぁ?
念の為、もう一度初期化してみる。
『このディスクにインストールできません。GUIDパーティーションに対応してください』のようなメッセージがまた出る。
だからやってるよ!
何が悪いんだろう?と考えたら、思い出しました。
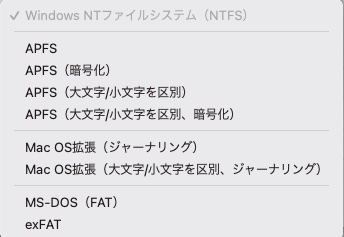
『APFSフォーマット』にしなきゃいけなかったのでは? と思い、もう一度やってみることにした。
・・・あれ? 無いよ?
そんな馬鹿なと思いながらも、いろいろぽちぽちして探してみる。
ありました。
ディスクユーティリティの左のディスク名のところで右クリック。
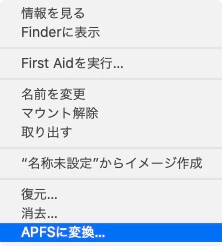
ここかーい!
これを実行したらちゃんと出てきました。
これでようやくインストールが無事終わりました。
一安心でございます。
しかし、macOS モントレーの動作がもっさりしているを通り越して時々止まるのは、まるでメモリ不足で起きる現象と似ていましたね。メモリーは十分積んでいるので、この現象はなんなのでしょう?
まぁ、これはOSのアップデートを待つしか無いのでしょうね。
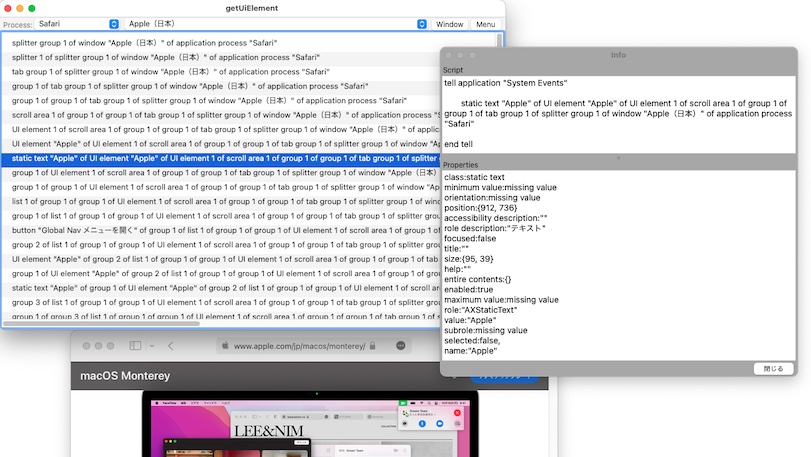
前回使ったUIのコードはどうやって調べたのか? [AppleScript辞書はつくれるか?]
前回のApplescript非対応アプリケーションのウインドウの中のボタンをクリックするためのコードってどこから出たのか説明していませんでした。
|
tell application "System Events" tell process "Safari" set aContents to entire contents of window 1 end tell end tell |
これで取得できます。
ですが、ウインドウ一つ分のすべてのオブジェクトのUIの中から、該当するコードを探すのは困難を極めます。
今回はそれを探すための支援アプリケーションを作ってみました。
|
Xcode-Applescript |
|
|
|
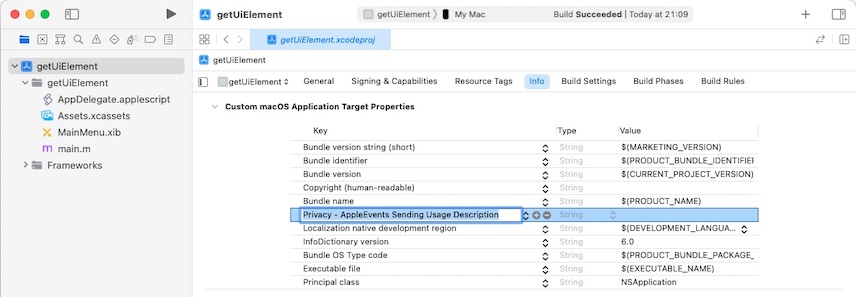
System Eventsを利用するため『info.pliset』を追加してください
|
Privacy - AppleEvents Sending Usage Description |
Xcodeの仕様上、最初に補助アクセス設定を有効にしてくれって要望がくるので、設定ウインドウを自動で表示させてみるところまでは作ったが、本当に開くだけ
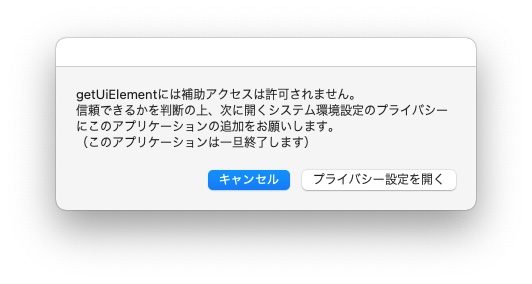
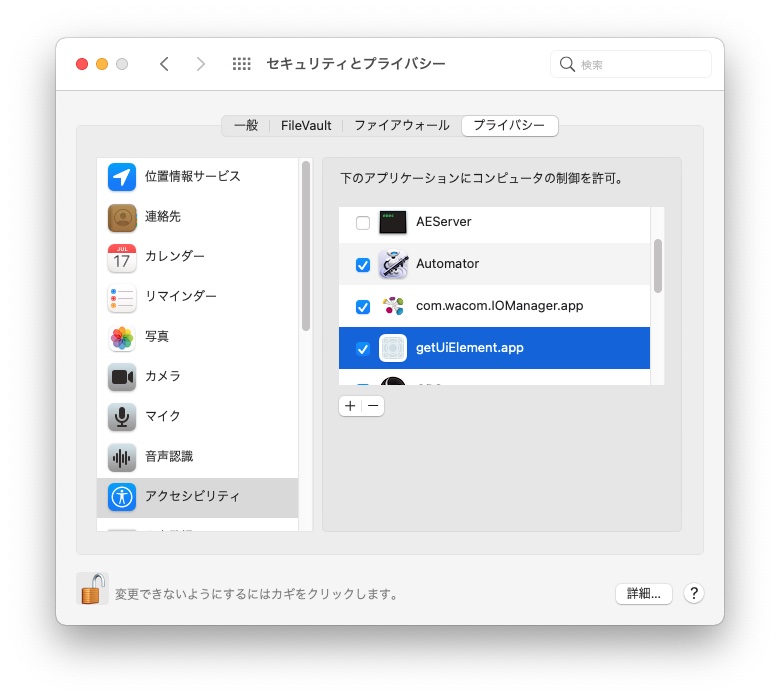
回避する方法もあるんだけど、セキュリティー上の問題なのでこれ以上は触らず。
(まぁ、作った人が安全な証明書を自分で作れば良いのではないかと...)
実行中には時間がかかる部分もあるので、表示を工夫してみたところもあります。
RGB画像をCMYKに変換したい [AppleScript辞書はつくれるか?]
RGB画像をCMYKに変換する方法を考えてみる。
PhotoshopなどのAdobe製の画像ソフトを使えば簡単に変換ができるのですが、それは使わない方法を探してみようと思います。
-目次-
(1)ターミナルやシェルスクリプトから試してみる
(2)ColorSyncユーティリティを使う方法
(3)ColorSyncユーティリティをApplescriptでコントロールしてみる
(4)もっと簡単な方法がある
|
(1)ターミナルやシェルスクリプトから試してみる |
色々なサイトで書かれているのがターミナルを使う方法。
|
|
$ sips -M JapanColor2001Coated.icc relative ~/Desktop/RGB.tif --out ~/Desktop/output.tif |
が、なぜか エラーを吐いてエラーを吐いて失敗する。
|
|
do shell script "sips -M JapanColor2001Coated.icc relative ~/Desktop/RGB.tif --out ~/Desktop/CMYK.tif ;" |
当然、Applescriptを使っても失敗する。
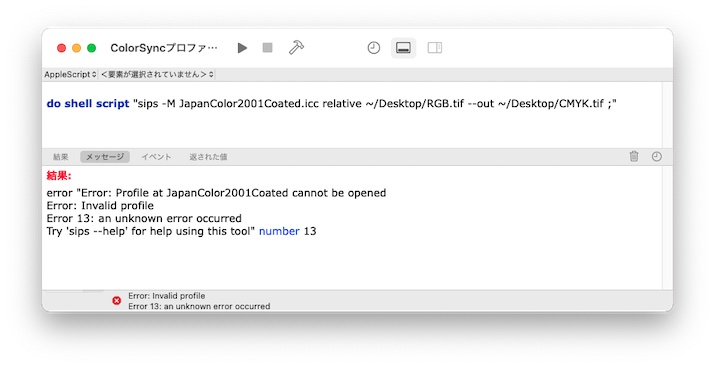
|
error "Error: Profile at JapanColor2001Coated.icc cannot be opened Error: Invalid profile Error 13: an unknown error occurred Try 'sips --help' for help using this tool" number 13 |
JapanColor2001Coatedは使えないと出てくる。
そもそも、sipsコマンドが使えないのかと思えば、グレー変換(Generic Gray Profile.icc)は実験をしたら使えているので理由がわからない。
色々試行錯誤するも、
|
|
do shell script "sips -E 'sRGB Profile.icc' -M JapanColor2001Coated.icc relative ~/Desktop/RGB.tif --out ~/Desktop/CMYK.tif ;" |
|
|
do shell script "a=`sips -g all ~/Desktop/RGB.tif | grep -e 'profile:' | cut -d ':' -f2- | cut -c2-` ; sips -E \"$a\" -M JapanColor2001Coated.icc ~/Desktop/RGB.tif --out ~/Desktop/CMYK.tif ;" |
全て、JapanColor2001Coated.iccが使えないというエラーを吐く。
JapanColor2001Coated.iccがそもそもないのかと思い、ColorSyncユーティリティを見ると存在はする。
壊れているのかと思い修復も試みるが、修復が成功しているのにエラーは変わらない。
なので、この方法は諦めました。
ということで、別な方法を試みてみる事にします。
|
(2)ColorSyncユーティリティを使う方法 |
ColorSyncユーティリティというアプリケーションで変換してみる。
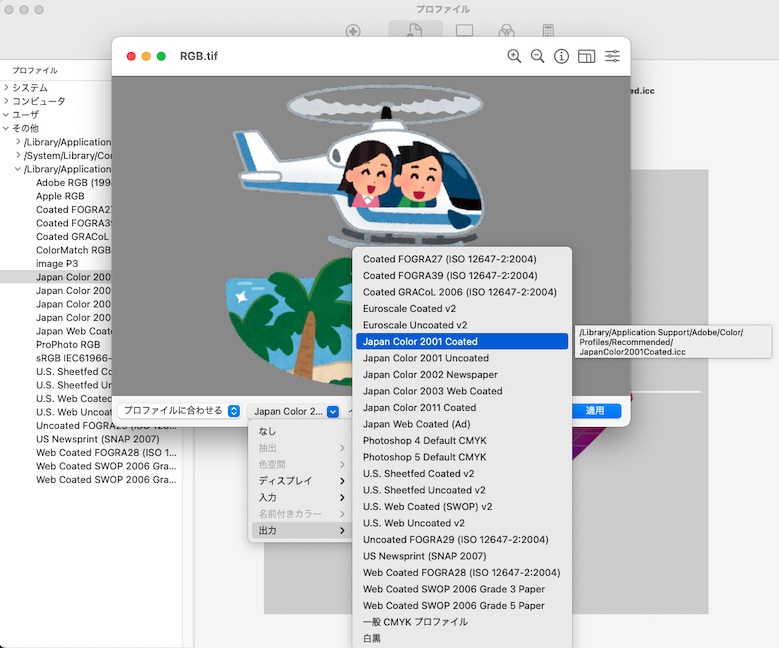
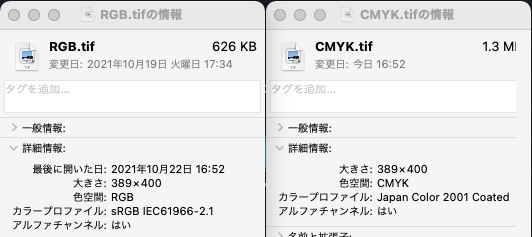
これなら、ちゃんと変換されているので保存をすれば終わり。
変換はすぐ終わりますが、これが複数あったら、繰り返しやらなければいけない。
ここはやっぱりApplescriptでやろう。
|
(3)ColorSyncユーティリティをApplescriptでコントロールしてみる |
Applescriptでコントロールをすると言ってみたものの、じつは、ColorSyncユーティリティはApplescriptに非対応なのです。
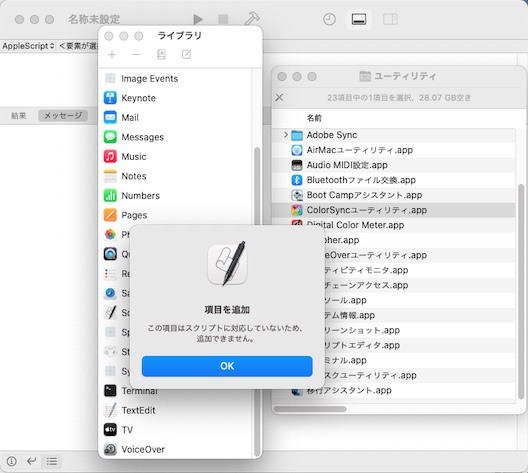
いきなり挫けたか?
いやいや、Applescriptに非対応と言っても、MacOS上で動いているアプリケーションであればなんとかなります。
直接ではなくSystem Eventsを使えばコントロールはできます。面倒ではありますけどね。
|
property colorProfileName : "Japan Color 2001 Coated" --変更したいICC profile名 (* アプリケーションを直接に実行した直後の処理 *) on run set choosedFiles to choose file with multiple selections allowed --ファイルを選択(複数選択が可能) my main(choosedFiles) --選択されたファイルをmainハンドラに送ります end run
(* ドラック&ドロップされたファイルを処理します (スクリプトをアプリケーション形式で保存する必要があり) *) on open inputFile my main(inputFile) --ドロップされたファイルをmainハンドラに送ります end open
-- on main(inputFile) repeat with add in inputFile --複数または単体で送られてきたファイルを1つづつ選びながら繰り返します set f to my henkan(add) --henkanハンドラに選ばれた指定のファイルを送り、結果を変数fに受け取ります if f ≠ true then --結果のfの内容がtrue以外の場合は、if・・・end if の間のエラー処理をします activate --ダイアログを見やすくするためのアクティブ命令をあらかじめしておきます display dialog ("エラーが発生しました:" & return & f) buttons {"中止"} default button 1 --> ダイアログでエラーメッセージを表示します return -- 中断します end if end repeat end main
on henkan(add) try (* ファイルアドレスの変換 *) set filePath to add as text --送られてきたファイルをテキスト化することでアドレスのみを取得できる if filePath contains "/" then --アドレスがPosixPathだった場合 set filePath to (filePath as POSIX file) as text -- ファイルパスに変更して統一します else if not (filePath contains ":") then -- PosixPathでもファイルパスでも無い場合 return "ファイルのアドレスが確認できません" -- 中断してメッセージを返します end if
tell application "Finder" -- Finderアプリケーションで作業します set originalName to name of file filePath -- 送られてきたオリジナルのファイル名を取得します copy file filePath to (folder of file filePath) -- オリジナルを壊さないために複製を作ります set obj to result -- 複製後のファイルの情報を記憶します end tell set filePath to obj as text -- 複製した方のファイルのパスを作業用として改めて取得します
(* ColorSyncユーティリティで画像を開く *) tell application "ColorSync Utility" --ColorSyncユーティリティで作業をします launch --ColorSyncユーティリティの着手を宣言します(省略しても良さそう) try tell application "System Events" to click button 1 of window 1 of process "ColorSync Utility" --いらないウインドウがあれば閉じておきます end try open filePath --画像ファイルをColorSyncユーティリティで開きます end tell activate application "ColorSync Utility" --ColorSyncユーティリティを最前面に出します(アクティブ化) tell application "System Events" --システムイベントで作業をします tell process "ColorSync Utility" -- ColorSyncユーティリティのプロセスでの作業を選びます set ans to value of pop up button 1 of group 1 of window 1 -- プロファイル設定の方向性のメニュー内容を取得します if ans ≠ "プロファイルに合わせる" then -- "プロファイルに合わせる"意外であれば再設定をしておきます click pop up button 1 of group 1 of window 1 -- メニューを開きます click menu item "プロファイルに合わせる" of menu 1 of pop up button 1 of group 1 of window 1 --選択しなおします end if set profileMenu to name of menu button 1 of group 1 of window 1 --プロファイル設定のプルダウンメニューの現在の状態を取得 if profileMenu ≠ colorProfileName then --希望のプロファイル以外だった場合の処理 click menu button 1 of group 1 of window 1 --プロファイル設定用のプルダウンメニューをクリック key code 126 --キーボートの上向き矢印キー(↑)を疑似入力 key code 124 --キーボートの右向き矢印キー(→)を疑似入力 try click menu item colorProfileName of menu "出力" of menu item "出力" of menu 1 of menu button 1 of ¬ group 1 of window 1 --メニュー内の希望のプロファイルを選択 on error return "Err : プロファイル名が認識できません。" --希望のプロファイルが見つからない場合は中断 end try click button "適用" of group 1 of window 1 --適用ボタンをクリック keystroke "s" using command down -- コマンド+S で『保存』を実行
--close window 1 --|なぜかクローズ命令が受け付けてもらえない| click button 1 of window 1 --なので、ウインドウ左上のクローズボタンをクリックして対応
end if end tell end tell tell application "Finder" set saveName to "『" & (text 1 thru ((offset in originalName of ".") - 1) of originalName) & "』をCMYKに変更" & (text (offset in originalName of ".") thru -1 of originalName) --> saveName = "『(元のファイル名)』をCMYKに変更.(拡張子)" try move (file saveName of (folder of file filePath)) to trash --すでにファイルが存在した場合、古いファイルはゴミ箱へ end try set name of file filePath to saveName --ファイル名の変更 end tell on error errText return errText --予期しない何らかのエラ~メッセージを返します end try return true end henkan |
|
(4)もっと簡単な方法がある(結構あっさり解決) |
Automator.appを使えば割とあっさりと簡単にはできるんです。
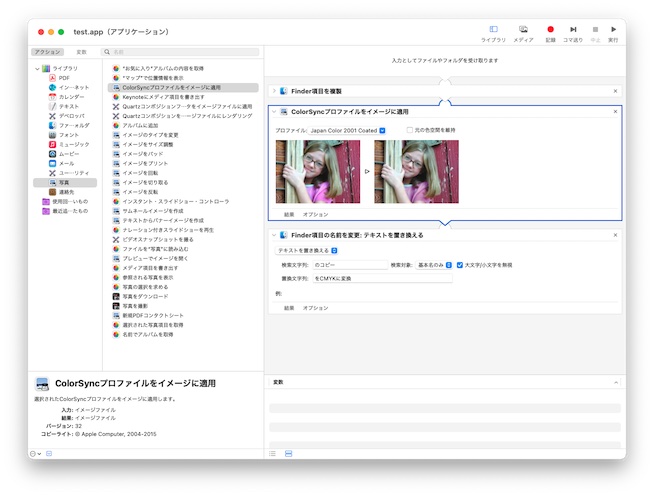
Automatorで新規書類(新規アプリケーション)を作成します。
空のウインドウの上部に『入力してファイルやフォルダを受け取ります』とあるので、その下に、
左のライブラリー項目の中から『(ファインダの)Finder項目を複製』または『(ファインダの)Finder項目をコピー』をドラック&ドロップで追加します。(どちらでもOK)
※『Finder項目を複製』は元のファイルと同じフォルダ内に複製します。
※『Finder項目をコピー』は任意のフォルダにコピーをする違いがあります。
次に『(ユーティリティの)ColorSyncプロファイルをイメージに適応』を追加し、プロファイル:の項目を”Japan Color 2001 Coated”に変更する。
最後に『(ファインダの)Finder項目の名前を変更』を挿入し、ポップアップメニューの中から『テキストを追加』を選びます。
追加するテキスト:を『をCMYKに変更』にし、『名前の後に追加』に変更(ここは、自分の好みで変更してみると良い)
あとは保存するだけで、ドロップレットアプリケーションが作成されます。
以上のいずれも、選択された画像がイメージファイル(画像ファイル)かどうかを判断する部分がありませんので、対象外のファイルが選ばれると予期せぬエラーが発生する場合があります。この辺りは注意するか、スクリプトを加えてみると良いかもしれません。
GarageBandの音源がパワーアップしたらしい。 [Mac日記]

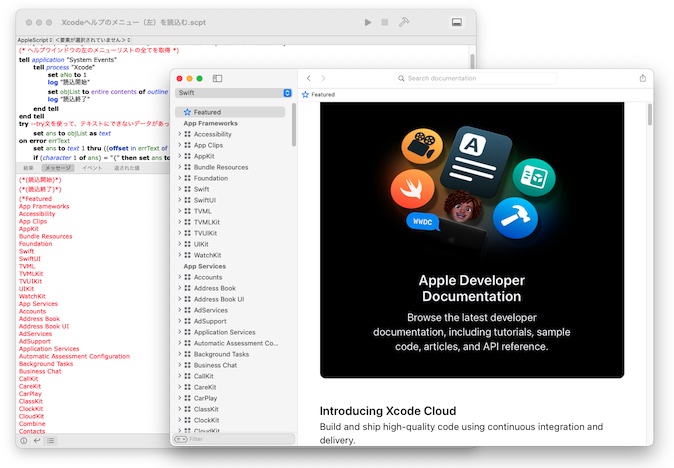
Xcodeのヘルプの情報を取得してみる。(再び) [AppleScript辞書はつくれるか?]
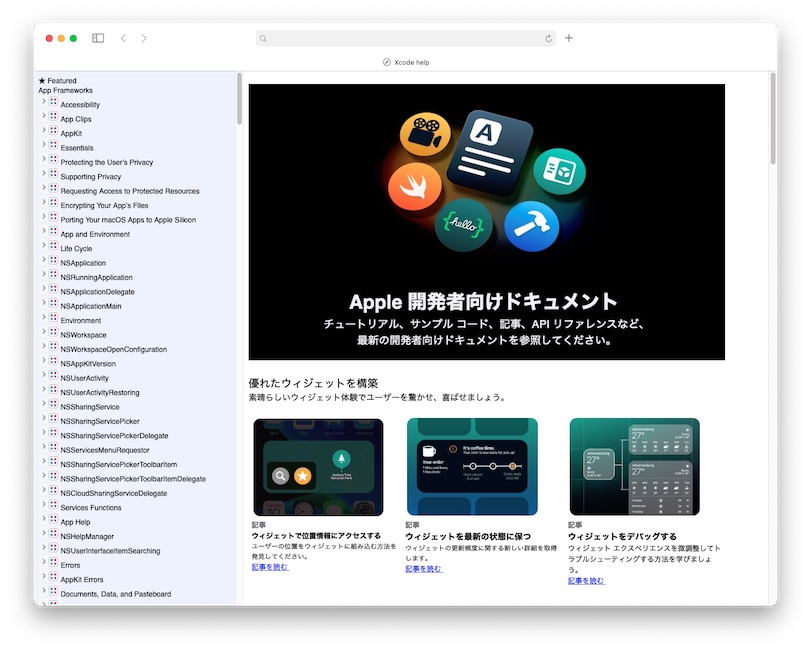
役に立つ情報ではないけれど、以前にやっていたXcodeヘルプの情報を取得し、今後の素材として保存をしておこうと作業をしてみました。
今回は、ヘルプの左側のメニューのテキストを取得してみようと思います。
|
|
(* 呼び出すコードを変数に入れ簡素化 *) set {LF, CR, FF} to {ASCII character 10, ASCII character 13, ASCII character 12} --LF=Linuxでよく使われる改行コード, CR=Macでよく使われる改行コード --FF=今では滅多に使われない改頁コード(滅多に使われないコードなので借りました。正規な使い方ではないです)
(* ヘルプウインドウの左のメニューリストの全てを取得 *) tell application "System Events" tell process "Xcode" set aNo to 1 log "読込開始" --場合によっては時間がかかるので進行状況を確認するためのログ set objList to entire contents of outline 1 of scroll area 1 of splitter group 1 of window 1 log "読込終了" end tell end tell try --try文を使って、テキストにできないデータがあってもテキスト化する set ans to objList as text on error errText set ans to text 1 thru ((offset in errText of "のタイプ") - 1) of errText if (character 1 of ans) = "{" then set ans to text 2 thru -2 of ans -- 入力がリスト・レコードの場合は先頭と末尾を外す end try
(* デリミタ(単語を入れ替える)処理 *) set tmp to AppleScript's text item delimiters --デリミタの初期状態を記憶 -- shell script 処理で邪魔になる "(ダブルクオート)を一時的に入れ替える set AppleScript's text item delimiters to "\"" --半角の " set theList to every text item of ans set AppleScript's text item delimiters to "”" --全角の ” set ans to theList as string --,(カンマ)部分で改行処理をする set AppleScript's text item delimiters to "”, " --念の為、『,』の単体カンマではなく、その周りを含めた『”, 』で対応 set theList to every text item of ans set AppleScript's text item delimiters to "”" & LF -- shell script ではLFを改行に使う set ans to theList as string -- set AppleScript's text item delimiters to tmp --デリミタを元に戻す
(* 用意されたテキストを見やすく修正してファイルとして出力 *) --オブジェクトのパスを書き出す do shell script ("echo \"" & ans & "\" | grep -e 'class sttx' | sed s/'window ”'/'window 1" & FF & "'/g | cut -d " & FF & " -f1 | sed s/'”'/'\\\"'/g > $HOME/Desktop/outputText1.txt ;") --オブジェクトの名前のみを取得して書き出す do shell script ("cd $HOME/Desktop/ ; cut -d '\"' -f2 outputText1.txt > outputText2.txt ;")
(* 保存された名前のテキストをログで表示する *) set ans to do shell script ("cat $HOME/Desktop/outputText2.txt ;") log ans
"End" |
● 最後のシェルスクリプト処理部の説明
echo '文字' -- 文字などを直接読み込みます
grep -e '検索する文字' [ファイルのアドレス(省略可)] -- -eというオプションの後の文字列を探し、含まれたすべての行を取得
sed s/'差替え前の文字'/'差替え後の文字'/g [ファイルのアドレス(省略可)] -- 文字を入れ替えます。さいごのgを入れないと最初の一つだけしか差替えません
cd [ファイルのアドレス(省略可)] -- 作業フォルダを変更します。同じフォルダ内でファイルを呼び出す際に使用して、アドレスを短くできます
cut -d '区切り文字' -f(数字) [ファイルのアドレス(省略可)] -- -dで指定した'区切り文字'で分けられた文字列の、数字場所を取得
> [書出すファイルのアドレス] -- > はファイルとして書き出します。
| -- パイプを使い、左で出された一時的なデータを右に引き継ぎます。
; -- コードの終点。一時的なデータは引き継がれません。
\ -- エスケープシーケンス。"などの特殊文字を命令語として認識させずに、普通の文字として扱えるようになります。
sedで使用する場合はエスケープシーケンスをさらにエスケープしないといけない場合があります。
ヘルプの画面を自動的に開くというものではないので、あらかじめヘルプを開いておかなければなりません。
Xcodeの画面の上のメニューから
Help > developer documentation
でメニューを開いておきます。
その状態で上記のスクリプトを実行すると、数秒後のデスクトップ上に
outputText1.txt(オブジェクトのリスト)
outputText2.txt(名前のリスト)
が作られます。
ただそれだけです。
今回のMacOSのアップデートがあまり好きでないなぁ。 [Mac日記]


福徳岡ノ場海底火山


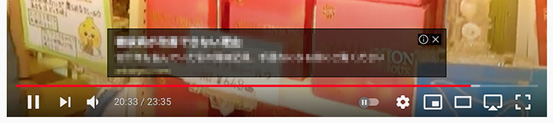
Youtubeの広告に邪魔されず動画を見る [Mac以外]

Xcodeのヘルプの日本語訳を作ってみたい(途中経過) [Xcode]
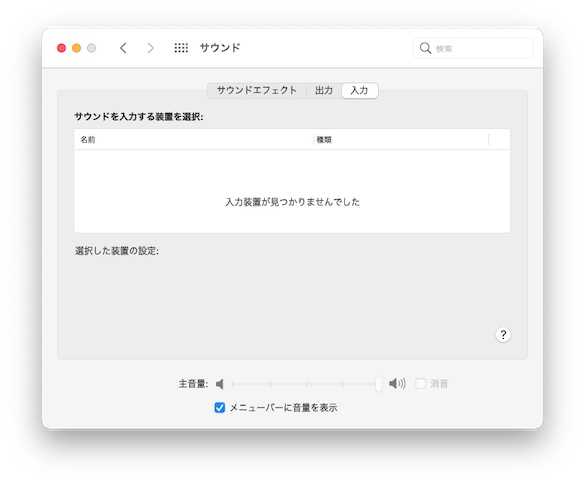
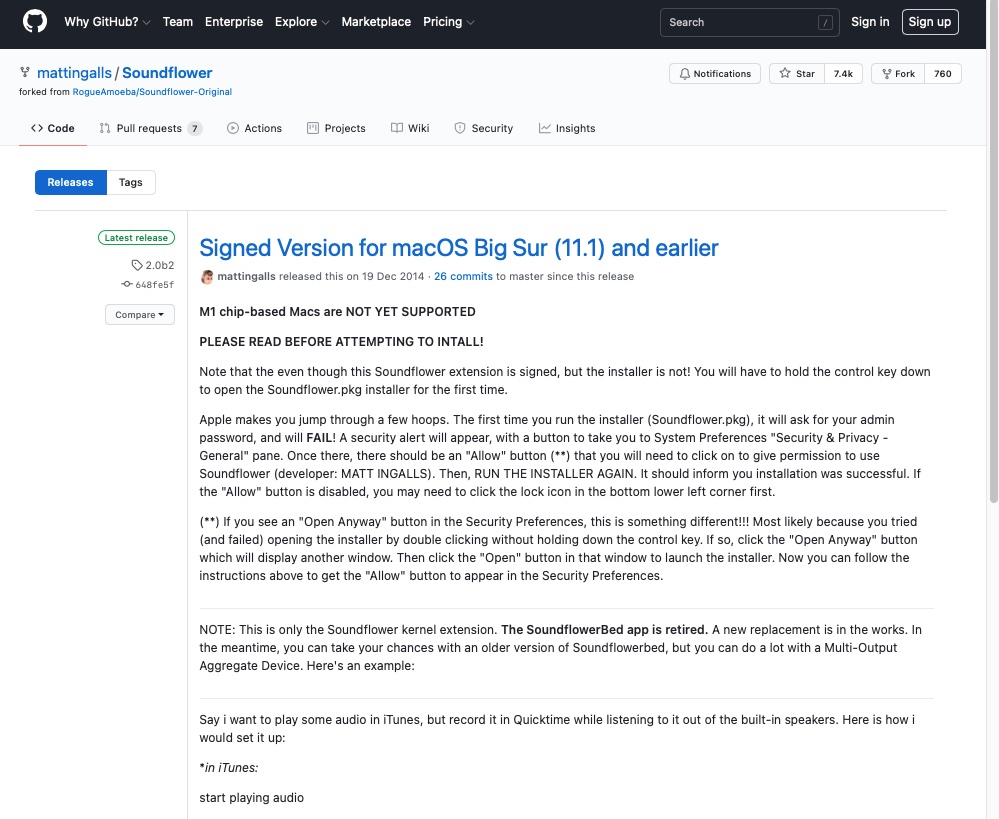
OSをアップデートしたらSoundflowerが使えなくなっていた [Mac日記]
https://github.com/mattingalls/Soundflower/releases/tag/2.0b2
サイトからインストーラーを再度ダウンロードして、圧縮ファイルを解凍し、
念の為、アンインストーラーで前のファイルをアンインストールを試みてみた。
ここまでは問題無し。
さあインストールだ!
・・・・・・
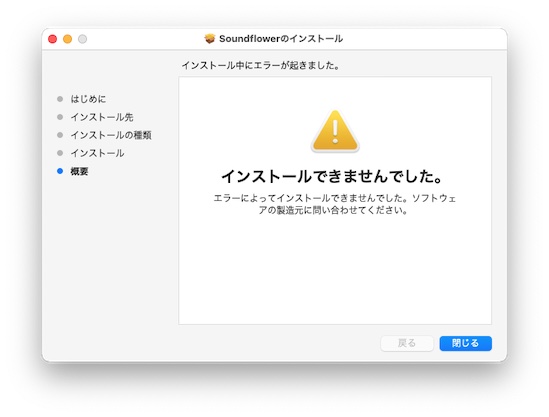
・・・あれ?
普通にやると失敗したと表示が出てしまうらしい。
ここは慌てず、Macを再起動してみよう。
Macを再起動しても出てこない場合は、Macをセーフブート起動して、再インストールを試みてみる。(セーフブート起動はShiftキーを押しっぱなしで起動。画面右上に赤い文字で『セーフブート』と表示がでます)
しかし、インストール失敗と出る場合もあるが、めげずに通常再起動してみよう。
うまくいけば、
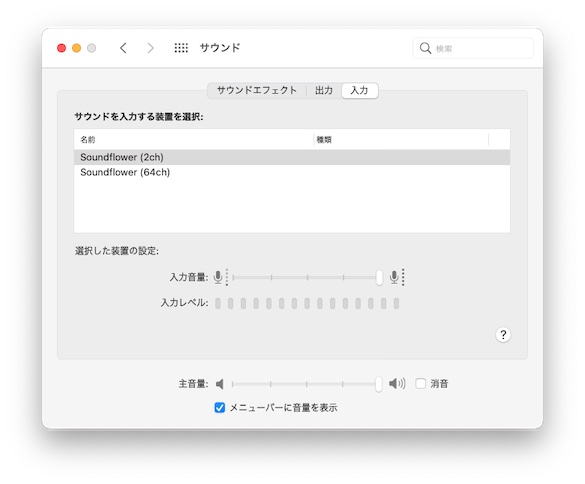
出てくるようです。
焦ってあれこれやったあとなので、何がきっかけで表示されたのかはあやふやな部分がありますがね。
XcodeHelpを少しづつまとめてみる [Xcode]
無謀な試み [AppleScript辞書はつくれるか?]

画像付きリッチテキストを、HTMLに変換してWebで表示できるようにする [AppleScript辞書はつくれるか?]
リッチテキスト(.rtf)や、画像付きリッチテキスト (.rtfd)を、HTML形式に変換します。
まぁ、Shellスクリプトの『textutil -convert html ~』を使うんですけどね。
これを使うと一発で変換してくれるんだけど、少々変更が必要になってくる。
・画像付きだとその画像のアドレスが完全ではないので修正している
・バックグラウンドの色に対応できない。(もともとテキストエディターだと背景色って変更できたかな?)-未解決-
など
|
(* 入力ファイル(複数選択可) *) set objList to choose file with multiple selections allowed if objList = false then return "中止" if (class of objList) ≠ list then set objList to objList as list (* 出力フォルダ *) set folderName to "RtfdToHTML" set outputFolder to ((path to desktop folder) as text) & folderName tell application "Finder" try make new folder at desktop with properties {name:folderName} end try try make new folder at folder outputFolder with properties {name:"img"} end try try get name of folder "img" of folder outputFolder on error log "make new folder Err. " return false end try end tell (* 変換 *) repeat with aObj in objList --ファイルを取得 tell application "Finder" to set name1 to name of aObj set thePath to POSIX path of (aObj as text) --名前からスペースなどを除去 set name2 to "_" & (text 1 thru ((offset in name1 of ".") - 1) of name1) & "_" repeat 10 times set c to offset in name2 of " " if c = 0 then exit repeat set name2 to (text 1 thru (c - 1) of name2) & "_" & (text (c + 1) thru -1 of name2) end repeat repeat 10 times set c to offset in name2 of "'" if c = 0 then exit repeat set name2 to (text 1 thru (c - 1) of name2) & "_" & (text (c + 1) thru -1 of name2) end repeat set name2 to text 2 thru -2 of name2 --HTMLへ変換 do shell script ("textutil -convert html \"" & thePath & "\" -output $HOME/Desktop/" & folderName & "/" & name2 & ".html ;") --画像を探し、あれば処理 try set imageList to do shell script ("du -a $HOME/Desktop/" & folderName & "/ | cut -f2- | grep -e .png -e .jpg;") on error set imageList to "" end try if imageList ≠ "" then tell application "Finder" repeat with obj in (paragraphs of imageList) set obj to (obj as POSIX file) as text set name3 to name of file obj move obj to folder (folderName & ":img:") of desktop end repeat end tell end if set aSource to do shell script ("cat \"$HOME/Desktop/" & folderName & "/" & name2 & ".html\" ;") repeat 10000 times set c to offset in aSource of "file:///" if c = 0 then exit repeat set aSource to (text 1 thru (c - 1) of aSource) & "./img/" & (text (c + 8) thru -1 of aSource) end repeat --最終HTMLファイルの保存 set locationURL to ((path to desktop folder) as text) & folderName & ":" & name2 & ".html" try set fn to open for access locationURL with write permission set eof of fn to 0 write aSource to fn as «class utf8» end try try close access fn end try end repeat
"End" |
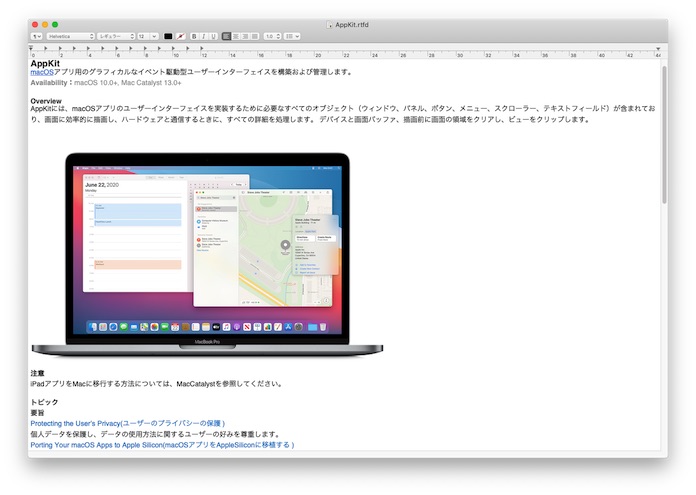
下記のファイルを変換するとして
内容はこんな感じで、画像付きのリッチテキストをテストで用意した。
スクリプトを実行して、ダイアログで先程のファイルを選ぶと、デスクトップに変換されたファイルが現れます。
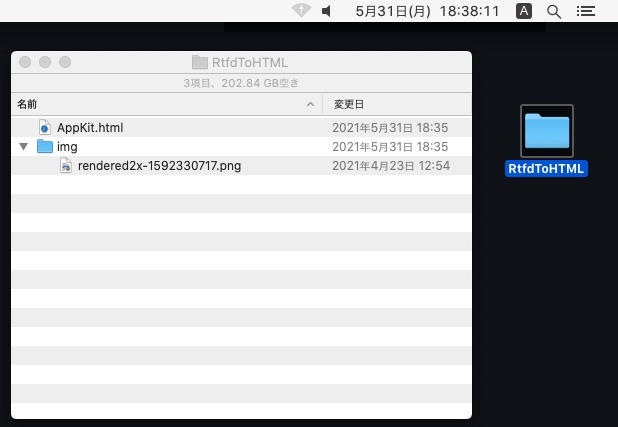
Safariで開くとちゃんと表示されます。

とりあえず、必要になったので作ってみたというお話です。
Safariのスクロールバーをコントロールしたい [AppleScript辞書はつくれるか?]
Safariで表示されているページで、見える部分の外にも情報がある場合にスクロールバーが追加されます。
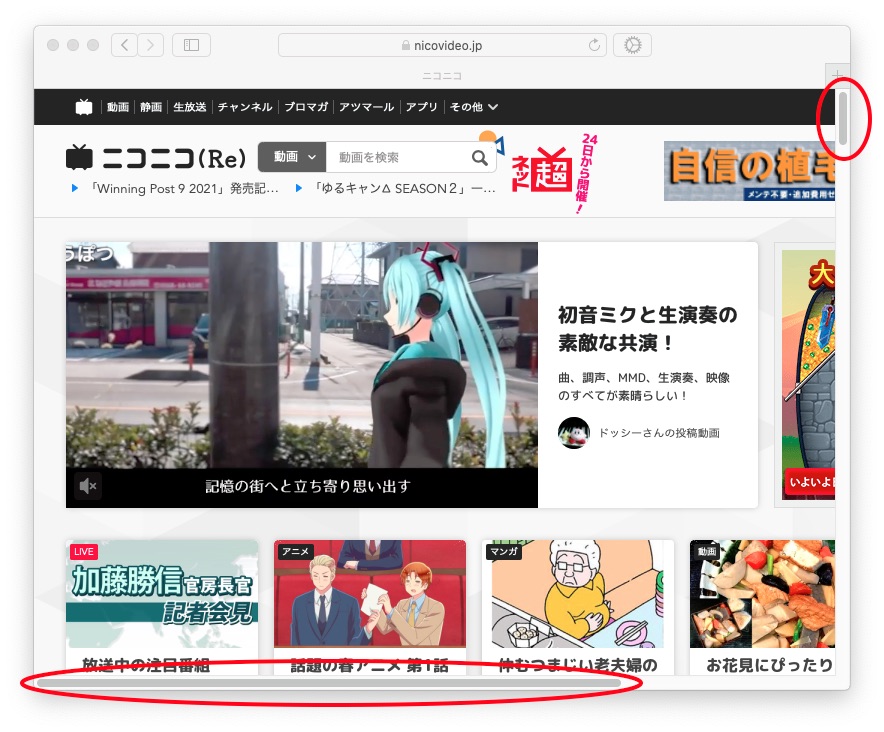
そのスクロールバーのマーカーの位置が知りたい。または、マーカーの位置を移動したいという場合に、Applescriptでは命令文が存在しなかったので、なんとかしてみたいと思いました。
System EventsのUI elementを調べていけばわかると思い、膨大な情報の中から検索してみたら有りました。
scroll bar 1 of scroll area 1 of group 1 of group 1 of tab group 1 of splitter group 1 of window 1
または、
scroll bar 2 of scroll area 1 of group 1 of group 1 of tab group 1 of splitter group 1 of window 1
"scroll bar 1"が横のバーで、"scroll bar 2"が縦のバーかと思ったらそうでもなかったみたいで、どちらかが非表示だった場合は、どちらでも"scroll bar 1"になるようでした。
ですので、非表示を含めちゃんとした情報を取得して横か縦かを判断して振り分けてみます。
|
(* Safariのスクロールバー情報の取得 *) tell application "System Events" tell process "Safari" set objList to every scroll bar of scroll area 1 of group 1 of group 1 of tab group 1 of splitter group 1 of window 1 set {scrollBarVertical, scrollBarHorizontal} to {missing value, missing value} repeat with scrollBar in objList set ans1 to properties of scrollBar set ans2 to orientation of ans1 if ans2 = "AXVerticalOrientation" then set scrollBarVertical to ans1 else if ans2 = "AXHorizontalOrientation" then set scrollBarHorizontal to ans1 end if end repeat end tell end tell log "縦の結果" log scrollBarVertical log "横の結果" log scrollBarHorizontal |
|
(*縦の結果*) (*class:scroll bar, minimum value:missing value, orientation:AXVerticalOrientation, position:910, 438, accessibility description:, role description:スクロールバー, focused:false, title:, size:15, 561, help:, entire contents:, enabled:true, maximum value:missing value, role:AXScrollBar, value:0.0, subrole:missing value, selected:false, name:missing value, description:*) (*横の結果*) (*class:scroll bar, minimum value:missing value, orientation:AXHorizontalOrientation, position:109, 999, accessibility description:, role description:スクロールバー, focused:false, title:, size:801, 15, help:, entire contents:, enabled:true, maximum value:missing value, role:AXScrollBar, value:0.0, subrole:missing value, selected:false, name:missing value, description:*) |
バーの現在の位置は、
value of scrollBarVertical
で値が取得でき、移動の場合は、
set value of scrollBarVertical to 0.5
で変更ができます。
この時の値は、移動可能領域の『いちばん上』または『左端』が「0.0」となり、
終点の『下』または『右端』は1.0となっているようです。
まぁ、いったいこれが何に使えるかは考えておりませんが...。
Safariで開いているページの中から、特定のページを自動的に閉じる。 [AppleScript辞書はつくれるか?]
ざっくり作ったので改良が必要かもしれませんが、
任意で登録したWebアドレスと同じページが開いたら、自動的に閉じるというものを作ってみました。
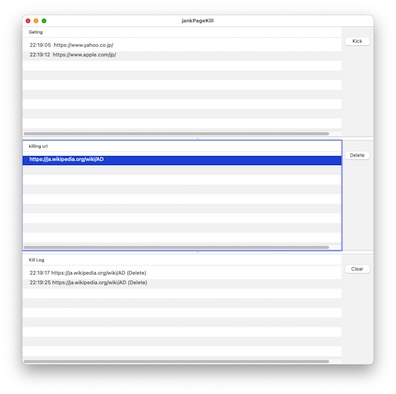
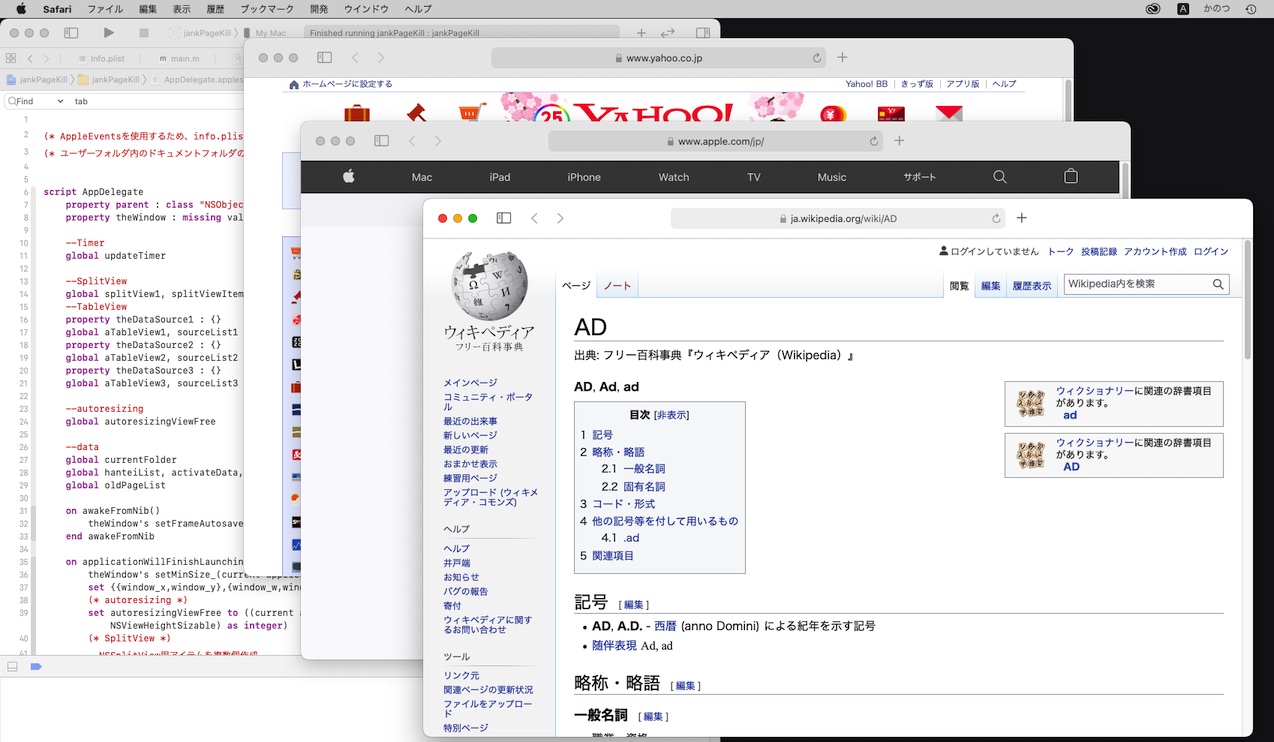
いくつかのWebページがあります。
今回の一例として使いましたが、Wikiのページ(悪いページではないのですが)このページが開いていたら強制的に閉じるようにします。
プログラムを走らせると、まずは何も登録されていないので、どのWebページも閉じられることがありません。
一番上のテーブルには現在までに開かれたページアドレス と、開かれたと認識された時間 のリストが表示されます。
試しに、Wikiのアドレスをリストの中から選び右の"Kick"ボタンをクリックします。
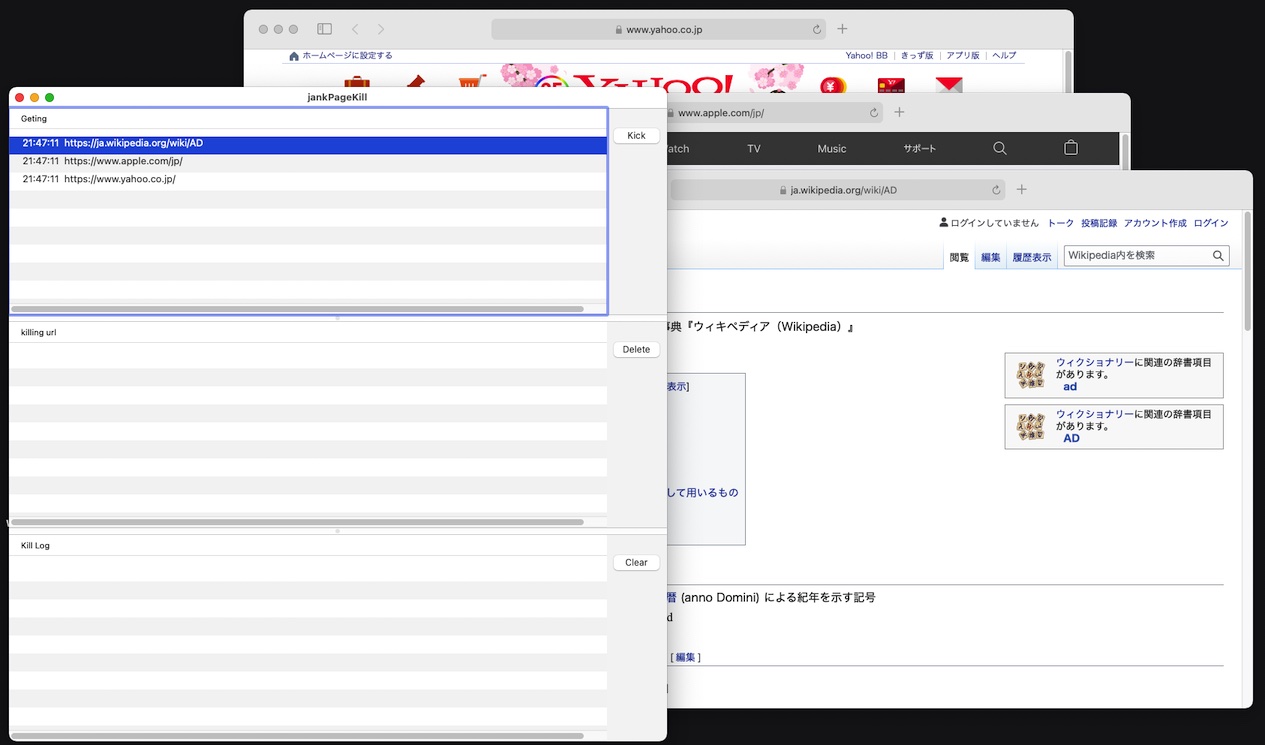
登録されたアドレスが2段目に表示され、同時にWebページが閉じられました。
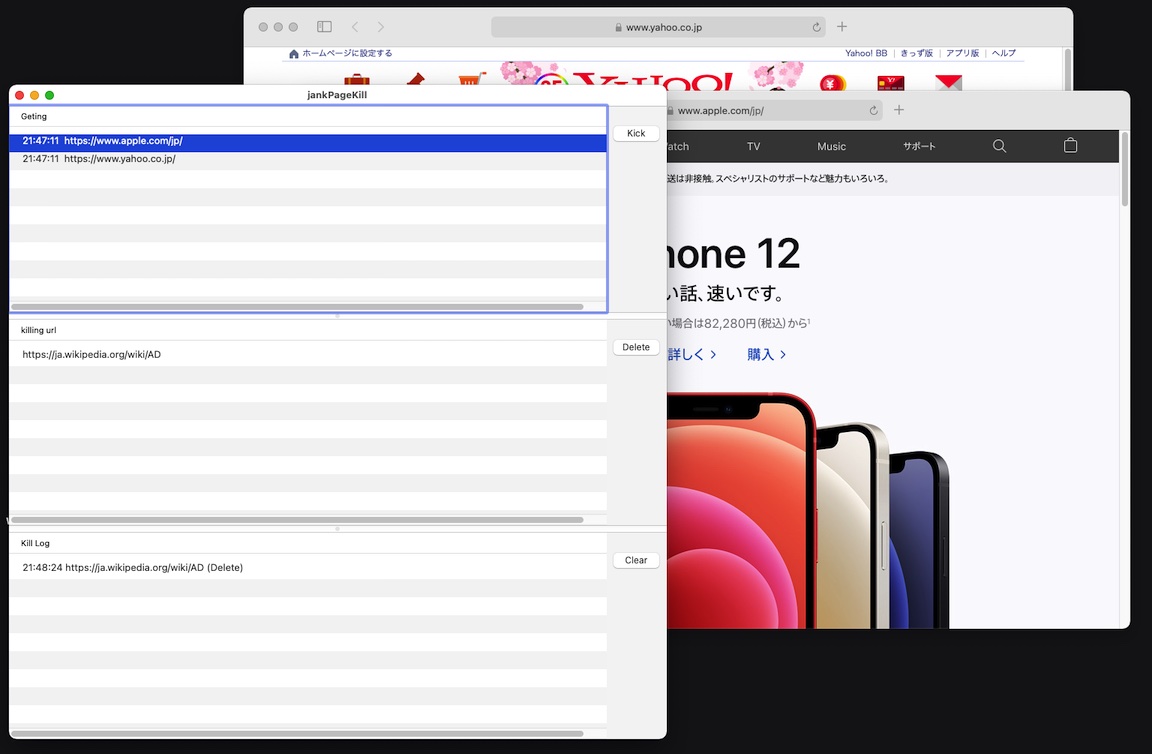
ここで登録されたページは何度開いても、即座に閉じられます。
閉じられたページのログは一番下のリストに、その都度、表示されていきます。
登録されたページを外したい場合は2段目のリストからアドレスを選び、"Delete"ボタンを押すと解除されます。この後、そのページを開いても閉じられることはありません。
(今後の課題)
大きくて邪魔なので縮小化できるようにしてみたい。
Mail.appで選択されたメールを開かず内容を読む [AppleScript辞書はつくれるか?]
スクリプトエディターでNSWindow作成の一時まとめ [AppleScript辞書はつくれるか?]
|
use AppleScript version "2.7" use scripting additions use framework "Foundation" use framework "AppKit"
property debugMode : true global theWindow global closeFlg global currentAppName --スクリプトエディタを使用して実行しているのか、アプリケーション済から起動されたかの判断用
on run set closeFlg to false -- set currentAppName to name of (current application) if currentAppName ≠ "Script Editor" then set debugMode to false if debugMode then --デバグモードの状態を表示 log "debugMode : ON" else log "debugMode : Off" end if -- my performSelectorOnMainThread:"mainMakeObject:" withObject:(missing value) waitUntilDone:true -- log "End" end run
on mainMakeObject:inputObj -- メインルーチン set aTitle to "test window" set aRect to {0, 0, 300, 450} set theWindow to my makeNewWindow(aTitle, aRect, true) -- my makeObject() -- if debugMode then repeat if closeFlg then my closeWin:theWindow exit repeat end if delay 0.2 end repeat end if end mainMakeObject:
on makeNewWindow(aTitle, aRect, moveCenter) set {windowX, windowY, windowW, windowH} to aRect set theRect to current application's NSMakeRect(windowX, windowY, windowW, windowH) set aScreen to current application's class "NSScreen"'s mainScreen() set aStyle to (current application's NSWindowStyleMaskTitled as integer) set aStyle to aStyle + (current application's NSWindowStyleMaskClosable as integer) set aStyle to aStyle + (current application's NSWindowStyleMaskMiniaturizable as integer) set aStyle to aStyle + (current application's NSWindowStyleMaskResizable as integer) set aBacking to current application's NSBackingStoreBuffered set aWindow to (current application's class "NSWindow"'s alloc()'s initWithContentRect:theRect styleMask:aStyle backing:aBacking defer:false screen:aScreen)'s autorelease() tell aWindow setAlphaValue_(0.0) --作成時のチラつき回避のため、いったん不透明度を0.0にして透明に setDelegate_(me) setTitle_(aTitle) setMinSize_(current application's NSMakeSize(windowW, windowH)) setMaxSize_(current application's NSMakeSize(10000, 10000)) setBackgroundColor_(current application's class "NSColor"'s colorWithCalibratedRed:0.95 green:0.95 blue:0.95 alpha:1.0) setDisplaysWhenScreenProfileChanges_(true) setReleasedWhenClosed_(true) makeKeyAndOrderFront_(me) end tell -- if moveCenter then -- |windowをセンターに移動| aWindow's |center|() --システム任せで中央に移動(※少し上にずれてしまう)下記のScreen命令で取得できなかった場合の避難処理 -- set theScreen to current application's class "NSScreen"'s screens() set {windowCenterX, winsowCenterY} to {windowX + (windowW / 2), windowY + (windowH / 2)} repeat with screenNo from 1 to (count of theScreen) set {{screenX1, screenY1}, {screenWidth, screenHeight}} to (item screenNo of theScreen)'s frame() set {screenX2, screenY2} to {screenX1 + screenWidth, screenY1 + screenHeight} if (windowCenterX > screenX1) and (windowCenterX < screenX2) and (winsowCenterY > screenY1) and (winsowCenterY < screenY2) then set originX to screenX1 + (screenWidth / 2) - (windowW / 2) set originY to screenY1 + (screenHeight / 2) - (windowH / 2) (aWindow's setFrameOrigin:(current application's NSMakePoint(originX, originY))) exit repeat end if end repeat end if -- aWindow's setAlphaValue:1.0 --不透明度を戻して表示 -- return aWindow end makeNewWindow
(* 配置する各オブジェクトを配置する *) on makeObject() set {{windowX, windowY}, {windowWidth, windowHeight}} to theWindow's contentView's frame() try -- 新しくオブジェクトを配置する部分 -------------------- set theRect to current application's NSMakeRect(90, 5, 120, 24) set button1 to current application's class "NSButton"'s alloc()'s initWithFrame:theRect tell button1 setBezelStyle_(1) setButtonType_(0) setTitle_("閉じる") setTarget_(me) setAction_("action1:") end tell theWindow's contentView()'s addSubview:button1 ----------------------------------------------------------- on error errText log errText end try end makeObject
on action1:sender set closeFlg to true end action1:
(* ウインドウバーの閉じるボタンアクションを受けた時 *) on windowShouldClose:sender set closeFlg to true end windowShouldClose:
(* ウインドウを閉じるための実際のアクション *) on closeWin:aWindow aWindow's orderOut:me if currentAppName ≠ "Script Editor" then quit me end closeWin: |
スクリプトエディタだけでゲームを作る1 [AppleScript辞書はつくれるか?]


スクリプトエディターでNSWindow作成の一部修正 [AppleScript辞書はつくれるか?]
じつは、先日の記事では不具合がありました。
それは、ウインドウを縮小化したときにも終了してしまうというもの
原因は、
|
if (theWindow's isVisible()) = false then --ウインドウが表示されていなかったら... |
という部分なのですが
縮小化ボタンが有効になっていなければ問題はないのですが、そうでなければ問題が出ます。
ということで、修正することにしました。
上記のスクリプトの代わりに、
|
on windowShouldClose:theEvent set closeFlg to false end windowShouldClose: |
というハンドラを追加します。
ウインドウ上部のバーのクローズボタンがクリックされるか、閉じられるかされると実行されるハンドラです。
そして一部整理をして作り直したものがこちら
|
use AppleScript version "2.7" use scripting additions use framework "Foundation" use framework "AppKit"
global theWindow
my performSelectorOnMainThread:"mainMakeObject:" withObject:(missing value) waitUntilDone:true --スクリプトエディタでは、performSelectorOnMainThreadを使用したメインとなるハンドラを指定し、 --そこでオブジェクトを扱わないとうまく動かない。
(* メインルーチン *) on mainMakeObject:inputObj -- Window作成 set aTitle to "test window" set theRect to current application's NSMakeRect(0, 0, 600, 450) my makeNewWindow_(aTitle, theRect) theWindow's |center|()
--オブジェクト作成まとめ my makeObject()
end mainMakeObject:
--NSWindow基本作成 on makeNewWindow_(aTitle, theRect) set aScreen to current application's class "NSScreen"'s mainScreen() --ウインドウを表示する画面(メインのデスクトップ)の取得 set aStyle to 15 --|タイトルバー設定(0:バー無 1:バー有 _ +2:クローズON +4:ミニマムON +8:リサイズON)| set theWindow to current application's class "NSWindow"'s alloc() --ウインドウのインスタンス作成 theWindow's initWithContentRect:theRect styleMask:aStyle backing:false defer:false screen:aScreen --ウインドウの形状設定 tell theWindow setBackgroundColor_(current application's class "NSColor"'s colorWithCalibratedRed:0.95 green:0.95 blue:0.95 alpha:1.0) --地の色の設定 setTitle_(aTitle) --ウインドウバーのタイトルを設定 setDelegate_(me) --デリゲートをこのAppで設定 setDisplaysWhenScreenProfileChanges_(true) --スクリーンプロファイルが変更されたときウインドウの内容をアップデートする setReleasedWhenClosed_(true) --ウインドウを閉じたときにメモリを解放する orderFront_(me) --指定のウインドウを最前面にする(これがないと表示されない場合がある) end tell ---WindowController作成 set wController to current application's class "NSWindowController"'s alloc() tell wController initWithWindow_(theWindow) --コントロールするウインドウの初期化 showWindow_(me) --管理するウインドウ end tell end makeNewWindow_
on makeObject() set {{windowX, windowY}, {windowWidth, windowHeight}} to theWindow's contentView's frame() --コンテンツビューのサイズを取得 try
(* ウインドウの上に追加するオブジェクトはここに記入 *)
on error errText --オブジェクトの作成ミスによってウインドウが終了しなくなるのを防ぐためのエラー回避処理 log errText end try end makeObject
--ウインドウバーのクローズがクリックされた on windowShouldClose:theEvent my closeWin:theWindow --ウインドウを閉じることを命令する end windowShouldClose:
--ウインドウを閉じることを確定する on closeWin:aWindow aWindow's |close|() end closeWin: |
一部のウインドウを閉じることに関係するアクションは直接閉じるように変更してみました。
スクリプトエディタから新規NSWindowを作る [AppleScript辞書はつくれるか?]
XcodeでNSWindowを操作するのは簡単なのですが、スクリプトエディターから新しいNSWindowを作るのは、なかなか理解できませんでした。
自力で解決するのは諦め、『AppleScriptの穴』さんの情報から、なんとかして解読して作ってみました。
参考:http://piyocast.com/as/ (NSWindowタグ)
[目的]
(1) 新しくNSWindowを作る。
(2) その中心に『閉じる』ボタンを作る。
(3) ボタンがクリックされるか、ウインドウを閉じたら終了する。
そして、四苦八苦しながらも作ったのがこれ、
|
use AppleScript version "2.7" use scripting additions use framework "Foundation" use framework "AppKit"
global closeFlg set closeFlg to true
my performSelectorOnMainThread:"mainMakeObject:" withObject:(missing value) waitUntilDone:true --スクリプトエディタでは、performSelectorOnMainThreadを使用したメインとなるハンドラを指定し、 --そこでオブジェクトを扱わないとうまく動かない。
on mainMakeObject:inputObj -- Window作成 set windowWidth to 600 set windowHeight to 450 set aTitle to "test window"
set aScreen to current application's class "NSScreen"'s mainScreen() --ウインドウを表示する画面(メインのデスクトップ)の取得 set aFrame to current application's NSMakeRect(0, 0, windowWidth, windowHeight) --ウインドウサイズ set aStyle to 3 --|タイトルバー設定(0:バー無 1:バー有 _ +2:クローズON +4:ミニマムON +8:リサイズON)| set theWindow to current application's class "NSWindow"'s alloc() --ウインドウのインスタンス作成 theWindow's initWithContentRect:aFrame styleMask:aStyle backing:false defer:false screen:aScreen --ウインドウの形状設定 tell theWindow setBackgroundColor_(current application's class "NSColor"'s colorWithCalibratedRed:0.95 green:0.95 blue:0.95 alpha:1.0) --地の色の設定 setTitle_(aTitle) --ウインドウバーのタイトルを設定 setDelegate_(me) --デリゲートをこのAppで設定 setDisplaysWhenScreenProfileChanges_(true) --スクリーンプロファイルが変更されたときウインドウの内容をアップデートする setReleasedWhenClosed_(true) --ウインドウを閉じたときにメモリを解放する |center|() --ウインドウを画面のセンターに設定(ちょい上になるけど) orderFront_(me) --指定のウインドウを最前面にする(これがないと表示されない場合がある) end tell
---WindowController作成 set wController to current application's class "NSWindowController"'s alloc() tell wController initWithWindow_(theWindow) --コントロールするウインドウの初期化 showWindow_(me) --管理するウインドウ end tell
--Button作成 set theRect to current application's NSMakeRect(windowWidth / 2 - 40, windowHeight / 2 - 12, 80, 24) --サイズ set button1 to current application's class "NSButton"'s alloc()'s initWithFrame:(theRect) --ボタンのインスタンス作成 tell button1 setTitle_("閉じる") --ボタンに表示される文字 setBezelStyle_(1) --ボタンの形状 setTarget_(me) --ボタンのアクションを受ける対象(ここのスクリプト) setAction_("clickAction:") --アクションが発生先のハンドラ end tell theWindow's contentView()'s addSubview:button1 --ウインドウのビュー(コンテンツビュー)の上にボタンを貼り付ける
repeat (*ウインドウが閉じた後に発生*) if (theWindow's isVisible()) = false then --ウインドウが表示されていなかったら... log "Exit 1" exit repeat --ループから出る --quit me end if (* オブジェクトからクローズアクションが発生した場合 *) if closeFlg = false then --閉じるフラグが立っていたら... log "Exit 2" exit repeat --quit me end if delay 0.01 --0.01秒待つ end repeat
my closeWin:theWindow --クローズハンドラの実行 end mainMakeObject:
--クリックアクション on clickAction:aSender set closeFlg to false end clickAction:
--ウインドウを閉じる on closeWin:aWindow log "close" aWindow's |close|() end closeWin: |

アプリケーション型で保存する場合は、2箇所の"exit repeat"を"quit me"に変更し、"ハンドラの実行後に終了しない"にチェックを入れて保存。

あとはこれをベースにオブジェクトを配置していけば夢が広がりそうです。
廃止予定だったはずの... [AppleScript辞書はつくれるか?]
廃止予定となって一度は使用できなくなっていた CGPostMouseEvent がMacOS 11で、また使えるようになっていた。
|
use scripting additions use framework "Foundation"
my clickAction(0, 0)
on clickAction(clickX, clickY) set pt to {x:clickX, y:clickY} tell current application CGPostMouseEvent(pt, 1, 1, 1) CGPostMouseEvent(pt, 1, 1, 0) end tell return pt end clickAction |
あえて
use AppleScript version "2.7"
は使っていなかったのだが、それはあまり関係ないようだ。
いつまで使えるのかはわからないが、こちらの方が動作が早いので使えるうちは使ってみたい。
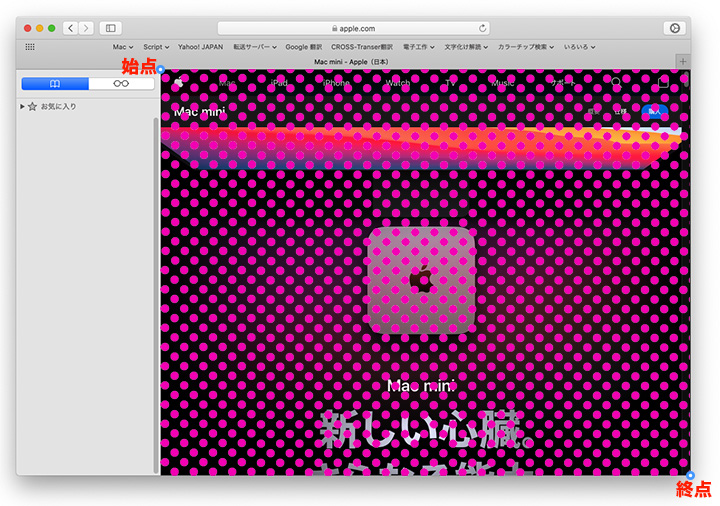
Safariウインドウ内のView部分を調べてみる。 [AppleScript辞書はつくれるか?]
|
tell application "Safari" set {x, y, w, h} to bounds of window 1 end tell |
|
tell application "Safari" --|Windowが一つも開いていなければ終了する処理| if (count of windows) = 0 then return false -- |最前面のWindowのDocumentが空の場合はサイズが測れない -- (そもそもView設定がされていない)ので、無理矢理に白ページをあてがう| if (source of document 1) = "" then set add to do shell script ("echo '' > $HOME/dammy.htm ; echo file:///$HOME/dammy.htm ;") set URL of document 1 to add delay 0.5 do shell script ("rm $HOME/dammy.htm ;") end if end tell
tell application "System Events" tell process "Safari" --ピンポピントでWebの表示部分の情報を取得 set obj to properties of scroll area 1 of group 1 of group 1 of tab group 1 of splitter group 1 of window 1 -- log obj --|どんな情報が取得できているかに興味がある人は、ここの左端のコメントアウトを外してみてください| set {x, y} to position of obj -- View部分の原点(左上の角の座標)の取得 set {w, h} to size of obj -- View部分の大きさを取得 end tell end tell
(* 取得した位置をポインターの移動で視覚的に確認 *) my movePointer(x, y) --|Viewの始点(原点)に移動| delay 2 my movePointer(x + w, y + h) --|Viewの終点に移動|
on movePointer(x, y) --|ポインターを移動のみするハンドラ| set codeText to "import sys; from Quartz.CoreGraphics import CGEventCreateMouseEvent,CGEventPost,CGPointMake; x = float(" & x & "); y = float(" & y & "); po = CGPointMake(x, y); event = CGEventCreateMouseEvent(None, 2, po, 0); CGEventPost(0, event);" do shell script "python -c " & quoted form of codeText return true end movePointer |
NSTableViewを複数使用する [AppleScript辞書はつくれるか?]
テーブルビューを2つまたはそれ以上使う場合に、ちょっとしたテクニックが必要だったのでメモ。

numberOfRowsInTableView_ と tableView_objectValueForTableColumn_row_ の両方に、どのテーブルの情報を使いたいのかを判断させなければいけないようだ。
if targetTableView = aTableView1 then ~
というような、Applescriptならできる、オブジェクトを直接比較するちょっと大胆な判断式を使ってみたらうまくいった。
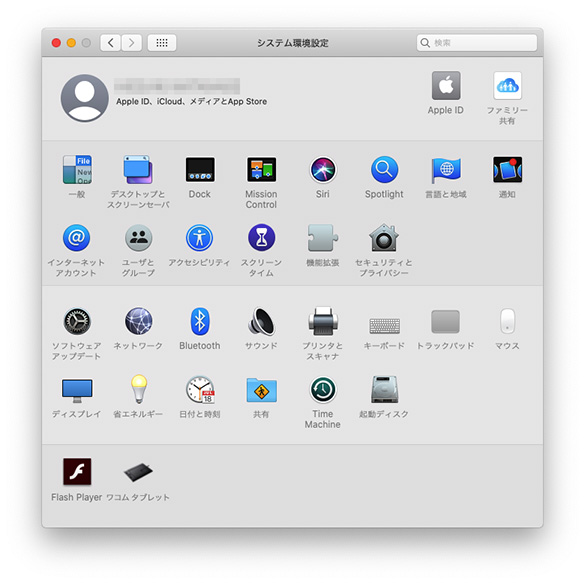
システム環境設定の表示操作 [AppleScript辞書はつくれるか?]
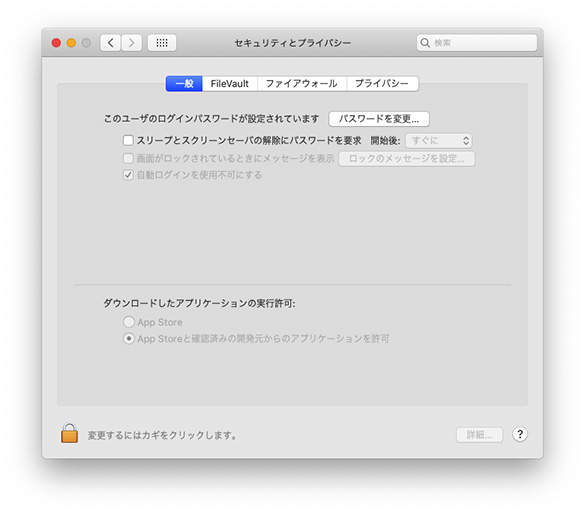
アップルスクリプトで『システム環境設定』の特定ページを表示しよう!
と、また使い道のわからないシリーズができてしまいそうですが、
Applescript からシステム環境設定の操作ができないかと思い、調べてみました。
※セキュリティーの問題がありますのでこれ以上のことはできないと思いますが、そのページまで自動で促すことができるようになります。
(1)まずは、システム環境設定の最初の画面を起動し表示します。
|
|
tell application "System Preferences" set show all to true activate --これを使わないと前に出てこない場合がある end tell |
(2)表示したい項目(pane)を表示する(例は『セキュリティー』)
|
|
tell application "System Preferences" set current pane to pane id "com.apple.preference.security" end tell |
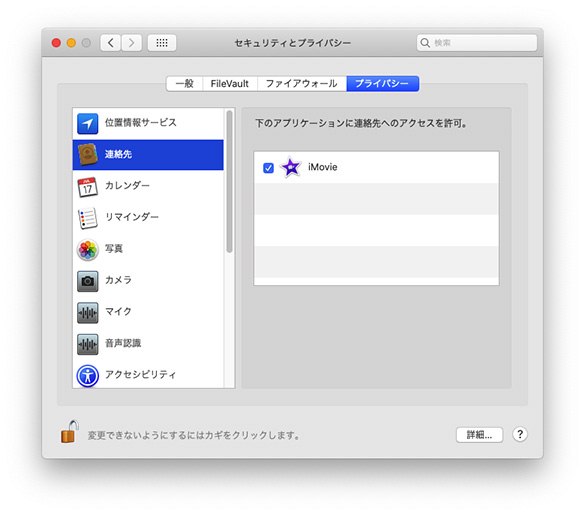
(3)Pane内の特定タグ等(アンカー)を直接表示する(例では『連絡先』)
|
|
tell application "System Preferences" reveal anchor "Privacy_Contacts" of pane id "com.apple.preference.security" end tell |
(4)PaneとかアンカーのIDがわからないから調べる
|
|
tell application "System Preferences" get anchor of the current pane end tell |
結果例:
{anchor "Privacy_Reminders" of pane id "com.apple.preference.security" of application "System Preferences",
anchor "Privacy_SystemServices" of pane id "com.apple.preference.security" of application "System Preferences",
anchor "Privacy_Calendars" of pane id "com.apple.preference.security" of application "System Preferences",
anchor "Firewall" of pane id "com.apple.preference.security" of application "System Preferences",
anchor "Privacy_Assistive" of pane id "com.apple.preference.security" of application "System Preferences",
anchor "Privacy_LocationServices" of pane id "com.apple.preference.security" of application "System Preferences",
anchor "Privacy_Contacts" of pane id "com.apple.preference.security" of application "System Preferences",
anchor "General" of pane id "com.apple.preference.security" of application "System Preferences",
anchor "Advanced" of pane id "com.apple.preference.security" of application "System Preferences",
anchor "Privacy_Accessibility" of pane id "com.apple.preference.security" of application "System Preferences",
anchor "Privacy_Camera" of pane id "com.apple.preference.security" of application "System Preferences",
anchor "FDE" of pane id "com.apple.preference.security" of application "System Preferences",
anchor "Privacy" of pane id "com.apple.preference.security" of application "System Preferences",
anchor "Privacy_AllFiles" of pane id "com.apple.preference.security" of application "System Preferences",
anchor "Privacy_Microphone" of pane id "com.apple.preference.security" of application "System Preferences"}
または、
|
|
tell application "System Preferences" get name of anchor of the current pane end tell |
結果例:
{"Privacy_Reminders", "Privacy_SystemServices", "Privacy_Calendars", "Firewall", "Privacy_Assistive", "Privacy_LocationServices", "Privacy_Contacts", "General", "Advanced", "Privacy_Accessibility", "Privacy_Camera", "FDE", "Privacy", "Privacy_AllFiles", "Privacy_Microphone"}
という操作ができます。
他の項目でも操作できるが、特定のアンカーではびっくりさせられることもある。
表示できるアンカーや見たことないアンカーまであるのが気になる。
MacでSiriの声が聞きたい。(でも失敗) [AppleScript辞書はつくれるか?]
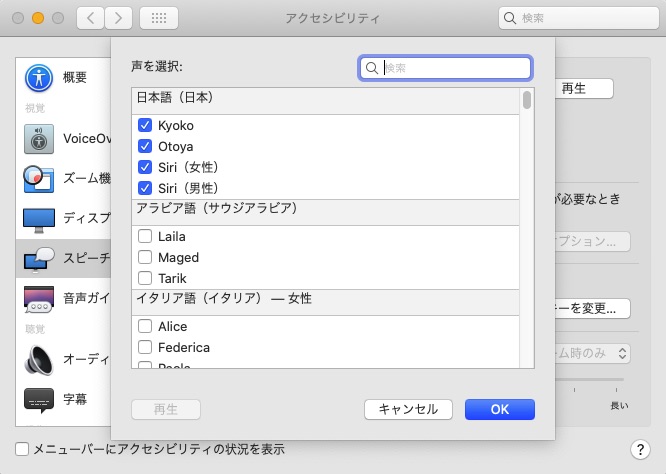
|
say "こんにちわ" using "Hattori" |
|
use scripting additions use framework "Foundation"
set speechSynthesizer to current application's class "AVSpeechSynthesizer"'s alloc()'s init() set speakingText to "こんにちわ" set utterance to current application's class "AVSpeechUtterance"'s speechUtteranceWithString:speakingText tell utterance setVoice_(current application's class "AVSpeechSynthesisVoice"'s voiceWithLanguage:"ja-JP") setRate_(0.35) --早さ setVolume_(0.8) --音量 setPitchMultiplier_(2.0) --声のピッチ (高さ)[0.5 - 2] Default = 1
end tell speechSynthesizer's speakUtterance:utterance |
ドラック&ドロップしたフォルダ内の隠しファイルを消去する [AppleScript辞書はつくれるか?]
|
(* A)エディターから実行 *) tell application "Finder" set add to POSIX path of (selection as text) end tell
set ans to my kakurefairusyoukyo(add) ans
(* B)ドロップレット *) on open DropItem set LF to ASCII character 10 set logText to "" repeat with obj in DropItem set add to POSIX path of (obj as string) set ans to my kakurefairusyoukyo(add) set logText to logText & ans & LF end repeat if logText contains ":" then set logText to "( " & ((current date) as string) & " )" & LF & "--------------------" & LF & logText & "--------------------" & LF else set logText to "( " & ((current date) as string) & " )" & LF & " (消去するファイルはありませんでした)" & LF & "--------------------" & LF end if
(* 消去したファイルのログをホームフォルダの書類フォルダ(/user/[LoginUserName]/documents/)にログテキストkillLog.txtを残します *) set logMode to 1 --(0 or 1 or 2) if logMode = 0 then --kill Logを残さない else if logMode = 1 then --kill Logは最新だけ残す(毎回上書き) do shell script ("echo \"" & logText & "\" > $HOME/Documents/killLog.txt ;") else if logMode = 2 then --kill Logは以前の履歴も全て残す(常に後ろに加えていく) do shell script ("echo \"" & logText & "\" >> $HOME/Documents/killLog.txt ;") end if end open
(* 消去の実行部分 *) on kakurefairusyoukyo(add) set theLog to "" --システムおよびデスクトップは除外 set hanteiList to do shell script "ls '" & add & "' ;" if (hanteiList contains "System") and (hanteiList contains "Library") then return false if (add ends with "Desktop") or (add ends with "Desktop:") or (add ends with "Desktop/") then return false
try set aList to do shell script ("du -a '" & add & "' | cut -f2- | sort; ") log aList on error return false end try repeat with oneLine in (every paragraph of aList) set oneLine to oneLine as string if not (oneLine contains ".app/") then --アプリケーションフォルダ内は除外 if (oneLine contains "/._") or (oneLine contains ".DS_Store") or (oneLine contains "Thumbs.db") then try do shell script ("rmdir '" & oneLine & "' ;") set theLog to theLog & "Kill : " & oneLine & (ASCII character 10) on error try do shell script ("rm '" & oneLine & "' ;") set theLog to theLog & "Kill : " & oneLine & (ASCII character 10) on error set theLog to theLog & "Err : " & oneLine & (ASCII character 10) end try end try end if end if end repeat return theLog end kakurefairusyoukyo |
書籍販売

『ApplescriptBasicMagazine Vol1』(販売中)
時計を作ることから理解するオブジェクトプログラミング編です。

 『ApplescriptBasicMagazine Vol2』
フォトショップの操作を自動化してみよう!編です。
販売サイト


